Brother International BES-100E BE-100 Workbook - English - Page 113
Needle cuts holes in garments, Stitches do not form - best -
 |
View all Brother International BES-100E manuals
Add to My Manuals
Save this manual to your list of manuals |
Page 113 highlights
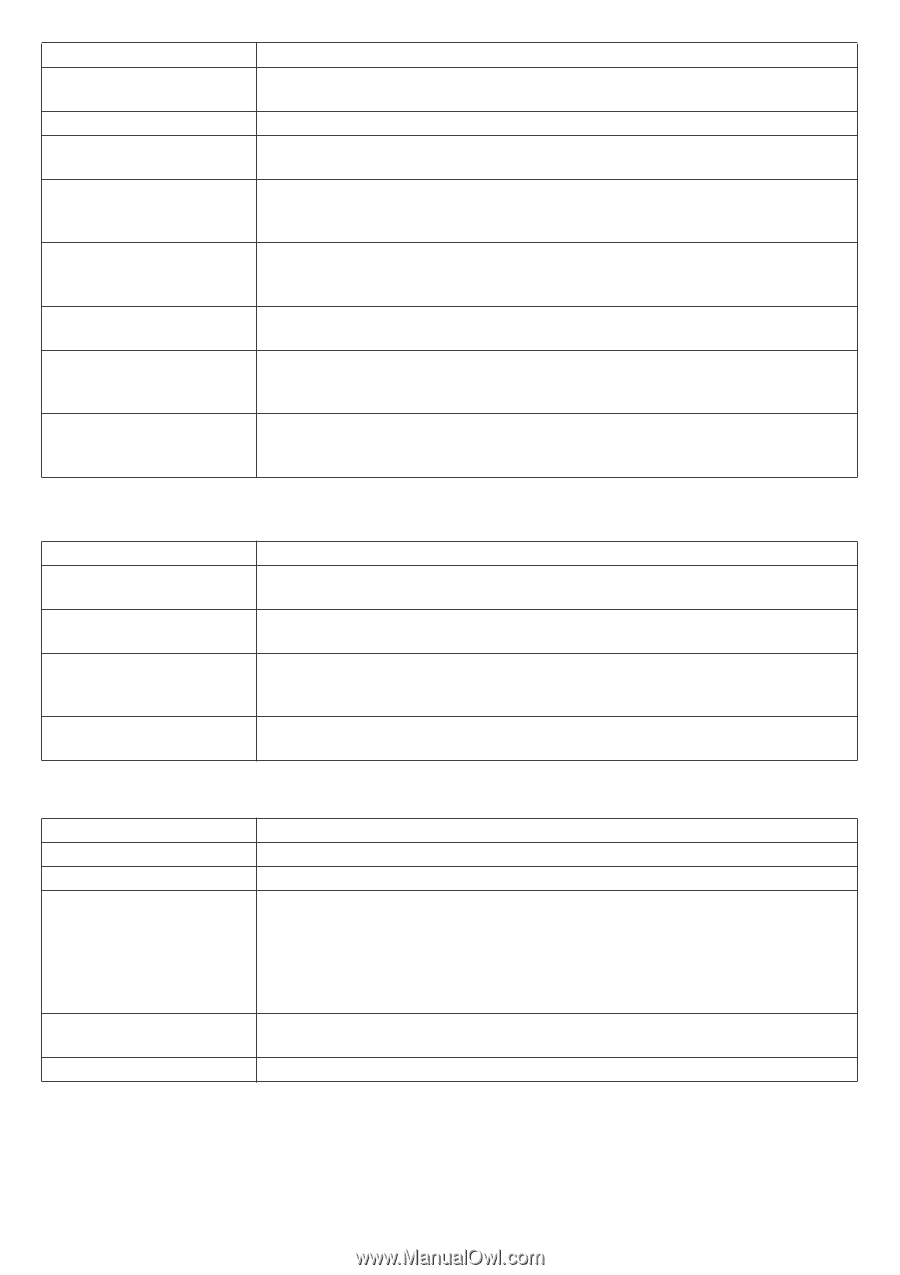
Cause Stitch length too short Stitching over stitching Improper threading Burrs in the needle's eye, thread guides, throat plate or hook Lack of lubrication in hook assembly Needle size too small for thread Too many stitches in a small area or densities are too heavy Improper tensions Action Slowing the machine down helps sometimes. Best bet is to have the design repunched with longer stitches. Reduce the density of the underlay. Try to avoid more than two layers of thread. Re-thread the machine, making sure thread goes through all the guides in the proper order. Replace the needle. Use fine-grade emery cloth or emery cord to buff the thread guides and throat plate. Buffing the hook may alter the timing; a damaged hook should be replaced. The hook needs frequent lubrication because it dries out faster. Using a hypodermic oiler, put one drop of oil in the hook assembly track every four to eight hours of machine use. Change to a larger needle or a thinner thread. Increase the design size by 5% to 10% to allow more room for stitches to lay down, decrease density, or remove extra stitches using your machine functions, have the design re-punched or use a thinner thread to prevent thread build-up. Loose tensions cause thread to pile up and loop. Tight tensions cause pulling, puckering and thread stress. Using machine manufacturer's guidelines, adjust tensions to achieve a smooth, flat look. s Needle cuts holes in garments Cause Dull needle Wrong needle point type Needle too large Delicate fabric Action Replace needle. Dull needles have a difficult time getting through the garment, causing some fabrics to tear. Sharp and round point needles can cut some delicate knits. Try a ball point needle. Large needles can stretch fibers excessively, causing them to burst or become distorted. Use the smallest needle size that is still acceptable for the thread size you are using. The simple penetration of the needle will cut some delicate fabrics. Soften the impact by using a topping. s Stitches do not form Cause Empty bobbin Incorrect timing Machine retaining finger in the wrong position Incorrect needle position Broken hook point Action Replace bobbin. The bobbin hook is not catching the loop. Reset timing. The retaining finger under the needle plate holds the bobbin case in place. If this is not in the correct position, a loop will not form. Adjust according to your machine manual. Note: This part usually does not "wiggle" out of position on its own. Wrong positioning may occur after work has been done in the hook assembly/bobbin area, for example after timing the hook. Re-insert the needle. If needle is not pushed all the way into the needle bar shaft or not rotated properly, the effect is the same as if the timing were off. Replace rotary hook assembly. 110
-
 1
1 -
2
-
3
-
4
-
5
-
6
-
7
-
8
-
9
-
10
-
11
-
12
-
13
-
14
-
15
-
16
-
17
-
18
-
19
-
20
-
21
-
22
-
23
-
24
-
25
-
26
-
27
-
28
-
29
-
30
-
31
-
32
-
33
-
34
-
35
-
36
-
37
-
38
-
39
-
40
-
41
-
42
-
43
-
44
-
45
-
46
-
47
-
48
-
49
-
50
-
51
-
52
-
53
-
54
-
55
-
56
-
57
-
58
-
59
-
60
-
61
-
62
-
63
-
64
-
65
-
66
-
67
-
68
-
69
-
70
-
71
-
72
-
73
-
74
-
75
-
76
-
77
-
78
-
79
-
80
-
81
-
82
-
83
-
84
-
85
-
86
-
87
-
88
-
89
-
90
-
91
-
92
-
93
-
94
-
95
-
96
-
97
-
98
-
99
-
100
-
101
-
102
-
103
-
104
-
105
-
106
-
107
-
 108
108 -
 109
109 -
 110
110 -
 111
111 -
 112
112 -
 113
113 -
 114
114 -
 115
115 -
 116
116 -
 117
117 -
 118
118 -
119
 |
 |