Brother International BES-100E BE-100 Workbook - English - Page 114
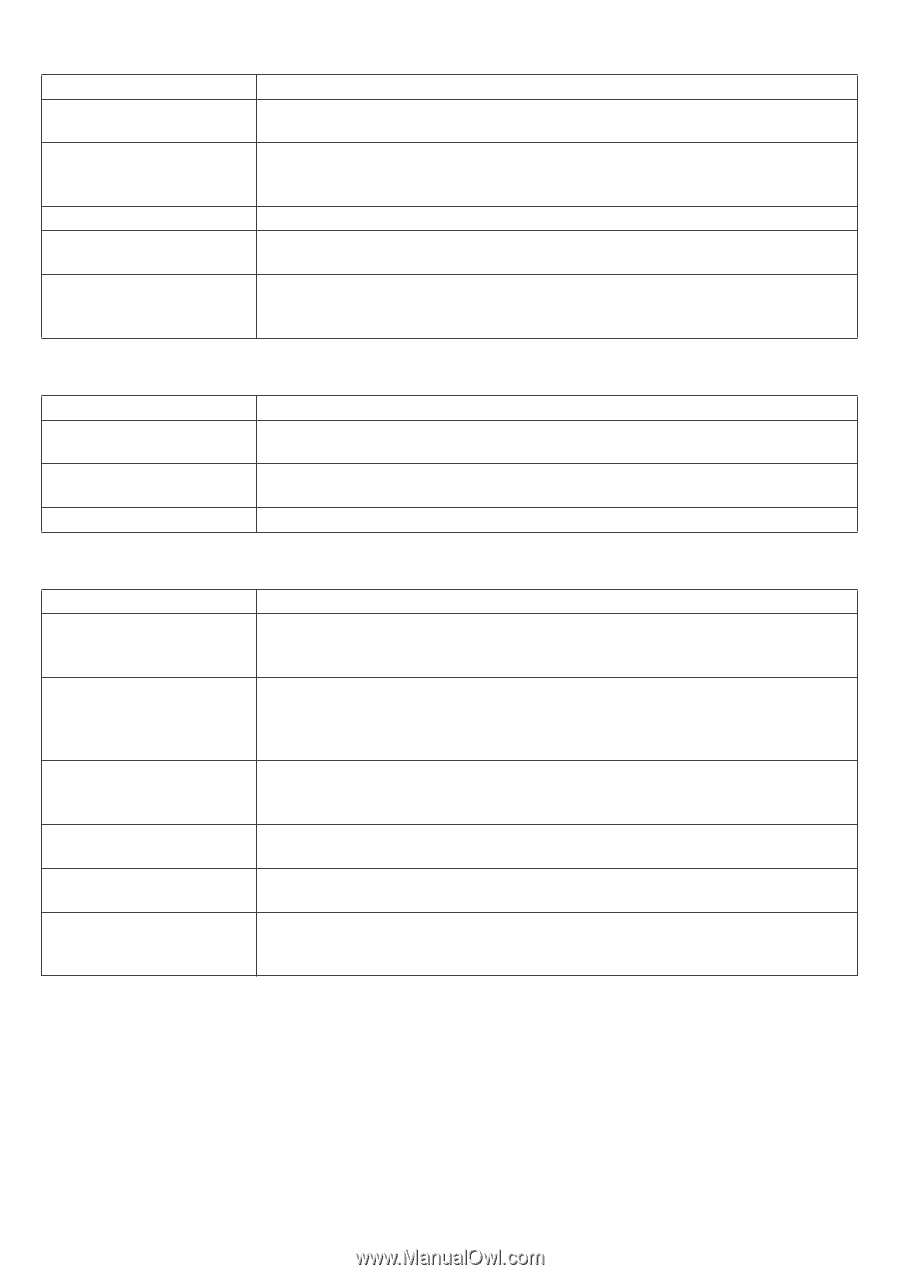
Needle breaks, Skipped stitches, Puckering
 |
View all Brother International BES-100E manuals
Add to My Manuals
Save this manual to your list of manuals |
Page 114 highlights
s Needle breaks Cause Improper timing Needle inserted incorrectly Bent needle Dull needle Holding loose end of thread during start-up Action If the needle and hook point are not timed properly, damage to both could result. Also stitching quality suffers. Replace damaged parts and re-time machine. Follow your machine manual's instructions for inserting the needle. Make sure that it is all the way up into the needle bar shaft, it is rotated properly, and the needle screw is tight. Always replace a needle if it hits, or even grazes, a hoop or other hard object. Dull needles with bow in an effort to push through the fabric and eventually break. Pulling the thread too tight and either wrapping it around the holding disk or holding it in your hand causes the needle to bend, and the needle and/or thread to break. s Skipped stitches Cause Wrong needle size Too tight or too loose twist on thread Incorrect timing Action Needles are too small or large in relation to the thread size and make it difficult for loops to form. Improper twist results in irregular loop formation. Try a new cone or different color to test this possible cause. The bobbin hook is not catching the loop. Reset timing. s Puckering Cause Tight tensions Improper hooping tension Unstable fabric Column stitches are too long Dull needles Design densities are too heavy Action Adjust tensions for specific garment and thread. For example, polyester thread will stretch during sewing, especially if tensions are too tight. After the stitching is complete, the thread returns to its original strength, puckering the garment. Hoop sturdy, woven fabrics tightly; loose hooping will cause the fabric to bunch up under the stitching. Hoop soft knits tautly, using a stable backing; overstretching the garment will cause it to look puckered when removed from the hoop. Use a backing, and be sure to hoop it with the garment. For added stability, use an adhesive spray designed for embroidery to affix backing to garment or use an iron-on tearaway backing. Re-punch as fill stitching or multiple rows of column stitching. Dull needles push fabric down instead of pushing between or piercing the weave. Replace needles. Too many stitches in an area pull the fabric causing it to look puckered. Decrease density, increase the design slightly (5% to 10%) or use a thinner thread. 111
-
 1
1 -
2
-
3
-
4
-
5
-
6
-
7
-
8
-
9
-
10
-
11
-
12
-
13
-
14
-
15
-
16
-
17
-
18
-
19
-
20
-
21
-
22
-
23
-
24
-
25
-
26
-
27
-
28
-
29
-
30
-
31
-
32
-
33
-
34
-
35
-
36
-
37
-
38
-
39
-
40
-
41
-
42
-
43
-
44
-
45
-
46
-
47
-
48
-
49
-
50
-
51
-
52
-
53
-
54
-
55
-
56
-
57
-
58
-
59
-
60
-
61
-
62
-
63
-
64
-
65
-
66
-
67
-
68
-
69
-
70
-
71
-
72
-
73
-
74
-
75
-
76
-
77
-
78
-
79
-
80
-
81
-
82
-
83
-
84
-
85
-
86
-
87
-
88
-
89
-
90
-
91
-
92
-
93
-
94
-
95
-
96
-
97
-
98
-
99
-
100
-
101
-
102
-
103
-
104
-
105
-
106
-
107
-
108
-
 109
109 -
 110
110 -
 111
111 -
 112
112 -
 113
113 -
 114
114 -
 115
115 -
 116
116 -
 117
117 -
 118
118 -
 119
119
 |
 |