Brother International BES-100E BE-100 Workbook - English - Page 23
Lettering Palette
 |
View all Brother International BES-100E manuals
Add to My Manuals
Save this manual to your list of manuals |
Page 23 highlights
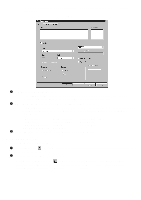
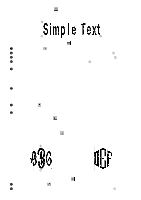
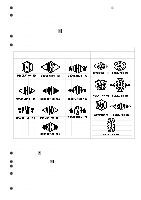
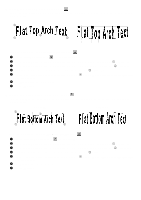
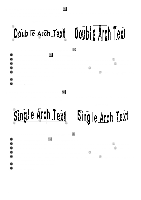
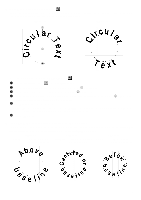
Chapter 9: Lettering Palette The Lettering palette contains various tools for creating a large selection of text arrangements that can be added to the design. Compared with the preset text shapes available with the Gallery button, the tools in the Lettering palette offer more layout flexibility, by allowing the length, height, angle and location to be specified. s Creating a text shape To create a text shape and add it to the design: 1 Click the desired tool in the Lettering palette. The pointer changes to large crosshairs ( ) when it is moved into the design area. NOTE: To view a description of a Lettering palette tool, move the pointer over the tool. The description appears in the left corner of the status bar. 2 Click the location in the design area where you wish to add the text shape. A small circle with an X in it appears. 3 Follow the instructions that appear in the left corner of the status bar to "punch" (i.e., click) within the design area and specify various text shape parameters, such as the baseline width, the height and the degree of arching. The instructions that appear differ depending on the Lettering palette tool being used. After the parameters are specified, the Text tab of the Text Properties dialog box appears. NOTE: For greater precision, drag the pointer (instead of clicking in the design area) until the desired measurement appears in the left corner of the status bar. To finish creating the text shape at any time without specifying the remaining parameters, rightclick in the design area. If parameters are not specified, the default settings are used. 4 In the Text box, type the desired text. NOTE: If the Simple Text tool ( ) or Circular Text tool ( ) was selected, multiple lines of text can be entered. For more information, see Entering multiple lines of text in chapter 1. 5 Select the desired settings, such as the font or needle (thread) color. NOTE: To maintain the proportions of the characters (i.e., to prevent distortion when the characters are adjusted to fit both the baseline width and the text height), select the Maintain aspect ratio check box. A check mark will appear. 6 Click the OK button. s Adjusting the parameters To adjust the various text shape parameters, such as the baseline width, the height and the degree of arching: 1 Using the Reshape tool ( ), select the punchpoint that adjusts the parameter that you wish to change. The punchpoint changes to light blue. 2 Drag the selected punchpoint until the text shape has the desired shape. NOTE: The punchpoints of text shapes that have not been converted to deformed text can only be used to move the shape or adjust its parameters, but not deform it (i.e., change its shape). For more information about deforming a text shape, see chapter 17. 20
-
 1
1 -
2
-
3
-
4
-
5
-
6
-
7
-
8
-
9
-
10
-
11
-
12
-
13
-
14
-
15
-
16
-
17
-
 18
18 -
 19
19 -
 20
20 -
 21
21 -
 22
22 -
 23
23 -
 24
24 -
 25
25 -
 26
26 -
 27
27 -
 28
28 -
29
-
30
-
31
-
32
-
33
-
34
-
35
-
36
-
37
-
38
-
39
-
40
-
41
-
42
-
43
-
44
-
45
-
46
-
47
-
48
-
49
-
50
-
51
-
52
-
53
-
54
-
55
-
56
-
57
-
58
-
59
-
60
-
61
-
62
-
63
-
64
-
65
-
66
-
67
-
68
-
69
-
70
-
71
-
72
-
73
-
74
-
75
-
76
-
77
-
78
-
79
-
80
-
81
-
82
-
83
-
84
-
85
-
86
-
87
-
88
-
89
-
90
-
91
-
92
-
93
-
94
-
95
-
96
-
97
-
98
-
99
-
100
-
101
-
102
-
103
-
104
-
105
-
106
-
107
-
108
-
109
-
110
-
111
-
112
-
113
-
114
-
115
-
116
-
117
-
118
-
119
 |
 |