Canon PowerShot S10 User Guide for ImageBrowser version 3.6 - Page 27
Rotating Images
 |
View all Canon PowerShot S10 manuals
Add to My Manuals
Save this manual to your list of manuals |
Page 27 highlights
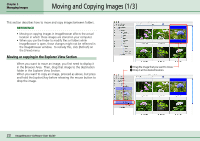
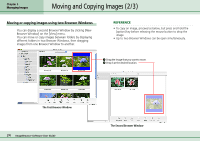
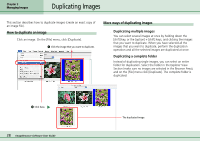
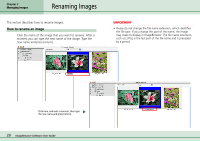
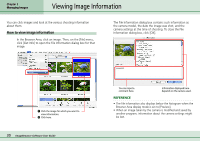
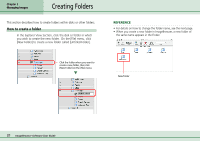
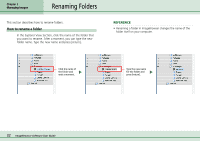
Chapter 3 Managing Images Rotating Images This section describes how to rotate images to the desired orientation. This is useful for images taken by holding the camera vertically. IMPORTANT • When you rotate an image in ImageBrowser, the actual image file on the disk is over-written with the rotated image. How to rotate an image Click the image that you want to rotate. On the [Edit] menu, point to [Rotate] and click the desired rotation angle. A Click the image that you want to rotate. REFERENCE • [90 degrees right] is a clockwise rotation and [90 degrees left] is a counterclockwise rotation. • There are two settings for rotating images. The default setting rotates the original image. • You can also set it to display the image in both the original and rotated positions. Click the [ImageBrowser] menu (in Mac OS 9, click the [Edit] menu), select [Preferences] and [Browser Window], and click to place a check mark beside [Retain original when rotating JPEG images]. • When you rotate an image in a format other than JPEG, only the rotated image displays. The original image file is overwritten. More ways of rotating images ■ Rotating multiple images You can select several images at once by holding down the [shift] key, or the [option] + [shift] keys, and clicking the images you want to rotate. When you have selected all the images that you want to rotate, perform the rotation operation and all the selected images are rotated at the same time. B Click a rotation angle. 27 ImageBrowser Software User Guide
-
 1
1 -
2
-
3
-
4
-
5
-
6
-
7
-
8
-
9
-
10
-
11
-
12
-
13
-
14
-
15
-
16
-
17
-
18
-
19
-
20
-
21
-
 22
22 -
 23
23 -
 24
24 -
 25
25 -
 26
26 -
 27
27 -
 28
28 -
 29
29 -
 30
30 -
 31
31 -
 32
32 -
33
-
34
-
35
-
36
-
37
-
38
-
39
-
40
-
41
-
42
-
43
-
44
-
45
-
46
-
47
-
48
-
49
-
50
-
51
-
52
-
53
-
54
-
55
-
56
-
57
-
58
-
59
-
60
-
61
-
62
-
63
-
64
-
65
-
66
-
67
-
68
-
69
-
70
-
71
-
72
-
73
-
74
-
75
-
76
-
77
-
78
-
79
-
80
-
81
-
82
-
83
-
84
-
85
-
86
-
87
-
88
-
89
-
90
-
91
-
92
-
93
-
94
-
95
-
96
-
97
-
98
-
99
-
100
-
101
-
102
-
103
-
104
-
105
-
106
-
107
-
108
-
109
-
110
 |
 |