Canon PowerShot S10 User Guide for ImageBrowser version 3.6 - Page 47
Adding Computer Images to the Camera 1/2
 |
View all Canon PowerShot S10 manuals
Add to My Manuals
Save this manual to your list of manuals |
Page 47 highlights
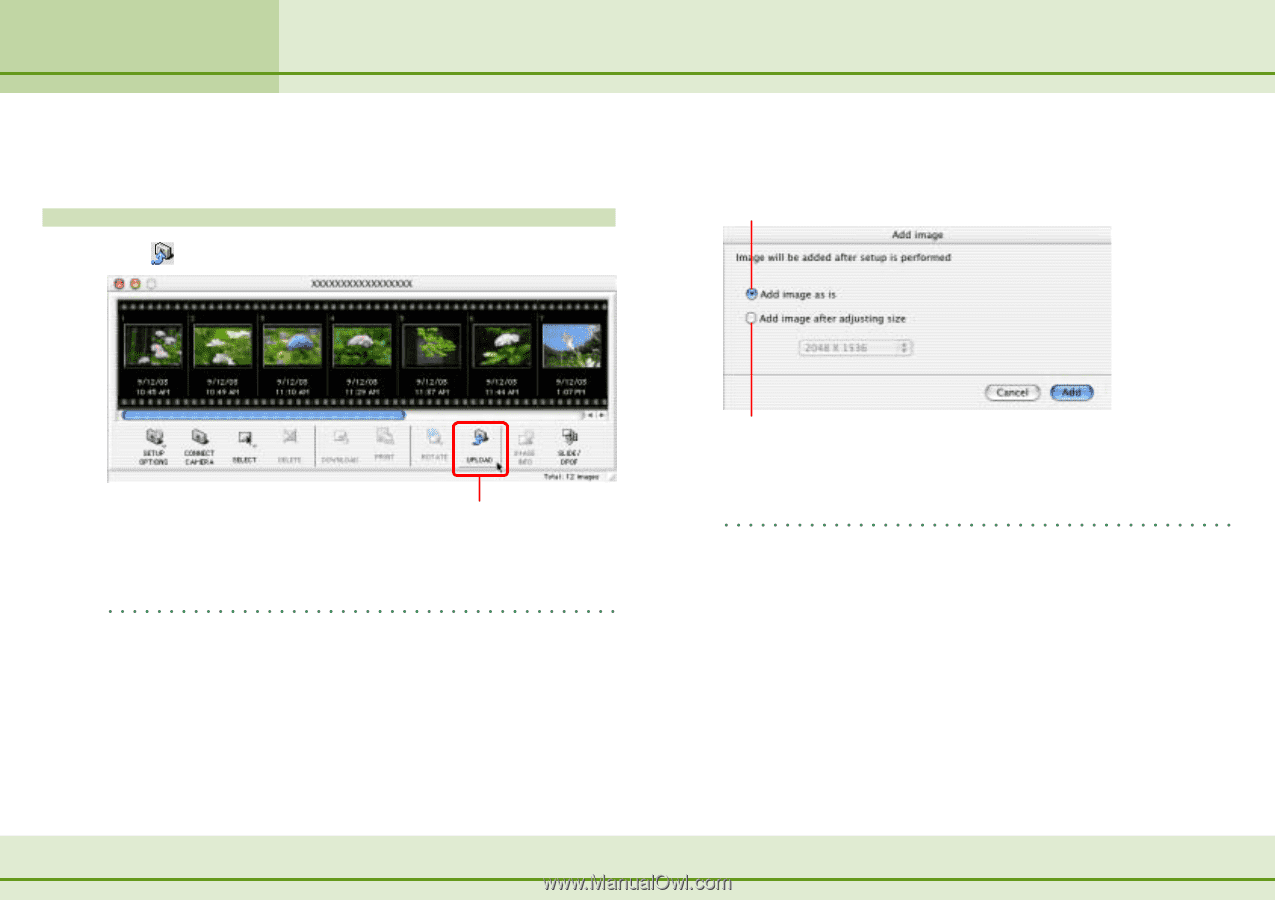
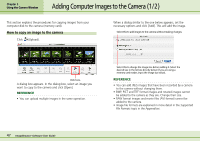
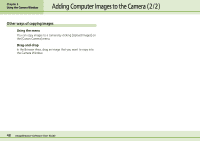
Chapter 5 Using the Camera Window Adding Computer Images to the Camera (1/2) This section explains the procedures for copying images from your computer disk to the camera (memory card). How to copy an image to the camera Click (Upload). When a dialog similar to the one below appears, set the necessary options and click [Add]. This will add the image. Select this to add images to the camera without making changes. Click here. A dialog box appears. In the dialog box, select an image you want to copy to the camera and click [Open]. REFERENCE • You can upload multiple images in the same operation. Select this to change the image size before adding it. Select the desired size in the list box directly below (if you are using a memory card reader, input the image size value). REFERENCE • You can add JPEG images that have been recorded by a camera to the camera without changing them. • BMP, PICT and TIFF format images and rotated images cannot be added to the camera as they are. Change their size. • RAW format images and movie files (AVI format) cannot be added to the camera. • Image file formats are explained in more detail in the Supported File Formats topic in the Appendices. 47 ImageBrowser Software User Guide
-
 1
1 -
2
-
3
-
4
-
5
-
6
-
7
-
8
-
9
-
10
-
11
-
12
-
13
-
14
-
15
-
16
-
17
-
18
-
19
-
20
-
21
-
22
-
23
-
24
-
25
-
26
-
27
-
28
-
29
-
30
-
31
-
32
-
33
-
34
-
35
-
36
-
37
-
38
-
39
-
40
-
41
-
 42
42 -
 43
43 -
 44
44 -
 45
45 -
 46
46 -
 47
47 -
 48
48 -
 49
49 -
 50
50 -
 51
51 -
 52
52 -
53
-
54
-
55
-
56
-
57
-
58
-
59
-
60
-
61
-
62
-
63
-
64
-
65
-
66
-
67
-
68
-
69
-
70
-
71
-
72
-
73
-
74
-
75
-
76
-
77
-
78
-
79
-
80
-
81
-
82
-
83
-
84
-
85
-
86
-
87
-
88
-
89
-
90
-
91
-
92
-
93
-
94
-
95
-
96
-
97
-
98
-
99
-
100
-
101
-
102
-
103
-
104
-
105
-
106
-
107
-
108
-
109
-
110
 |
 |