Canon PowerShot S10 User Guide for ImageBrowser version 3.6 - Page 89
Operating the Camera Shutter from a Computer 1/ 4
 |
View all Canon PowerShot S10 manuals
Add to My Manuals
Save this manual to your list of manuals |
Page 89 highlights
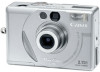
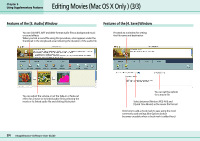
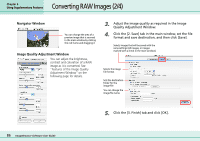
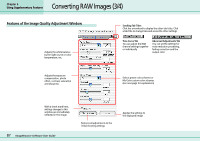
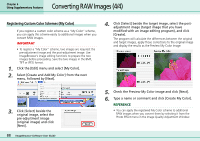
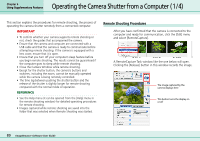
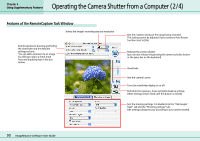
Chapter 6 Using Supplementary Features Operating the Camera Shutter from a Computer (1/4) This section explains the procedures for remote shooting, the process of operating the camera shutter remotely from a connected computer. IMPORTANT • To confirm whether your camera supports remote shooting or not, check the guides that accompanied the camera. • Ensure that the camera and computer are connected with a USB cable and that the camera is ready to communicate before attempting remote shooting. If the camera is equipped with a lens cover, ensure that it is open. • Ensure that you turn off your computer's sleep feature before you begin remote shooting. The results cannot be guaranteed if the computer goes to sleep while remote shooting. • Close the Camera Window while remote shooting. • Except for the shutter button, the camera's buttons and switches, including the zoom, cannot be manually operated while the camera is being remotely controlled. • The time lag between pushing the shutter button and the release of the shutter is slightly longer for remote shooting compared with the normal mode of operation. REFERENCE • See the Help menu (it can be opened from the [Help] menu in the remote shooting window) for detailed operating procedures for remote shooting. • Images captured while remote shooting are saved into the folder that was selected when Remote Shooting was started. Remote Shooting Procedures After you have confirmed that the camera is connected to the computer and ready for communication, click the [Edit] menu and select [RemoteCapture]. A RemoteCapture Task window like the one below will open. Clicking the [Release] button in this window records the image. The image captured by the camera displays here This button turns the display on or off 89 ImageBrowser Software User Guide
-
 1
1 -
2
-
3
-
4
-
5
-
6
-
7
-
8
-
9
-
10
-
11
-
12
-
13
-
14
-
15
-
16
-
17
-
18
-
19
-
20
-
21
-
22
-
23
-
24
-
25
-
26
-
27
-
28
-
29
-
30
-
31
-
32
-
33
-
34
-
35
-
36
-
37
-
38
-
39
-
40
-
41
-
42
-
43
-
44
-
45
-
46
-
47
-
48
-
49
-
50
-
51
-
52
-
53
-
54
-
55
-
56
-
57
-
58
-
59
-
60
-
61
-
62
-
63
-
64
-
65
-
66
-
67
-
68
-
69
-
70
-
71
-
72
-
73
-
74
-
75
-
76
-
77
-
78
-
79
-
80
-
81
-
82
-
83
-
 84
84 -
 85
85 -
 86
86 -
 87
87 -
 88
88 -
 89
89 -
 90
90 -
 91
91 -
 92
92 -
 93
93 -
 94
94 -
95
-
96
-
97
-
98
-
99
-
100
-
101
-
102
-
103
-
104
-
105
-
106
-
107
-
108
-
109
-
110
 |
 |