Epson 7850p User Manual - Page 120
Presenting Image Files on Your Digital Camera
 |
UPC - 010343845992
View all Epson 7850p manuals
Add to My Manuals
Save this manual to your list of manuals |
Page 120 highlights
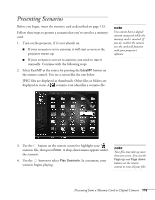
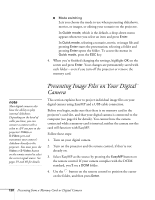
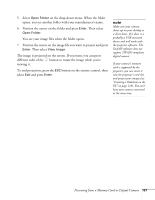
■ Mode switching Lets you choose the mode to use when presenting slideshows, movies, or images, or editing your scenario on the projector. In Guide mode, which is the default, a drop-down menu appears whenever you select an item and press Enter. In Quick mode, selecting a scenario, movie, or image file and pressing Enter starts the presentation; selecting a folder and pressing Enter opens the folder. To access the menus in Quick mode, press the ESC key. 4. When you're finished changing the settings, highlight OK on the screen and press Enter. Your changes are permanently saved with each folder-even if you turn off the projector or remove the memory card. note Most digital cameras also have the ability to play internal slideshows. Depending on the kind of cable you have, you can connect a camera with a video or A/V out port to the projector's Video or S-Video port and transmmit your camera's slideshow directly to the projector. You must press the Video or S-Video button on the remote control to select the correct signal source. See pages 59 and 60 for details. Presenting Image Files on Your Digital Camera This section explains how to project individual image files on your digital camera using EasyMP and a USB cable connection. Before you begin, make sure that there is no memory card in the projector's card slot, and that your digital camera is connected to the computer (see page 64 for details). You cannot have the camera connected while a memory card is inserted; neither the camera nor the card will function with EasyMP. Follow these steps: 1. Turn on your digital camera. 2. Turn on the projector and the remote control, if they're not already on. 3. Select EasyMP as the source by pressing the EasyMP button on the remote control. If your camera complies with the DCIM standard, you'll see a DCIM folder. 4. Use the button on the remote control to position the cursor on the folder, and then press Enter. 120 Presenting from a Memory Card or Digital Camera
-
 1
1 -
2
-
3
-
4
-
5
-
6
-
7
-
8
-
9
-
10
-
11
-
12
-
13
-
14
-
15
-
16
-
17
-
18
-
19
-
20
-
21
-
22
-
23
-
24
-
25
-
26
-
27
-
28
-
29
-
30
-
31
-
32
-
33
-
34
-
35
-
36
-
37
-
38
-
39
-
40
-
41
-
42
-
43
-
44
-
45
-
46
-
47
-
48
-
49
-
50
-
51
-
52
-
53
-
54
-
55
-
56
-
57
-
58
-
59
-
60
-
61
-
62
-
63
-
64
-
65
-
66
-
67
-
68
-
69
-
70
-
71
-
72
-
73
-
74
-
75
-
76
-
77
-
78
-
79
-
80
-
81
-
82
-
83
-
84
-
85
-
86
-
87
-
88
-
89
-
90
-
91
-
92
-
93
-
94
-
95
-
96
-
97
-
98
-
99
-
100
-
101
-
102
-
103
-
104
-
105
-
106
-
107
-
108
-
109
-
110
-
111
-
112
-
113
-
114
-
 115
115 -
 116
116 -
 117
117 -
 118
118 -
 119
119 -
 120
120 -
 121
121 -
 122
122 -
 123
123 -
 124
124 -
 125
125 -
126
-
127
-
128
-
129
-
130
-
131
-
132
-
133
-
134
-
135
-
136
-
137
-
138
-
139
-
140
-
141
-
142
-
143
-
144
-
145
-
146
-
147
-
148
-
149
-
150
-
151
-
152
-
153
-
154
-
155
-
156
-
157
-
158
-
159
-
160
-
161
-
162
-
163
-
164
-
165
-
166
-
167
-
168
-
169
-
170
-
171
-
172
-
173
-
174
-
175
-
176
-
177
-
178
-
179
-
180
-
181
-
182
-
183
-
184
-
185
-
186
-
187
-
188
-
189
-
190
-
191
-
192
-
193
-
194
-
195
-
196
-
197
-
198
-
199
-
200
-
201
-
202
-
203
-
204
-
205
-
206
-
207
-
208
-
209
-
210
-
211
-
212
-
213
-
214
-
215
-
216
-
217
-
218
-
219
-
220
-
221
-
222
-
223
-
224
 |
 |