Epson 7850p User Manual - Page 127
Adjusting Computer Images, You see a screen similar to the one below. The settings will
 |
UPC - 010343845992
View all Epson 7850p manuals
Add to My Manuals
Save this manual to your list of manuals |
Page 127 highlights
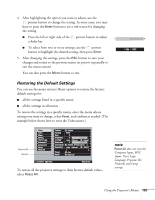
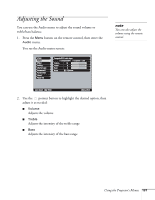
■ Color Adjusts the color intensity, from black-and-white to full color (not available for RGB video images). ■ Tint Adjusts the tint of the image (not available for RGB video images). ■ Sharpness Adjusts the sharpness of the image. Adjusting Computer Images You can also adjust brightness, contrast, and sharpness when you're projecting a computer image. In addition, if you're projecting an analog RGB image transmitted through the Computer or BNC port(s), you can make several other settings. 1. Press the Menu button on the remote control, then select the Video menu. You see a screen similar to the one below. (The settings will be different if you're projecting a digital RGB image transmitted through the DVI port.) note You can also use the remote control's Auto button to automatically reset the projector's tracking, sync, resolution, and position settings. See page 28 for details. Video Audio Effect Setting User's Logo Advanced1 Advanced2 About Reset All Position Tracking : Sync. : Brightness : Contrast : Sharpness : Color Mode Resolution : : Preset Reset Adjust 0000 0 0 - + Auto Manual 0 - Adjust + Select [Presentation ] Auto Manual Select [ ] Set Execute [ ]: Select [ ]: Enter [Menu]: Exit ■ Position If the image is slightly cut off on one or more sides, it may not be centered exactly. Use this setting to center it. ■ Tracking Adjust this value to eliminate vertical stripes in the image. tip Before adjusting tracking or sync, fill the screen with an image containing fine detail. For example, in Windows you can select a pattern to appear as your desktop background. If this option isn't available, try projecting black text on a white background. Using the Projector's Menus 127
-
 1
1 -
2
-
3
-
4
-
5
-
6
-
7
-
8
-
9
-
10
-
11
-
12
-
13
-
14
-
15
-
16
-
17
-
18
-
19
-
20
-
21
-
22
-
23
-
24
-
25
-
26
-
27
-
28
-
29
-
30
-
31
-
32
-
33
-
34
-
35
-
36
-
37
-
38
-
39
-
40
-
41
-
42
-
43
-
44
-
45
-
46
-
47
-
48
-
49
-
50
-
51
-
52
-
53
-
54
-
55
-
56
-
57
-
58
-
59
-
60
-
61
-
62
-
63
-
64
-
65
-
66
-
67
-
68
-
69
-
70
-
71
-
72
-
73
-
74
-
75
-
76
-
77
-
78
-
79
-
80
-
81
-
82
-
83
-
84
-
85
-
86
-
87
-
88
-
89
-
90
-
91
-
92
-
93
-
94
-
95
-
96
-
97
-
98
-
99
-
100
-
101
-
102
-
103
-
104
-
105
-
106
-
107
-
108
-
109
-
110
-
111
-
112
-
113
-
114
-
115
-
116
-
117
-
118
-
119
-
120
-
121
-
 122
122 -
 123
123 -
 124
124 -
 125
125 -
 126
126 -
 127
127 -
 128
128 -
 129
129 -
 130
130 -
 131
131 -
 132
132 -
133
-
134
-
135
-
136
-
137
-
138
-
139
-
140
-
141
-
142
-
143
-
144
-
145
-
146
-
147
-
148
-
149
-
150
-
151
-
152
-
153
-
154
-
155
-
156
-
157
-
158
-
159
-
160
-
161
-
162
-
163
-
164
-
165
-
166
-
167
-
168
-
169
-
170
-
171
-
172
-
173
-
174
-
175
-
176
-
177
-
178
-
179
-
180
-
181
-
182
-
183
-
184
-
185
-
186
-
187
-
188
-
189
-
190
-
191
-
192
-
193
-
194
-
195
-
196
-
197
-
198
-
199
-
200
-
201
-
202
-
203
-
204
-
205
-
206
-
207
-
208
-
209
-
210
-
211
-
212
-
213
-
214
-
215
-
216
-
217
-
218
-
219
-
220
-
221
-
222
-
223
-
224
 |
 |