Epson 7850p User Manual - Page 43
Projecting Images Without a Screen, Making Initial Color Corrections
 |
UPC - 010343845992
View all Epson 7850p manuals
Add to My Manuals
Save this manual to your list of manuals |
Page 43 highlights
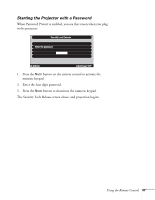
Projecting Images Without a Screen Even if you don't have a screen, you can project images onto surfaces like blackboards and colored walls without loss of image color. Your projector has a sensor that measures the conditions of the projection surface and automatically adjusts the colors and shading of your image. For example, if you're projecting onto a surface near a window, your image appears clear and well-defined rather than faint. Making Initial Color Corrections Press the Wall Shot button on either the remote control or the projector's control panel while projecting an image. Wall Shot's status appears in the upper right corner of your screen. Then you see a sequence of colors flash for approximately five seconds while the sensor measures the conditions of the projection surface and adjusts the image. Wall Shot ON note If the status message indicates that Wall Shot is off, press the Wall Shot button again to turn it on. When you turn the projector off, the projector stores the correction values obtained by the last Wall Shot measurements. This is useful if you're projecting against the same surface and under the same conditions. To retrieve these corrections, just press the Wall Shot button again while projecting an image. Using the Remote Control 43
-
 1
1 -
2
-
3
-
4
-
5
-
6
-
7
-
8
-
9
-
10
-
11
-
12
-
13
-
14
-
15
-
16
-
17
-
18
-
19
-
20
-
21
-
22
-
23
-
24
-
25
-
26
-
27
-
28
-
29
-
30
-
31
-
32
-
33
-
34
-
35
-
36
-
37
-
 38
38 -
 39
39 -
 40
40 -
 41
41 -
 42
42 -
 43
43 -
 44
44 -
 45
45 -
 46
46 -
 47
47 -
 48
48 -
49
-
50
-
51
-
52
-
53
-
54
-
55
-
56
-
57
-
58
-
59
-
60
-
61
-
62
-
63
-
64
-
65
-
66
-
67
-
68
-
69
-
70
-
71
-
72
-
73
-
74
-
75
-
76
-
77
-
78
-
79
-
80
-
81
-
82
-
83
-
84
-
85
-
86
-
87
-
88
-
89
-
90
-
91
-
92
-
93
-
94
-
95
-
96
-
97
-
98
-
99
-
100
-
101
-
102
-
103
-
104
-
105
-
106
-
107
-
108
-
109
-
110
-
111
-
112
-
113
-
114
-
115
-
116
-
117
-
118
-
119
-
120
-
121
-
122
-
123
-
124
-
125
-
126
-
127
-
128
-
129
-
130
-
131
-
132
-
133
-
134
-
135
-
136
-
137
-
138
-
139
-
140
-
141
-
142
-
143
-
144
-
145
-
146
-
147
-
148
-
149
-
150
-
151
-
152
-
153
-
154
-
155
-
156
-
157
-
158
-
159
-
160
-
161
-
162
-
163
-
164
-
165
-
166
-
167
-
168
-
169
-
170
-
171
-
172
-
173
-
174
-
175
-
176
-
177
-
178
-
179
-
180
-
181
-
182
-
183
-
184
-
185
-
186
-
187
-
188
-
189
-
190
-
191
-
192
-
193
-
194
-
195
-
196
-
197
-
198
-
199
-
200
-
201
-
202
-
203
-
204
-
205
-
206
-
207
-
208
-
209
-
210
-
211
-
212
-
213
-
214
-
215
-
216
-
217
-
218
-
219
-
220
-
221
-
222
-
223
-
224
 |
 |
