Epson 7850p User Manual - Page 72
the projector, you must type it the same way on the computer, connecting to the projector.
 |
UPC - 010343845992
View all Epson 7850p manuals
Add to My Manuals
Save this manual to your list of manuals |
Page 72 highlights
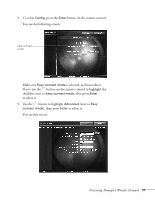
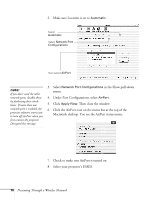
note If you want to enter a blank space, use the space character that comes before the capital letter A. If you want to enter numbers, press the Num button on the remote control. The button lights up to indicate that the numeric keypad mode is active. Press the Num button again to exit numeric keypad mode. note The projector keyword changes each time you turn the projector off and then on again, or remove and reinsert the 802.11b card. Check the keyword on the EasyMP Network screen whenever you start EasyMP, and enter that keyword on your computer. You can't connect using a previous keyword. 4. Make sure the projector has a unique name, so you can identify it when connecting to it from your computer. If you need to rename it, highlight the Clear button next to Projector name, then press Enter on the remote control to clear the text box. Then highlight the text box and press Enter. The outline of the text box turns green to indicate you are in input mode. Tilt the button up to select individual letters in alphabetical order, or down to select letters in reverse order; then tilt the button to the right to move to the next character position. When done typing the new name, press Enter. 5. To enable your computer to find the projector on the network, select the appropriate Ad hoc mode settings: ■ Select ESSID ad hoc if your network card supports an SSID or ESSID identifier (see page 75). Then highlight the ESSID text box, press Enter, and enter a name (for example, "CONF ROOM"). When you're done, press Enter. Note that the ESSID is case-sensitive (if you enter the name in uppercase on the projector, you must type it the same way on the computer connecting to the projector). ■ Select Channel ad hoc if your network card supports using channels instead of ESSID names to identify devices on the network. Then select a channel number in the Channel text box and press Enter. (Channel ad hoc mode is not supported for Macintosh.) 6. If you want to create a password for remote access to the projector, highlight the Password for WEB control checkbox, press Enter, and enter a password of up to 8 alphanumeric characters. When you're done, press Enter. 7. If you want to set up a security keyword so that only people who are in the same room as the projector can access it, turn Projector keyword on. Then when you want to connect to the projector, it displays a randomized four-digit number or "keyword" on the screen. When prompted by NS Connection, you can enter the keyword on your computer to connect (see page 92). 72 Presenting Through a Wireless Network
-
 1
1 -
2
-
3
-
4
-
5
-
6
-
7
-
8
-
9
-
10
-
11
-
12
-
13
-
14
-
15
-
16
-
17
-
18
-
19
-
20
-
21
-
22
-
23
-
24
-
25
-
26
-
27
-
28
-
29
-
30
-
31
-
32
-
33
-
34
-
35
-
36
-
37
-
38
-
39
-
40
-
41
-
42
-
43
-
44
-
45
-
46
-
47
-
48
-
49
-
50
-
51
-
52
-
53
-
54
-
55
-
56
-
57
-
58
-
59
-
60
-
61
-
62
-
63
-
64
-
65
-
66
-
 67
67 -
 68
68 -
 69
69 -
 70
70 -
 71
71 -
 72
72 -
 73
73 -
 74
74 -
 75
75 -
 76
76 -
 77
77 -
78
-
79
-
80
-
81
-
82
-
83
-
84
-
85
-
86
-
87
-
88
-
89
-
90
-
91
-
92
-
93
-
94
-
95
-
96
-
97
-
98
-
99
-
100
-
101
-
102
-
103
-
104
-
105
-
106
-
107
-
108
-
109
-
110
-
111
-
112
-
113
-
114
-
115
-
116
-
117
-
118
-
119
-
120
-
121
-
122
-
123
-
124
-
125
-
126
-
127
-
128
-
129
-
130
-
131
-
132
-
133
-
134
-
135
-
136
-
137
-
138
-
139
-
140
-
141
-
142
-
143
-
144
-
145
-
146
-
147
-
148
-
149
-
150
-
151
-
152
-
153
-
154
-
155
-
156
-
157
-
158
-
159
-
160
-
161
-
162
-
163
-
164
-
165
-
166
-
167
-
168
-
169
-
170
-
171
-
172
-
173
-
174
-
175
-
176
-
177
-
178
-
179
-
180
-
181
-
182
-
183
-
184
-
185
-
186
-
187
-
188
-
189
-
190
-
191
-
192
-
193
-
194
-
195
-
196
-
197
-
198
-
199
-
200
-
201
-
202
-
203
-
204
-
205
-
206
-
207
-
208
-
209
-
210
-
211
-
212
-
213
-
214
-
215
-
216
-
217
-
218
-
219
-
220
-
221
-
222
-
223
-
224
 |
 |
