Epson 7850p User Manual - Page 37
Adjusting the Image Shape, Repeat steps 5 and 6 as needed to adjust any remaining corners.
 |
UPC - 010343845992
View all Epson 7850p manuals
Add to My Manuals
Save this manual to your list of manuals |
Page 37 highlights
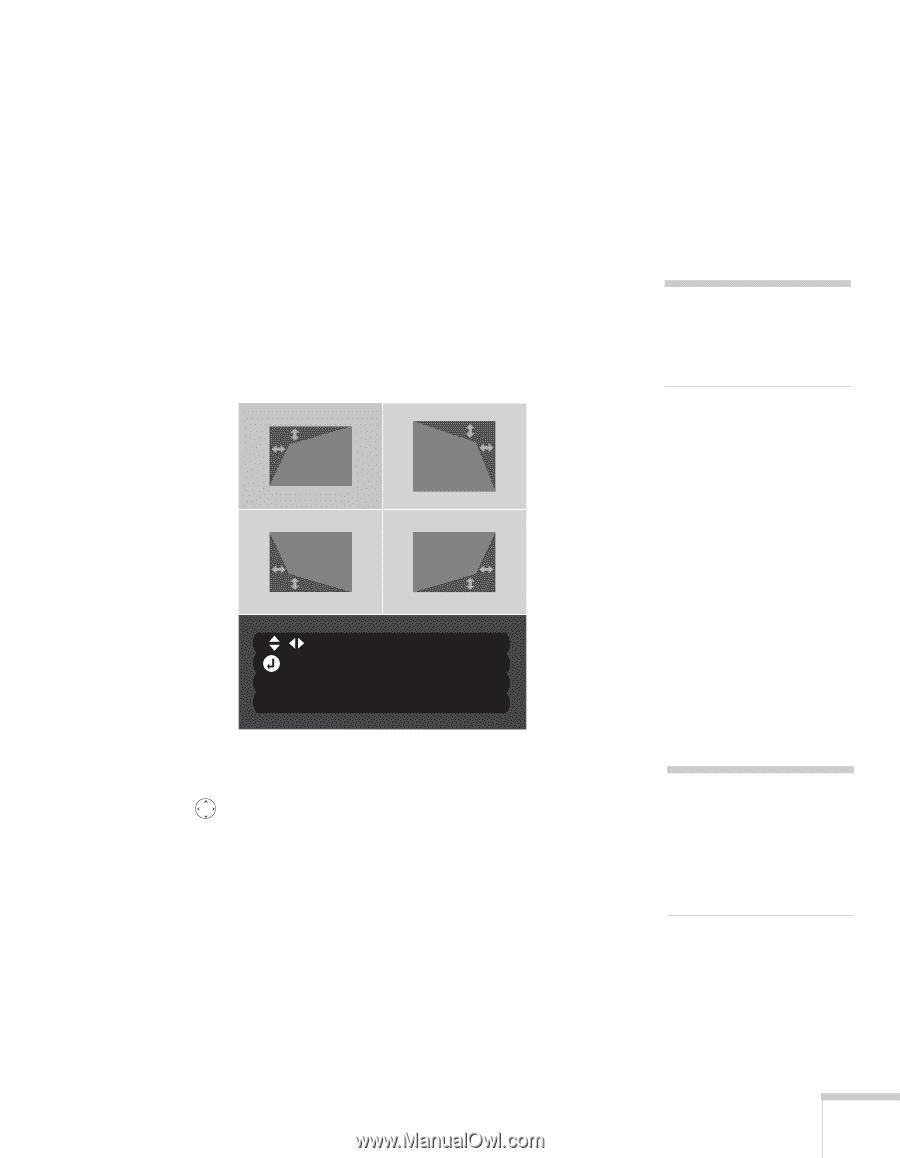
Adjusting the Image Shape Even if your projected image has no parallel sides, you can correct the problem with Quick Corner. Follow these steps: 1. Press the Menu button on the remote control (or on the projector's control panel). 2. Select the Setting menu and press Enter. 3. From the Setting menu, select Keystone and press Enter. 4. Select Quick Corner and press Enter. You see this screen: note For more information on using the menu system, see Chapter 6. [ / ]:Adjust [ ] :Move next [ESC] :Return (Press 1 second to reset) 5. Press the Enter button to select the corner you want to adjust. 6. Use the pointer button on the remote control (or the arrow buttons on the projector) to adjust the shape. 7. Repeat steps 5 and 6 as needed to adjust any remaining corners. 8. When done, press the ESC button on the remote control or projector's control panel to exit the menu system. If Quick Corner remains selected in the Keystone menu, the Quick Corner screen appears whenever you press the projector's Keystone buttons. You can then follow steps 5 through 8 above to correct the shape of your image, or press ESC to exit Quick Corner. note If you are not satisfied with the corrections made, press the ESC button for one second to reset the screen to its original shape. Using the Remote Control 37
-
 1
1 -
2
-
3
-
4
-
5
-
6
-
7
-
8
-
9
-
10
-
11
-
12
-
13
-
14
-
15
-
16
-
17
-
18
-
19
-
20
-
21
-
22
-
23
-
24
-
25
-
26
-
27
-
28
-
29
-
30
-
31
-
 32
32 -
 33
33 -
 34
34 -
 35
35 -
 36
36 -
 37
37 -
 38
38 -
 39
39 -
 40
40 -
 41
41 -
 42
42 -
43
-
44
-
45
-
46
-
47
-
48
-
49
-
50
-
51
-
52
-
53
-
54
-
55
-
56
-
57
-
58
-
59
-
60
-
61
-
62
-
63
-
64
-
65
-
66
-
67
-
68
-
69
-
70
-
71
-
72
-
73
-
74
-
75
-
76
-
77
-
78
-
79
-
80
-
81
-
82
-
83
-
84
-
85
-
86
-
87
-
88
-
89
-
90
-
91
-
92
-
93
-
94
-
95
-
96
-
97
-
98
-
99
-
100
-
101
-
102
-
103
-
104
-
105
-
106
-
107
-
108
-
109
-
110
-
111
-
112
-
113
-
114
-
115
-
116
-
117
-
118
-
119
-
120
-
121
-
122
-
123
-
124
-
125
-
126
-
127
-
128
-
129
-
130
-
131
-
132
-
133
-
134
-
135
-
136
-
137
-
138
-
139
-
140
-
141
-
142
-
143
-
144
-
145
-
146
-
147
-
148
-
149
-
150
-
151
-
152
-
153
-
154
-
155
-
156
-
157
-
158
-
159
-
160
-
161
-
162
-
163
-
164
-
165
-
166
-
167
-
168
-
169
-
170
-
171
-
172
-
173
-
174
-
175
-
176
-
177
-
178
-
179
-
180
-
181
-
182
-
183
-
184
-
185
-
186
-
187
-
188
-
189
-
190
-
191
-
192
-
193
-
194
-
195
-
196
-
197
-
198
-
199
-
200
-
201
-
202
-
203
-
204
-
205
-
206
-
207
-
208
-
209
-
210
-
211
-
212
-
213
-
214
-
215
-
216
-
217
-
218
-
219
-
220
-
221
-
222
-
223
-
224
 |
 |