Epson 7850p User Manual - Page 143
button on the remote control or the, button on the projector. This stores the value.
 |
UPC - 010343845992
View all Epson 7850p manuals
Add to My Manuals
Save this manual to your list of manuals |
Page 143 highlights
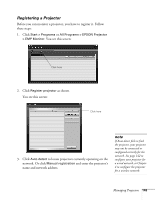
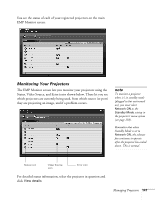
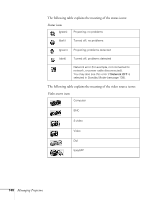
■ To enter numbers using the remote control, press the Num button until it lights, then use the number keypad shown below. Num button Zero ■ To change the network addresses from the projector's control panel, press the right and left arrow buttons to select the part of the address you want to enter, then use the up and down arrow buttons to increase or decrease the numeric value. Select the part of the address to change Increase or decrease the value When you finish changing an address in the network menu, press the Enter button (on the remote control) or the Auto/Enter button (on the projector). This stores the value. 5. When done making all necessary changes, press ESC to exit the menu system. Managing Projectors 143
-
 1
1 -
2
-
3
-
4
-
5
-
6
-
7
-
8
-
9
-
10
-
11
-
12
-
13
-
14
-
15
-
16
-
17
-
18
-
19
-
20
-
21
-
22
-
23
-
24
-
25
-
26
-
27
-
28
-
29
-
30
-
31
-
32
-
33
-
34
-
35
-
36
-
37
-
38
-
39
-
40
-
41
-
42
-
43
-
44
-
45
-
46
-
47
-
48
-
49
-
50
-
51
-
52
-
53
-
54
-
55
-
56
-
57
-
58
-
59
-
60
-
61
-
62
-
63
-
64
-
65
-
66
-
67
-
68
-
69
-
70
-
71
-
72
-
73
-
74
-
75
-
76
-
77
-
78
-
79
-
80
-
81
-
82
-
83
-
84
-
85
-
86
-
87
-
88
-
89
-
90
-
91
-
92
-
93
-
94
-
95
-
96
-
97
-
98
-
99
-
100
-
101
-
102
-
103
-
104
-
105
-
106
-
107
-
108
-
109
-
110
-
111
-
112
-
113
-
114
-
115
-
116
-
117
-
118
-
119
-
120
-
121
-
122
-
123
-
124
-
125
-
126
-
127
-
128
-
129
-
130
-
131
-
132
-
133
-
134
-
135
-
136
-
137
-
 138
138 -
 139
139 -
 140
140 -
 141
141 -
 142
142 -
 143
143 -
 144
144 -
 145
145 -
 146
146 -
 147
147 -
 148
148 -
149
-
150
-
151
-
152
-
153
-
154
-
155
-
156
-
157
-
158
-
159
-
160
-
161
-
162
-
163
-
164
-
165
-
166
-
167
-
168
-
169
-
170
-
171
-
172
-
173
-
174
-
175
-
176
-
177
-
178
-
179
-
180
-
181
-
182
-
183
-
184
-
185
-
186
-
187
-
188
-
189
-
190
-
191
-
192
-
193
-
194
-
195
-
196
-
197
-
198
-
199
-
200
-
201
-
202
-
203
-
204
-
205
-
206
-
207
-
208
-
209
-
210
-
211
-
212
-
213
-
214
-
215
-
216
-
217
-
218
-
219
-
220
-
221
-
222
-
223
-
224
 |
 |
Managing Projectors
143
■
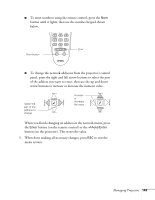
To enter numbers using the remote control, press the
Num
button until it lights, then use the number keypad shown
below.
■
To change the network addresses from the projector’s control
panel, press the right and left arrow buttons to select the part
of the address you want to enter, then use the up and down
arrow buttons to increase or decrease the numeric value.
When you finish changing an address in the network menu, press
the
Enter
button (on the remote control) or the
Auto/Enter
button (on the projector). This stores the value.
5.
When done making all necessary changes, press
ESC
to exit the
menu system.
Num button
Zero
Increase
or
decrease
the value
Select the
part of the
address to
change