HP 1050c Service Manual - Page 233
Removal
 |
View all HP 1050c manuals
Add to My Manuals
Save this manual to your list of manuals |
Page 233 highlights
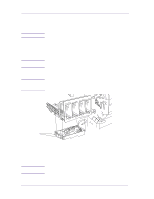
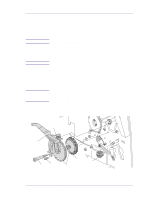
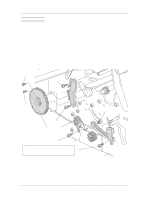
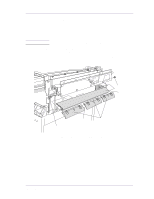
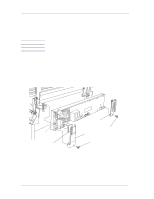
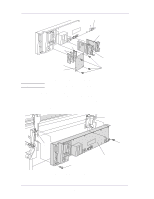
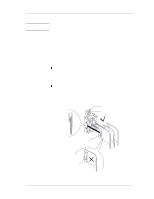
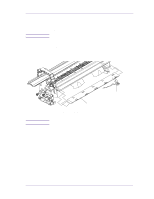
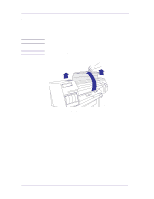
Removal and Installation Electronics Module Refer to Figure 23 and Figure 24. WARNING NOTE NOTE WARNING Removal Switch off the printer and remove the power cord. Working from the rear of the Printer. 1. Remove the following: 1. "Left and Right Hand Rear Covers" see page 8-24. 2. "Tail Deflectors and Rear Platen" see page 8-23. For steps 2 to 7, refer to Figure 23. 2. Locate the four T-10 screws (item 1) that secure the DIMM cover (item 2) to the Electronics Module. Remove the four screws and the DIMM cover. Note the position of the DIMMs. From left to right: n The DRAM DIMM(s) are held in the 1st and 2nd slot (item 3). n The Firmware/Postscript Code DIMM (Flash DIMM) are held in the 3rd slot (Item 4). 3. Remove the DIMMs by releasing the retaining clips at the top and bottom of each one, holding the outer non-metallic edge and gently pulling towards you. Store these parts in a safe place. 4. With a flat end screwdriver, unscrew the two screws that attach the EIO card (item 5) to the Electronics Module. Remove the EIO card and store in a safe place. 5. With a flat end screwdriver, unscrew the two screws that attach the Hard Disk Drive (item 6) to the Electronics Module. Remove the Hard Disk Drive and store in a safe place. Be very careful when disconnecting the Trailing Cable from the Electronics Module. Incorrect handling will damage the Trailing Cable and then it will need replacing. 6. Disconnect the Trailing Cable by releasing it from retaining clips in the socket and carefully pulling it towards you. 7. Carefully disconnect all the cables from the left and right side of the electronics module. HP DesignJets 1050C and 1055CM Printers Service Manual 8-25
-
 1
1 -
2
-
3
-
4
-
5
-
6
-
7
-
8
-
9
-
10
-
11
-
12
-
13
-
14
-
15
-
16
-
17
-
18
-
19
-
20
-
21
-
22
-
23
-
24
-
25
-
26
-
27
-
28
-
29
-
30
-
31
-
32
-
33
-
34
-
35
-
36
-
37
-
38
-
39
-
40
-
41
-
42
-
43
-
44
-
45
-
46
-
47
-
48
-
49
-
50
-
51
-
52
-
53
-
54
-
55
-
56
-
57
-
58
-
59
-
60
-
61
-
62
-
63
-
64
-
65
-
66
-
67
-
68
-
69
-
70
-
71
-
72
-
73
-
74
-
75
-
76
-
77
-
78
-
79
-
80
-
81
-
82
-
83
-
84
-
85
-
86
-
87
-
88
-
89
-
90
-
91
-
92
-
93
-
94
-
95
-
96
-
97
-
98
-
99
-
100
-
101
-
102
-
103
-
104
-
105
-
106
-
107
-
108
-
109
-
110
-
111
-
112
-
113
-
114
-
115
-
116
-
117
-
118
-
119
-
120
-
121
-
122
-
123
-
124
-
125
-
126
-
127
-
128
-
129
-
130
-
131
-
132
-
133
-
134
-
135
-
136
-
137
-
138
-
139
-
140
-
141
-
142
-
143
-
144
-
145
-
146
-
147
-
148
-
149
-
150
-
151
-
152
-
153
-
154
-
155
-
156
-
157
-
158
-
159
-
160
-
161
-
162
-
163
-
164
-
165
-
166
-
167
-
168
-
169
-
170
-
171
-
172
-
173
-
174
-
175
-
176
-
177
-
178
-
179
-
180
-
181
-
182
-
183
-
184
-
185
-
186
-
187
-
188
-
189
-
190
-
191
-
192
-
193
-
194
-
195
-
196
-
197
-
198
-
199
-
200
-
201
-
202
-
203
-
204
-
205
-
206
-
207
-
208
-
209
-
210
-
211
-
212
-
213
-
214
-
215
-
216
-
217
-
218
-
219
-
220
-
221
-
222
-
223
-
224
-
225
-
226
-
227
-
 228
228 -
 229
229 -
 230
230 -
 231
231 -
 232
232 -
 233
233 -
 234
234 -
 235
235 -
 236
236 -
 237
237 -
 238
238 -
239
-
240
-
241
-
242
-
243
-
244
-
245
-
246
-
247
-
248
-
249
-
250
-
251
-
252
-
253
-
254
-
255
-
256
-
257
-
258
-
259
-
260
-
261
-
262
-
263
-
264
-
265
-
266
-
267
-
268
-
269
-
270
-
271
-
272
-
273
-
274
-
275
-
276
-
277
-
278
-
279
-
280
-
281
-
282
-
283
-
284
-
285
-
286
-
287
-
288
-
289
-
290
-
291
-
292
-
293
-
294
-
295
-
296
-
297
-
298
-
299
-
300
-
301
-
302
-
303
-
304
-
305
-
306
-
307
-
308
-
309
-
310
-
311
-
312
-
313
-
314
-
315
-
316
-
317
-
318
-
319
-
320
-
321
-
322
 |
 |