HP 1050c Service Manual - Page 82
DO NOT replace the Carriage Assembly. If the test PASSES, replace
 |
View all HP 1050c manuals
Add to My Manuals
Save this manual to your list of manuals |
Page 82 highlights
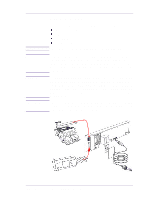
Service Tests and Utilities WARNING 2 If the Test fails again, switch the Power OFF, disconnect the power cord and Replace the DRAM DIMMs (Memory Modules). Reconnect the power cord and power On the Printer and perform the test again. 3 Replace the Electronics Module ⇒ Page 8-25. Only replace one component at a time and try the Service Test again before replacing another component. Using this procedure you will be able to determine exactly which component failed. Trailing Cable Failure If there is a problem with the Trailing Cable then the following message will appear on the front panel: ELECTRONIC SYSTEMS Possible Failure on: 1. Trailing Cable 2. Carriage 3. Electronics Module Code: 00XXXX:0000XX WARNING In this case, try one of the following: 1 Make sure that the Trailing Cable is connected correctly. 2 Power OFF the Printer and connect a new Trailing Cable to the Carriage and the Electronics Module (without removing the old Trailing Cable from the Printer). Perform this test again and if the test FAILS, then DO NOT replace the trailing cable. If the test PASSES, replace the Trailing Cable ⇒ Page 8-39. 3 Power OFF the Printer and connect a new Carriage Assembly to the Trailing Cable (without removing the old Carriage Assembly from the Printer). Perform this test again and if the test FAILS, then DO NOT replace the Carriage Assembly. If the test PASSES, replace the Carriage Assembly ⇒ Page 8-44. 4 Power OFF the Printer and connect a new Electronics Module to the Trailing Cable (without removing the old Electronics Module from the Printer). Perform this test again and if the test FAILS, then DO NOT replace the Electronics Module. If the test PASSES, replace the Electronics Module ⇒ Page 8-25. Only replace one component at a time and try the Service Test again before replacing another component. Using this procedure you will be able to determine exactly which component failed. 4-8 HP DesignJets 1050C and 1055CM Printers Service Manual
-
 1
1 -
2
-
3
-
4
-
5
-
6
-
7
-
8
-
9
-
10
-
11
-
12
-
13
-
14
-
15
-
16
-
17
-
18
-
19
-
20
-
21
-
22
-
23
-
24
-
25
-
26
-
27
-
28
-
29
-
30
-
31
-
32
-
33
-
34
-
35
-
36
-
37
-
38
-
39
-
40
-
41
-
42
-
43
-
44
-
45
-
46
-
47
-
48
-
49
-
50
-
51
-
52
-
53
-
54
-
55
-
56
-
57
-
58
-
59
-
60
-
61
-
62
-
63
-
64
-
65
-
66
-
67
-
68
-
69
-
70
-
71
-
72
-
73
-
74
-
75
-
76
-
 77
77 -
 78
78 -
 79
79 -
 80
80 -
 81
81 -
 82
82 -
 83
83 -
 84
84 -
 85
85 -
 86
86 -
 87
87 -
88
-
89
-
90
-
91
-
92
-
93
-
94
-
95
-
96
-
97
-
98
-
99
-
100
-
101
-
102
-
103
-
104
-
105
-
106
-
107
-
108
-
109
-
110
-
111
-
112
-
113
-
114
-
115
-
116
-
117
-
118
-
119
-
120
-
121
-
122
-
123
-
124
-
125
-
126
-
127
-
128
-
129
-
130
-
131
-
132
-
133
-
134
-
135
-
136
-
137
-
138
-
139
-
140
-
141
-
142
-
143
-
144
-
145
-
146
-
147
-
148
-
149
-
150
-
151
-
152
-
153
-
154
-
155
-
156
-
157
-
158
-
159
-
160
-
161
-
162
-
163
-
164
-
165
-
166
-
167
-
168
-
169
-
170
-
171
-
172
-
173
-
174
-
175
-
176
-
177
-
178
-
179
-
180
-
181
-
182
-
183
-
184
-
185
-
186
-
187
-
188
-
189
-
190
-
191
-
192
-
193
-
194
-
195
-
196
-
197
-
198
-
199
-
200
-
201
-
202
-
203
-
204
-
205
-
206
-
207
-
208
-
209
-
210
-
211
-
212
-
213
-
214
-
215
-
216
-
217
-
218
-
219
-
220
-
221
-
222
-
223
-
224
-
225
-
226
-
227
-
228
-
229
-
230
-
231
-
232
-
233
-
234
-
235
-
236
-
237
-
238
-
239
-
240
-
241
-
242
-
243
-
244
-
245
-
246
-
247
-
248
-
249
-
250
-
251
-
252
-
253
-
254
-
255
-
256
-
257
-
258
-
259
-
260
-
261
-
262
-
263
-
264
-
265
-
266
-
267
-
268
-
269
-
270
-
271
-
272
-
273
-
274
-
275
-
276
-
277
-
278
-
279
-
280
-
281
-
282
-
283
-
284
-
285
-
286
-
287
-
288
-
289
-
290
-
291
-
292
-
293
-
294
-
295
-
296
-
297
-
298
-
299
-
300
-
301
-
302
-
303
-
304
-
305
-
306
-
307
-
308
-
309
-
310
-
311
-
312
-
313
-
314
-
315
-
316
-
317
-
318
-
319
-
320
-
321
-
322
 |
 |
