HP Photosmart 2570 User Guide - Page 108
Solution, Contact HP, Cause, Contact HP Support. Go
 |
View all HP Photosmart 2570 manuals
Add to My Manuals
Save this manual to your list of manuals |
Page 108 highlights
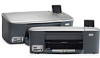
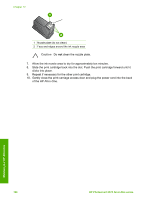
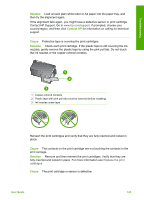
Troubleshooting Solution Load unused plain white letter or A4 paper into the paper tray, and then try the alignment again. If the alignment fails again, you might have a defective sensor or print cartridge. Contact HP Support. Go to www.hp.com/support. If prompted, choose your country/region, and then click Contact HP for information on calling for technical support. Cause Protective tape is covering the print cartridges. Solution Check each print cartridge. If the plastic tape is still covering the ink nozzles, gently remove the plastic tape by using the pink pull tab. Do not touch the ink nozzles or the copper-colored contacts. 1 Copper-colored contacts 2 Plastic tape with pink pull tab (must be removed before installing) 3 Ink nozzles under tape Reinsert the print cartridges and verify that they are fully inserted and locked in place. Cause The contacts on the print cartridge are not touching the contacts in the print carriage. Solution Remove and then reinsert the print cartridges. Verify that they are fully inserted and locked in place. For more information see Replace the print cartridges Cause The print cartridge or sensor is defective. User Guide 105
-
 1
1 -
2
-
3
-
4
-
5
-
6
-
7
-
8
-
9
-
10
-
11
-
12
-
13
-
14
-
15
-
16
-
17
-
18
-
19
-
20
-
21
-
22
-
23
-
24
-
25
-
26
-
27
-
28
-
29
-
30
-
31
-
32
-
33
-
34
-
35
-
36
-
37
-
38
-
39
-
40
-
41
-
42
-
43
-
44
-
45
-
46
-
47
-
48
-
49
-
50
-
51
-
52
-
53
-
54
-
55
-
56
-
57
-
58
-
59
-
60
-
61
-
62
-
63
-
64
-
65
-
66
-
67
-
68
-
69
-
70
-
71
-
72
-
73
-
74
-
75
-
76
-
77
-
78
-
79
-
80
-
81
-
82
-
83
-
84
-
85
-
86
-
87
-
88
-
89
-
90
-
91
-
92
-
93
-
94
-
95
-
96
-
97
-
98
-
99
-
100
-
101
-
102
-
 103
103 -
 104
104 -
 105
105 -
 106
106 -
 107
107 -
 108
108 -
 109
109 -
 110
110 -
 111
111 -
 112
112 -
 113
113 -
114
-
115
-
116
-
117
-
118
-
119
-
120
-
121
-
122
-
123
-
124
-
125
-
126
-
127
-
128
-
129
-
130
-
131
-
132
-
133
-
134
-
135
-
136
-
137
-
138
-
139
-
140
-
141
-
142
 |
 |