HP Photosmart 2570 User Guide - Page 111
Start, d:\setup.exe, HP All-in-One Installer, Solution, Details, HP Image Zone Express, HP Image Zone
 |
View all HP Photosmart 2570 manuals
Add to My Manuals
Save this manual to your list of manuals |
Page 111 highlights
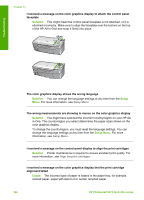
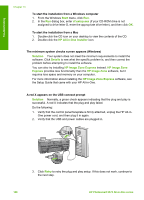
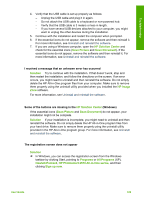
Troubleshooting Chapter 13 To start the installation from a Windows computer 1. From the Windows Start menu, click Run. 2. In the Run dialog box, enter d:\setup.exe (if your CD-ROM drive is not assigned to drive letter D, enter the appropriate drive letter), and then click OK. To start the installation from a Mac 1. Double-click the CD icon on your desktop to view the contents of the CD. 2. Double-click the HP All-in-One Installer icon. The minimum system checks screen appears (Windows) Solution Your system does not meet the minimum requirements to install the software. Click Details to see what the specific problem is, and then correct the problem before attempting to install the software. You can also try installing HP Image Zone Express instead. HP Image Zone Express provides less functionality than the HP Image Zone software, but it requires less space and memory on your computer. For more information about installing the HP Image Zone Express software, see the Setup Guide that came with your HP All-in-One. A red X appears on the USB connect prompt Solution Normally, a green check appears indicating that the plug and play is successful. A red X indicates that the plug and play failed. Do the following: 1. Verify that the control panel faceplate is firmly attached, unplug the HP All-inOne power cord, and then plug it in again. 2. Verify that the USB and power cables are plugged in. 3. Click Retry to retry the plug and play setup. If this does not work, continue to the next step. 108 HP Photosmart 2570 All-in-One series
-
 1
1 -
2
-
3
-
4
-
5
-
6
-
7
-
8
-
9
-
10
-
11
-
12
-
13
-
14
-
15
-
16
-
17
-
18
-
19
-
20
-
21
-
22
-
23
-
24
-
25
-
26
-
27
-
28
-
29
-
30
-
31
-
32
-
33
-
34
-
35
-
36
-
37
-
38
-
39
-
40
-
41
-
42
-
43
-
44
-
45
-
46
-
47
-
48
-
49
-
50
-
51
-
52
-
53
-
54
-
55
-
56
-
57
-
58
-
59
-
60
-
61
-
62
-
63
-
64
-
65
-
66
-
67
-
68
-
69
-
70
-
71
-
72
-
73
-
74
-
75
-
76
-
77
-
78
-
79
-
80
-
81
-
82
-
83
-
84
-
85
-
86
-
87
-
88
-
89
-
90
-
91
-
92
-
93
-
94
-
95
-
96
-
97
-
98
-
99
-
100
-
101
-
102
-
103
-
104
-
105
-
 106
106 -
 107
107 -
 108
108 -
 109
109 -
 110
110 -
 111
111 -
 112
112 -
 113
113 -
 114
114 -
 115
115 -
 116
116 -
117
-
118
-
119
-
120
-
121
-
122
-
123
-
124
-
125
-
126
-
127
-
128
-
129
-
130
-
131
-
132
-
133
-
134
-
135
-
136
-
137
-
138
-
139
-
140
-
141
-
142
 |
 |