HP Photosmart 2570 User Guide - Page 11
Start Copy Color, Start Copy Black - help
 |
View all HP Photosmart 2570 manuals
Add to My Manuals
Save this manual to your list of manuals |
Page 11 highlights
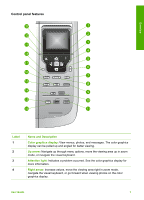
Overview Chapter 1 (continued) Label 5 6 7 8 9 10 11 12 13 14 15 16 17 18 19 20 21 Name and Description Down arrow: Navigate down through menu options, move the viewing area down in zoom mode, or navigate the visual keyboard. Cancel: Stop the current operation, exit a menu, or exit settings. Rotate: Rotate the currently displayed photo on the color graphics display 90 degrees. Subsequent presses continue to rotate the photo 90 degrees. Note Rotate only affects printing in album mode. Zoom: Zoom in to enlarge the image on the color graphics display. Zoom out to see more of a photo on the color graphics display. You can also use this button to adjust the crop box when printing. Print Photos: Select the photo function. When the button is lit, the photo function is selected. Use this button to print photos from a memory card or storage device, or to save photos to your computer. Start Scan: Start a scan job and send it to the destination you selected using the Scan To button. Start Copy Color: Start a color copy job. Start Copy Black: Start a black copy job. Copy Menu: Select copy options, such as number of copies, paper size, and paper type. Scan To: Select a scan destination. Photo Menu: Adjust a photo for viewing or printing. Features include color effects, photo brightness, frames, and red-eye removal. Proof Sheet: Print a proof sheet when a memory card has been inserted in a memory card slot. A proof sheet shows thumbnail views of all the photos on the memory card. You can select photos on the proof sheet, then print those photos by scanning the proof sheet. HP Instant Share: Send or receive images directly from a network-connected HP All-in-One. If your HP All-in-One is USB-connected, you can send images using the HP Instant Share software on your computer. Setup: Access the menu system for reports, maintenance, and help. Left arrow: Decrease values, move the viewing area left in zoom mode, navigate the visual keyboard, go back when viewing photos on the color graphics display, or exit menus. On: Turn the HP All-in-One on or off. When the HP All-in-One is off, a minimal amount of power is still supplied to the device. To completely disconnect the power supply to the HP All-in-One, turn the device off, and then unplug the power cord. OK: Select a menu, setting, or value displayed on the color graphics display. 8 HP Photosmart 2570 All-in-One series
-
 1
1 -
2
-
3
-
4
-
5
-
 6
6 -
 7
7 -
 8
8 -
 9
9 -
 10
10 -
 11
11 -
 12
12 -
 13
13 -
 14
14 -
 15
15 -
 16
16 -
17
-
18
-
19
-
20
-
21
-
22
-
23
-
24
-
25
-
26
-
27
-
28
-
29
-
30
-
31
-
32
-
33
-
34
-
35
-
36
-
37
-
38
-
39
-
40
-
41
-
42
-
43
-
44
-
45
-
46
-
47
-
48
-
49
-
50
-
51
-
52
-
53
-
54
-
55
-
56
-
57
-
58
-
59
-
60
-
61
-
62
-
63
-
64
-
65
-
66
-
67
-
68
-
69
-
70
-
71
-
72
-
73
-
74
-
75
-
76
-
77
-
78
-
79
-
80
-
81
-
82
-
83
-
84
-
85
-
86
-
87
-
88
-
89
-
90
-
91
-
92
-
93
-
94
-
95
-
96
-
97
-
98
-
99
-
100
-
101
-
102
-
103
-
104
-
105
-
106
-
107
-
108
-
109
-
110
-
111
-
112
-
113
-
114
-
115
-
116
-
117
-
118
-
119
-
120
-
121
-
122
-
123
-
124
-
125
-
126
-
127
-
128
-
129
-
130
-
131
-
132
-
133
-
134
-
135
-
136
-
137
-
138
-
139
-
140
-
141
-
142
 |
 |