Intel S2600GZ S2600GZ/GL - Page 108
System Update and Recovery files are included in the System Update Packages SUP - bios download
 |
View all Intel S2600GZ manuals
Add to My Manuals
Save this manual to your list of manuals |
Page 108 highlights
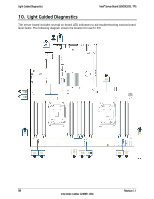
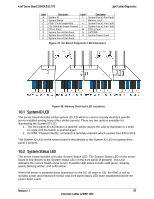
Intel® Server Board S2600GZ/GL TPS Reset and Recovery Jumpers B - BIOS Recovery Jumper When the BIOS Recovery jumper block is moved from its default pin position, the system will boot into a BIOS Recovery Mode. It is used when the system BIOS has become corrupted and is non-functional, requiring a new BIOS image to be loaded on to the server board. Note: The BIOS Recovery jumper is ONLY used to re-install a BIOS image in the event the BIOS has become corrupted. This jumper is NOT used when the BIOS is operating normally and you need to update the BIOS from one version to another. The following steps demonstrate the BIOS recovery process: 1. After downloading the latest System Update Package (SUP) from the Intel Web site, copy the following files to the root directory of a USB media device: IPMI.EFI IFlash32.EFI RML.ROM ####REC.CAP (where #### = BIOS revision number) STARTUP.NSH Note: It may be necessary to edit the STARTUP.NSH file to ensure the ####REC.CAP file is called in the shell script. 2. Power OFF the system. 3. Locate the BIOS Recovery Jumper on the server board and move the jumper block from pins 1-2 (default) to pins 2-3 (recovery setting). 4. Insert the recovery media into a USB port. 5. Power ON the system. 6. The system will automatically boot into the embedded EFI Shell. 7. The STARTUP.NSH file automatically executes and initiates the flash update. When complete, the IFlash utility will display a message. 8. Power OFF the system and return the BIOS Recovery jumper to its default position. 9. Power ON the system. 10. Do *NOT* interrupt the BIOS POST during the first boot. C - Management Engine (ME) Firmware Force Update Jumper Block When the ME Firmware Force Update jumper is moved from its default position, the ME is forced to operate in a reduced minimal operating capacity. This jumper should only be used if the ME firmware has gotten corrupted and requires re-installation. The following procedure should be followed. Note: System Update and Recovery files are included in the System Update Packages (SUP) posted to Intel's web site. 1. Turn off the system and remove power cords. 2. Remove Riser Card Assembly #2. 3. Move the ME FRC UPD Jumper (J6C5) from the default (pins 1 and 2) operating position to the Force Update position (pins 2 and 3). 4. Re-attach system power cords. 5. Power on the system. Note: System Fans will boost and the BIOS Error Manager should report an 83A0 error code (ME in recovery mode). Revision 1.1 95 Intel order number G24881-004
-
 1
1 -
2
-
3
-
4
-
5
-
6
-
7
-
8
-
9
-
10
-
11
-
12
-
13
-
14
-
15
-
16
-
17
-
18
-
19
-
20
-
21
-
22
-
23
-
24
-
25
-
26
-
27
-
28
-
29
-
30
-
31
-
32
-
33
-
34
-
35
-
36
-
37
-
38
-
39
-
40
-
41
-
42
-
43
-
44
-
45
-
46
-
47
-
48
-
49
-
50
-
51
-
52
-
53
-
54
-
55
-
56
-
57
-
58
-
59
-
60
-
61
-
62
-
63
-
64
-
65
-
66
-
67
-
68
-
69
-
70
-
71
-
72
-
73
-
74
-
75
-
76
-
77
-
78
-
79
-
80
-
81
-
82
-
83
-
84
-
85
-
86
-
87
-
88
-
89
-
90
-
91
-
92
-
93
-
94
-
95
-
96
-
97
-
98
-
99
-
100
-
101
-
102
-
 103
103 -
 104
104 -
 105
105 -
 106
106 -
 107
107 -
 108
108 -
 109
109 -
 110
110 -
 111
111 -
 112
112 -
 113
113 -
114
-
115
-
116
-
117
-
118
-
119
-
120
-
121
-
122
-
123
-
124
-
125
-
126
-
127
-
128
-
129
-
130
-
131
-
132
-
133
-
134
-
135
-
136
-
137
-
138
-
139
-
140
-
141
-
142
-
143
-
144
-
145
-
146
-
147
-
148
-
149
-
150
-
151
-
152
-
153
-
154
-
155
-
156
-
157
-
158
-
159
-
160
-
161
-
162
-
163
-
164
-
165
-
166
-
167
-
168
-
169
-
170
-
171
-
172
-
173
-
174
-
175
-
176
-
177
-
178
-
179
-
180
-
181
-
182
-
183
-
184
-
185
-
186
-
187
-
188
-
189
-
190
-
191
-
192
-
193
-
194
-
195
-
196
-
197
-
198
-
199
-
200
-
201
-
202
-
203
-
204
-
205
-
206
-
207
-
208
-
209
-
210
-
211
-
212
-
213
-
214
-
215
-
216
-
217
-
218
-
219
-
220
-
221
-
222
-
223
-
224
-
225
-
226
-
227
-
228
-
229
-
230
-
231
-
232
-
233
-
234
-
235
-
236
-
237
-
238
-
239
-
240
-
241
-
242
-
243
-
244
-
245
-
246
-
247
-
248
-
249
-
250
-
251
-
252
-
253
-
254
-
255
-
256
-
257
-
258
-
259
-
260
-
261
-
262
-
263
-
264
 |
 |
