Lexmark 5470 User's Guide - Page 79
Removing wavy patterns from scanned photos, magazines, or newspapers, Printing photos
 |
UPC - 734646010801
View all Lexmark 5470 manuals
Add to My Manuals
Save this manual to your list of manuals |
Page 79 highlights
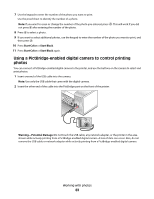
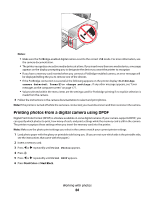
Removing wavy patterns from scanned photos, magazines, or newspapers Descreening helps to remove wavy (moire) patterns from images scanned from magazines or newspapers. 1 Make sure the printer is connected to a computer, and both the printer and the computer are on. 2 Load an original document facedown on the scanner glass. 3 From the desktop, double-click the Productivity Studio icon. 4 Click Scan. 5 Select the Photo or Several Photos option. 6 Click Start. 7 Click the Advanced tab. 8 Click Image Patterns. 9 To remove the image patterns caused by scanning from magazines or newspapers, click Remove Patterns. 10 From the drop-down list, select the patterns to be removed. 11 To reduce stray marks on color photos, click the check box, and then move the slider to the desired value. 12 Click OK. The thumbnail is updated. Printing photos Printing photos from a CD or removable storage device using the computer 1 Load photo paper with the glossy or printable side facing you. (If you are not sure which side is the printable side, see the instructions that came with the paper.) 2 Insert a CD or any removable storage device (such as a flash drive, memory card, or digital camera) into the computer. • If you are using Windows Vista, an "AutoPlay" screen appears. Click Transfer Photos to your computer using the Productivity Studio. • If you are using Windows XP, a "What do you want Windows to do?" screen appears. Click Transfer Photos to your computer using the Productivity Studio. • If you are using Windows 2000: a From the desktop, double-click the Productivity Studio icon. b Click Transfer Photos. 3 Click Select photos to print. 4 To print all photos, click Print. 5 To print selected photos, click Deselect All and select only the photo(s) you want to print. 6 Click Print. 7 From the Quality drop-down list, select a print quality. Working with photos 79
-
 1
1 -
2
-
3
-
4
-
5
-
6
-
7
-
8
-
9
-
10
-
11
-
12
-
13
-
14
-
15
-
16
-
17
-
18
-
19
-
20
-
21
-
22
-
23
-
24
-
25
-
26
-
27
-
28
-
29
-
30
-
31
-
32
-
33
-
34
-
35
-
36
-
37
-
38
-
39
-
40
-
41
-
42
-
43
-
44
-
45
-
46
-
47
-
48
-
49
-
50
-
51
-
52
-
53
-
54
-
55
-
56
-
57
-
58
-
59
-
60
-
61
-
62
-
63
-
64
-
65
-
66
-
67
-
68
-
69
-
70
-
71
-
72
-
73
-
 74
74 -
 75
75 -
 76
76 -
 77
77 -
 78
78 -
 79
79 -
 80
80 -
 81
81 -
 82
82 -
 83
83 -
 84
84 -
85
-
86
-
87
-
88
-
89
-
90
-
91
-
92
-
93
-
94
-
95
-
96
-
97
-
98
-
99
-
100
-
101
-
102
-
103
-
104
-
105
-
106
-
107
-
108
-
109
-
110
-
111
-
112
-
113
-
114
-
115
-
116
-
117
-
118
-
119
-
120
-
121
-
122
-
123
-
124
-
125
-
126
-
127
-
128
-
129
-
130
-
131
-
132
-
133
-
134
-
135
-
136
-
137
-
138
-
139
-
140
-
141
-
142
-
143
-
144
-
145
-
146
-
147
-
148
-
149
-
150
-
151
-
152
-
153
-
154
-
155
-
156
-
157
-
158
-
159
-
160
-
161
-
162
-
163
-
164
-
165
-
166
-
167
-
168
-
169
-
170
-
171
-
172
-
173
-
174
-
175
-
176
-
177
-
178
-
179
-
180
-
181
-
182
-
183
-
184
-
185
-
186
-
187
-
188
-
189
-
190
-
191
-
192
-
193
-
194
-
195
-
196
-
197
-
198
-
199
-
200
-
201
-
202
 |
 |