Brother International LZ2-B856E Instruction Manual - English and Spanish - Page 96
Setting the zigzag width, 2-2. Einstellen der Zickzackbreite
 |
View all Brother International LZ2-B856E manuals
Add to My Manuals
Save this manual to your list of manuals |
Page 96 highlights
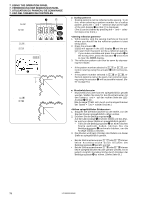
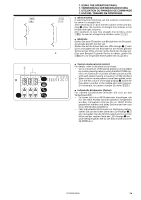
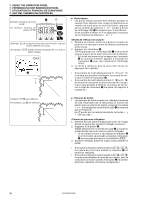
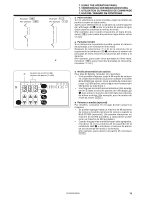
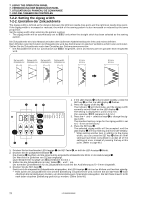
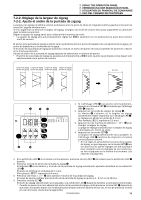
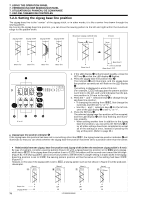
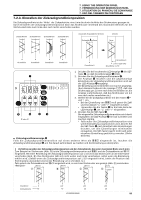
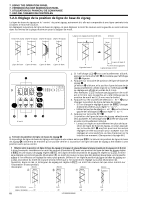
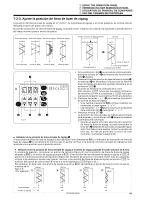
7. USING THE OPERATION PANEL 7. VERWENDUNG DER BEDIENUNGSTAFEL 7. UTILISATION DU PANNEAU DE COMMANDE 7. USO DEL TABLERO DE CONTROLES 7-2-2. Setting the zigzag width 7-2-2. Einstellen der Zickzackbreite The zigzag width is defined as the distance between the leftmost needle drop point and the rightmost needle drop point. If the zigzag width is increased or reduced, the width of the sewing pattern is also increased or reduced by the same proportion. Set the zigzag width after selecting the pattern number. * The zigzag width will be automatically set to ++0 only when the straight stitch has been selected as the sewing pattern. Die Zickzackbreite wird als Abstand zwischen dem äußersten Nadeleinstichpunkt links und rechts definiert. Beim Erhöhen oder Vermindern der Zickzackbreite wird das Stichmuster im gleichen Verhältnis erhöht oder vermindert. Stellen Sie die Zickzackbreite nach dem Einstellen der Stichmusternummer ein. * Die Zickzackbreite wird nur automatisch auf ++0 eingestellt, wenn als Stichmuster ein gerader Stich eingestellt wird. Zigzag width Zigzag width Zigzag width Zigzag width Zickzackbreite Zickzackbreite Zickzackbreite Zickzackbreite 4.0 mm 4,0 mm 8.0 mm 8,0 mm TEST SET w 1. If the LED display q is illuminated steadily, press the SET key w so that the LED display q flashes. q re 2. Press the zigzag width key e. The indicator r will illuminate, and the zigzag width currently set will flash on the LED display q. The setting is displayed in units of 0.1 mm. 12 3 4 56 7 8 9 (For example, +50 represents 5.0 mm.) PAT T ERN S S ROM 3. Press the ˚ and ˜ selection keys t to change the zig- zag width. The standard setting range for the zigzag width is set to 0 - 8 mm at the factory. L r 4. Press the SET key w. The selected zigzag width will be accepted, and the LED display q will stop flashing and illuminate steadily. * When setting another item in addition to the zigzag width, you can press the SET key w after all other settings have been completed to accept all of the settings at once, instead of pressing the key at this t point. (Refer to page 66.) 1. Drücken Sie bei leuchtender LED-Anzeige q die SET-Taste w, so daß die LED-Anzeige q blinkt. 2. Drücken Sie die Zickzackbreitentaste e. Die Anzeige r leuchtet und die gegenwärtig eingestellte Zickzackbreite blinkt in der LED-Anzeige q. Der Wert wird in Einheiten von 0,1 mm angezeigt. (Zum Beispiel eine Anzeige von +50 bedeutet 5,0 mm.) 3. Stellen Sie die Zickzackbreite mit den Tasten t ˚ und ˜ ein. Der normaler Einstellbereich für de Zickzackbreite wurde bei der Auslieferung auf 0 - 8 mm eingestellt. 4. Drücken Sie die SET-Taste w. Damit wird die eingestellte Zickzackbreite eingegeben, die LED-Anzeige q hört auf zu blinken und leuchtet ständig. * Falls außer der Zickzackbreite eine weitere Einstellung vorgenommen wird, können Sie die SET-Taste w nach Abschluß aller Einstellungen drücken, um alle Einstellungen miteinander einzugeben. Die SET-Taste braucht nicht nach jeder einzelnen Einstellung gedrückt zu werden. (Siehe Seite 66.) 77 LZ2-B855E,B856E
-
 1
1 -
2
-
3
-
4
-
5
-
6
-
7
-
8
-
9
-
10
-
11
-
12
-
13
-
14
-
15
-
16
-
17
-
18
-
19
-
20
-
21
-
22
-
23
-
24
-
25
-
26
-
27
-
28
-
29
-
30
-
31
-
32
-
33
-
34
-
35
-
36
-
37
-
38
-
39
-
40
-
41
-
42
-
43
-
44
-
45
-
46
-
47
-
48
-
49
-
50
-
51
-
52
-
53
-
54
-
55
-
56
-
57
-
58
-
59
-
60
-
61
-
62
-
63
-
64
-
65
-
66
-
67
-
68
-
69
-
70
-
71
-
72
-
73
-
74
-
75
-
76
-
77
-
78
-
79
-
80
-
81
-
82
-
83
-
84
-
85
-
86
-
87
-
88
-
89
-
90
-
 91
91 -
 92
92 -
 93
93 -
 94
94 -
 95
95 -
 96
96 -
 97
97 -
 98
98 -
 99
99 -
 100
100 -
 101
101 -
102
-
103
-
104
-
105
-
106
-
107
-
108
-
109
-
110
-
111
-
112
-
113
-
114
-
115
-
116
-
117
-
118
-
119
-
120
-
121
-
122
-
123
-
124
-
125
-
126
-
127
-
128
-
129
-
130
-
131
-
132
-
133
-
134
-
135
-
136
-
137
-
138
-
139
-
140
-
141
-
142
-
143
-
144
-
145
-
146
-
147
-
148
-
149
-
150
-
151
-
152
-
153
-
154
-
155
-
156
-
157
-
158
-
159
-
160
-
161
-
162
-
163
-
164
-
165
-
166
-
167
-
168
-
169
-
170
-
171
-
172
-
173
-
174
-
175
-
176
-
177
-
178
-
179
-
180
-
181
-
182
-
183
-
184
-
185
-
186
-
187
-
188
-
189
-
190
-
191
-
192
-
193
-
194
-
195
-
196
-
197
-
198
-
199
-
200
-
201
-
202
-
203
-
204
-
205
-
206
-
207
-
208
-
209
-
210
-
211
-
212
-
213
-
214
-
215
-
216
-
217
-
218
-
219
-
220
-
221
-
222
 |
 |
