Canon imageCLASS MF6595cx imageCLASS MF6500 Series Reference Guide - Page 124
Print Server Settings, For Windows Vista, click [Change sharing
 |
View all Canon imageCLASS MF6595cx manuals
Add to My Manuals
Save this manual to your list of manuals |
Page 124 highlights
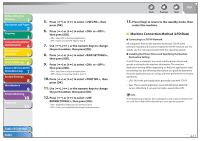
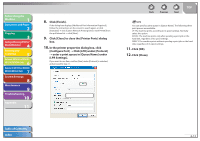
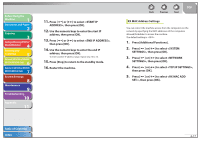
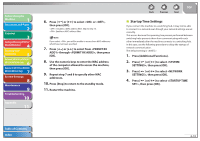
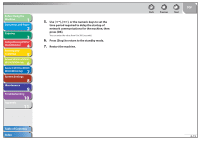
Before Using the Machine 1 Document and Paper 2 Copying 3 Sending and Receiving (MF6595cx/ MF6595/MF6590 Only) 4 Printing and Scanning 5 Network (MF6595cx/MF6595/ 6 MF6590/MF6540 Only) Remote UI (MF6595cx/MF6595/ 7 MF6590/MF6540 Only) System Settings 8 Maintenance 9 Troubleshooting 10 Appendix 11 ˙ Print Server Settings If Windows 2000/XP/Server 2003/Vista is on your network, the following procedure enables you to set up a print server for more efficient management of network printers. Once a print server is set up, print jobs can be managed by the print server. Also, by setting up an alternate driver for the print server, printer drivers can be installed in each computer via the network. 1. Open the printer properties dialog box. - For Windows Vista, click [Start] on the Windows task bar → [Control Panel] → [Hardware and Sound] → [Printers] - For Windows 2000, click [Start] on the Windows task bar → [Settings] → [Printers]. - For Windows XP Professional/Server 2003, click [start] on the Windows task bar → [Printers and Faxes]. - For Windows XP Home Edition, click [start] on the Windows task bar → [Control Panel] → [Printers and Other Hardware] → Printers and Faxes]. 2. Right-click the icon of the printer you installed → select [Sharing]. 3. For Windows Vista, click [Change sharing options] For other operating systems, skip to step 4. Click [Continue] to proceed if the [User Account Control] dialog box appears. Back Previous Next TOP 4. Select [Share this printer] (Windows 2000: [Shared as]) and enter a share name. 5. If this machine is shared with users running different versions of Windows, click [Additional drivers]. When the alternate driver is installed, additional windows will open for entering the location of the file containing the printer driver. Follow the instructions in these windows. To install the printer driver on another computer, use the [Printer Wizard] window for selecting the printer destination → select [Network printer] → select the shared printer for the computer selected in the print server. 6. Click [OK]. The shared printer settings are complete. Table of Contents Index 6-14
-
 1
1 -
2
-
3
-
4
-
5
-
6
-
7
-
8
-
9
-
10
-
11
-
12
-
13
-
14
-
15
-
16
-
17
-
18
-
19
-
20
-
21
-
22
-
23
-
24
-
25
-
26
-
27
-
28
-
29
-
30
-
31
-
32
-
33
-
34
-
35
-
36
-
37
-
38
-
39
-
40
-
41
-
42
-
43
-
44
-
45
-
46
-
47
-
48
-
49
-
50
-
51
-
52
-
53
-
54
-
55
-
56
-
57
-
58
-
59
-
60
-
61
-
62
-
63
-
64
-
65
-
66
-
67
-
68
-
69
-
70
-
71
-
72
-
73
-
74
-
75
-
76
-
77
-
78
-
79
-
80
-
81
-
82
-
83
-
84
-
85
-
86
-
87
-
88
-
89
-
90
-
91
-
92
-
93
-
94
-
95
-
96
-
97
-
98
-
99
-
100
-
101
-
102
-
103
-
104
-
105
-
106
-
107
-
108
-
109
-
110
-
111
-
112
-
113
-
114
-
115
-
116
-
117
-
118
-
 119
119 -
 120
120 -
 121
121 -
 122
122 -
 123
123 -
 124
124 -
 125
125 -
 126
126 -
 127
127 -
 128
128 -
 129
129 -
130
-
131
-
132
-
133
-
134
-
135
-
136
-
137
-
138
-
139
-
140
-
141
-
142
-
143
-
144
-
145
-
146
-
147
-
148
-
149
-
150
-
151
-
152
-
153
-
154
-
155
-
156
-
157
-
158
-
159
-
160
-
161
-
162
-
163
-
164
-
165
-
166
-
167
-
168
-
169
-
170
-
171
-
172
-
173
-
174
-
175
-
176
-
177
-
178
-
179
-
180
-
181
-
182
-
183
-
184
-
185
-
186
-
187
-
188
-
189
-
190
-
191
-
192
-
193
-
194
-
195
-
196
-
197
-
198
-
199
-
200
-
201
-
202
-
203
-
204
-
205
-
206
-
207
-
208
-
209
-
210
-
211
-
212
-
213
-
214
-
215
-
216
-
217
-
218
-
219
-
220
-
221
-
222
-
223
-
224
-
225
-
226
-
227
-
228
-
229
-
230
-
231
-
232
-
233
-
234
-
235
-
236
-
237
-
238
-
239
-
240
-
241
-
242
-
243
-
244
-
245
-
246
-
247
-
248
-
249
-
250
-
251
-
252
-
253
-
254
-
255
-
256
-
257
-
258
-
259
-
260
-
261
-
262
-
263
-
264
-
265
-
266
-
267
-
268
-
269
-
270
-
271
-
272
-
273
-
274
-
275
-
276
-
277
-
278
-
279
-
280
-
281
-
282
-
283
-
284
-
285
-
286
-
287
-
288
-
289
-
290
-
291
-
292
 |
 |