Canon imageCLASS MF6595cx imageCLASS MF6500 Series Reference Guide - Page 98
Remote Reception, Perform step 1 to 3 in Memory Lock Reception
 |
View all Canon imageCLASS MF6595cx manuals
Add to My Manuals
Save this manual to your list of manuals |
Page 98 highlights
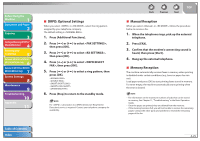
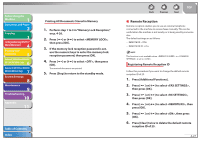
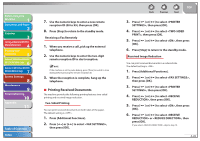
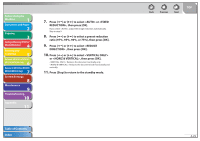
Before Using the Machine 1 Document and Paper 2 Copying 3 Sending and Receiving (MF6595cx/ MF6595/MF6590 Only) 4 Printing and Scanning 5 Network (MF6595cx/MF6595/ 6 MF6590/MF6540 Only) Remote UI (MF6595cx/MF6595/ 7 MF6590/MF6540 Only) System Settings 8 Maintenance 9 Troubleshooting 10 Appendix 11 Printing All Documents Stored in Memory 1. Perform step 1 to 3 in "Memory Lock Reception," on p. 4-26. 2. Press [ ] or [ ] to select , then press [OK]. 3. If the memory lock reception password is set, use the numeric keys to enter the memory lock reception password, then press [OK]. 4. Press [ ] or [ ] to select , then press [OK]. The received documents are printed. 5. Press [Stop] to return to the standby mode. Table of Contents Index Back Previous Next TOP ˙ Remote Reception Remote reception enables you to use an external telephone connected to the machine to receive faxes manually. This can be useful when the machine is not nearby or is being used by someone else. The default settings are as follows: - REMOTE RX: - REMOTE RX ID: This function is not available when in is set to . Registering Remote Reception ID Follow this procedure if you want to change the default remote reception ID of 25. 1. Press [Additional Functions]. 2. Press [ ] or [ ] to select , then press [OK]. 3. Press [ ] or [ ] to select , then press [OK]. 4. Press [ ] or [ ] to select , then press [OK]. 5. Press [ ] or [ ] to select , then press [OK]. 6. Press [Clear] twice to delete the default remote reception ID of 25. 4-27
-
 1
1 -
2
-
3
-
4
-
5
-
6
-
7
-
8
-
9
-
10
-
11
-
12
-
13
-
14
-
15
-
16
-
17
-
18
-
19
-
20
-
21
-
22
-
23
-
24
-
25
-
26
-
27
-
28
-
29
-
30
-
31
-
32
-
33
-
34
-
35
-
36
-
37
-
38
-
39
-
40
-
41
-
42
-
43
-
44
-
45
-
46
-
47
-
48
-
49
-
50
-
51
-
52
-
53
-
54
-
55
-
56
-
57
-
58
-
59
-
60
-
61
-
62
-
63
-
64
-
65
-
66
-
67
-
68
-
69
-
70
-
71
-
72
-
73
-
74
-
75
-
76
-
77
-
78
-
79
-
80
-
81
-
82
-
83
-
84
-
85
-
86
-
87
-
88
-
89
-
90
-
91
-
92
-
 93
93 -
 94
94 -
 95
95 -
 96
96 -
 97
97 -
 98
98 -
 99
99 -
 100
100 -
 101
101 -
 102
102 -
 103
103 -
104
-
105
-
106
-
107
-
108
-
109
-
110
-
111
-
112
-
113
-
114
-
115
-
116
-
117
-
118
-
119
-
120
-
121
-
122
-
123
-
124
-
125
-
126
-
127
-
128
-
129
-
130
-
131
-
132
-
133
-
134
-
135
-
136
-
137
-
138
-
139
-
140
-
141
-
142
-
143
-
144
-
145
-
146
-
147
-
148
-
149
-
150
-
151
-
152
-
153
-
154
-
155
-
156
-
157
-
158
-
159
-
160
-
161
-
162
-
163
-
164
-
165
-
166
-
167
-
168
-
169
-
170
-
171
-
172
-
173
-
174
-
175
-
176
-
177
-
178
-
179
-
180
-
181
-
182
-
183
-
184
-
185
-
186
-
187
-
188
-
189
-
190
-
191
-
192
-
193
-
194
-
195
-
196
-
197
-
198
-
199
-
200
-
201
-
202
-
203
-
204
-
205
-
206
-
207
-
208
-
209
-
210
-
211
-
212
-
213
-
214
-
215
-
216
-
217
-
218
-
219
-
220
-
221
-
222
-
223
-
224
-
225
-
226
-
227
-
228
-
229
-
230
-
231
-
232
-
233
-
234
-
235
-
236
-
237
-
238
-
239
-
240
-
241
-
242
-
243
-
244
-
245
-
246
-
247
-
248
-
249
-
250
-
251
-
252
-
253
-
254
-
255
-
256
-
257
-
258
-
259
-
260
-
261
-
262
-
263
-
264
-
265
-
266
-
267
-
268
-
269
-
270
-
271
-
272
-
273
-
274
-
275
-
276
-
277
-
278
-
279
-
280
-
281
-
282
-
283
-
284
-
285
-
286
-
287
-
288
-
289
-
290
-
291
-
292
 |
 |