Canon imageCLASS MF6595cx imageCLASS MF6500 Series Reference Guide - Page 88
Advanced Sending Features, Broadcasting, Delayed Sending
 |
View all Canon imageCLASS MF6595cx manuals
Add to My Manuals
Save this manual to your list of manuals |
Page 88 highlights
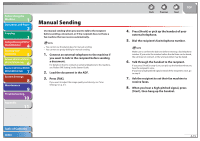
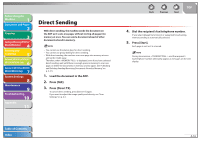
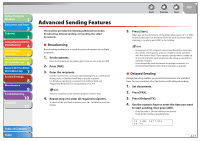
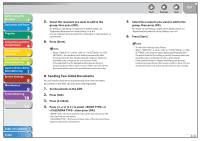
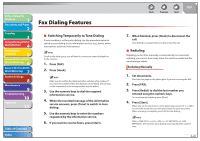
Before Using the Machine 1 Document and Paper 2 Copying 3 Sending and Receiving (MF6595cx/ MF6595/MF6590 Only) 4 Printing and Scanning 5 Network (MF6595cx/MF6595/ 6 MF6590/MF6540 Only) Remote UI (MF6595cx/MF6595/ 7 MF6590/MF6540 Only) System Settings 8 Maintenance 9 Troubleshooting 10 Appendix 11 Advanced Sending Features The machine provides the following additional fax modes: broadcasting, delayed sending, and sending two-sided documents. ˙ Broadcasting Broadcasting enables you to send the same document to multiple recipients. 1. Set documents. Place the first page on the platen glass if you are not using the ADF. 2. Press [FAX]. 3. Enter the recipients. Use the numeric keys, one-touch speed dialing keys or coded speed dialing codes or [Address Book] key to specify recipients. For details on specifying a recipient from Address Book, see "Registering Recipients for Group Dialing," on p. 4-9. Only one recipient can be entered using the numeric keys. 4. Repeat step 3 to enter all required recipients. To check all the specified recipients, press [ ] or [ ] to scroll the display. Table of Contents Index Back Previous Next TOP 5. Press [Start]. When you set the documents on the platen glass, press [ ] or [ ] to specify the paper size and press [Start] for each document. When scanning is complete, press [OK] to start dialing. - A maximum of 124 recipients can be specified at the same time. (Out of the 124 recipients, only one recipient can be specified with the numeric keys.) If you specify a group, which is made up of several recipients, each recipient in the group is counted as a separate recipient. - If you frequently send documents to multiple recipients, it is recommended that you store those recipients as a group. ˙ Delayed Sending Delayed sending enables you to start transmission at a specified time. You can combine other fax features with delayed sending. 1. Set documents. 2. Press [FAX]. 3. Press [Delayed TX]. 4. Use the numeric keys to enter the time you want to start sending, then press [OK]. - Enter the time in 24-hour military time format. - Enter all the numbers, including zeros. Ex. T X T I ME 20 : 00 S E T T I NG 4-17
-
 1
1 -
2
-
3
-
4
-
5
-
6
-
7
-
8
-
9
-
10
-
11
-
12
-
13
-
14
-
15
-
16
-
17
-
18
-
19
-
20
-
21
-
22
-
23
-
24
-
25
-
26
-
27
-
28
-
29
-
30
-
31
-
32
-
33
-
34
-
35
-
36
-
37
-
38
-
39
-
40
-
41
-
42
-
43
-
44
-
45
-
46
-
47
-
48
-
49
-
50
-
51
-
52
-
53
-
54
-
55
-
56
-
57
-
58
-
59
-
60
-
61
-
62
-
63
-
64
-
65
-
66
-
67
-
68
-
69
-
70
-
71
-
72
-
73
-
74
-
75
-
76
-
77
-
78
-
79
-
80
-
81
-
82
-
 83
83 -
 84
84 -
 85
85 -
 86
86 -
 87
87 -
 88
88 -
 89
89 -
 90
90 -
 91
91 -
 92
92 -
 93
93 -
94
-
95
-
96
-
97
-
98
-
99
-
100
-
101
-
102
-
103
-
104
-
105
-
106
-
107
-
108
-
109
-
110
-
111
-
112
-
113
-
114
-
115
-
116
-
117
-
118
-
119
-
120
-
121
-
122
-
123
-
124
-
125
-
126
-
127
-
128
-
129
-
130
-
131
-
132
-
133
-
134
-
135
-
136
-
137
-
138
-
139
-
140
-
141
-
142
-
143
-
144
-
145
-
146
-
147
-
148
-
149
-
150
-
151
-
152
-
153
-
154
-
155
-
156
-
157
-
158
-
159
-
160
-
161
-
162
-
163
-
164
-
165
-
166
-
167
-
168
-
169
-
170
-
171
-
172
-
173
-
174
-
175
-
176
-
177
-
178
-
179
-
180
-
181
-
182
-
183
-
184
-
185
-
186
-
187
-
188
-
189
-
190
-
191
-
192
-
193
-
194
-
195
-
196
-
197
-
198
-
199
-
200
-
201
-
202
-
203
-
204
-
205
-
206
-
207
-
208
-
209
-
210
-
211
-
212
-
213
-
214
-
215
-
216
-
217
-
218
-
219
-
220
-
221
-
222
-
223
-
224
-
225
-
226
-
227
-
228
-
229
-
230
-
231
-
232
-
233
-
234
-
235
-
236
-
237
-
238
-
239
-
240
-
241
-
242
-
243
-
244
-
245
-
246
-
247
-
248
-
249
-
250
-
251
-
252
-
253
-
254
-
255
-
256
-
257
-
258
-
259
-
260
-
261
-
262
-
263
-
264
-
265
-
266
-
267
-
268
-
269
-
270
-
271
-
272
-
273
-
274
-
275
-
276
-
277
-
278
-
279
-
280
-
281
-
282
-
283
-
284
-
285
-
286
-
287
-
288
-
289
-
290
-
291
-
292
 |
 |