Canon imageCLASS MF6595cx imageCLASS MF6500 Series Reference Guide - Page 204
If <CHANGE PAPER SIZE> is displayed, Re-loading the Paper, Changing the Paper Size Setting
 |
View all Canon imageCLASS MF6595cx manuals
Add to My Manuals
Save this manual to your list of manuals |
Page 204 highlights
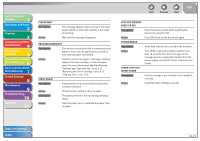
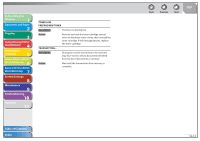
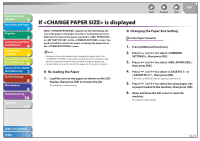
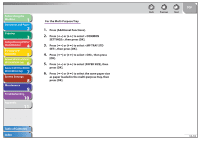
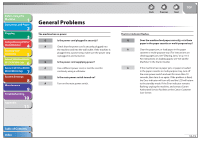
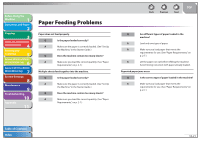
Before Using the Machine 1 Document and Paper 2 Copying 3 Sending and Receiving (MF6595cx/ MF6595/MF6590 Only) 4 Printing and Scanning 5 Network (MF6595cx/MF6595/ 6 MF6590/MF6540 Only) Remote UI (MF6595cx/MF6595/ 7 MF6590/MF6540 Only) System Settings 8 Maintenance 9 Troubleshooting 10 Appendix 11 Back Previous Next TOP If is displayed When appears on the LCD display, the size of the paper in the paper cassette or multi-purpose tray is different from that of the paper specified in or in the menu. You need to load the correct size paper or change the paper size in the menu. - For paper in the multi-purpose tray, changing the paper size in the menu does not clear the error. Cancel the copy job from the system monitor first, and then change the paper size. - For print jobs, you need to specify the paper size from your computer. ˙ Re-loading the Paper 1. Load the correct size paper as shown on the LCD display, then press [OK] to resume the job. The machine re-starts printing. ˙ Changing the Paper Size Setting For the Paper Cassette 1. Press [Additional Functions]. 2. Press [ ] or [ ] to select , then press [OK]. 3. Press [ ] or [ ] to select , then press [OK]. 4. Press [ ] or [ ] to select or * , then press [OK]. * MF6595cx or MF6595 with the optional cassette only 5. Press [ ] or [ ] to select the same paper size as paper loaded in the machine, then press [OK]. 6. Open and close the left cover to reset the machine. The machine start printing. Table of Contents Index 10-17
-
 1
1 -
2
-
3
-
4
-
5
-
6
-
7
-
8
-
9
-
10
-
11
-
12
-
13
-
14
-
15
-
16
-
17
-
18
-
19
-
20
-
21
-
22
-
23
-
24
-
25
-
26
-
27
-
28
-
29
-
30
-
31
-
32
-
33
-
34
-
35
-
36
-
37
-
38
-
39
-
40
-
41
-
42
-
43
-
44
-
45
-
46
-
47
-
48
-
49
-
50
-
51
-
52
-
53
-
54
-
55
-
56
-
57
-
58
-
59
-
60
-
61
-
62
-
63
-
64
-
65
-
66
-
67
-
68
-
69
-
70
-
71
-
72
-
73
-
74
-
75
-
76
-
77
-
78
-
79
-
80
-
81
-
82
-
83
-
84
-
85
-
86
-
87
-
88
-
89
-
90
-
91
-
92
-
93
-
94
-
95
-
96
-
97
-
98
-
99
-
100
-
101
-
102
-
103
-
104
-
105
-
106
-
107
-
108
-
109
-
110
-
111
-
112
-
113
-
114
-
115
-
116
-
117
-
118
-
119
-
120
-
121
-
122
-
123
-
124
-
125
-
126
-
127
-
128
-
129
-
130
-
131
-
132
-
133
-
134
-
135
-
136
-
137
-
138
-
139
-
140
-
141
-
142
-
143
-
144
-
145
-
146
-
147
-
148
-
149
-
150
-
151
-
152
-
153
-
154
-
155
-
156
-
157
-
158
-
159
-
160
-
161
-
162
-
163
-
164
-
165
-
166
-
167
-
168
-
169
-
170
-
171
-
172
-
173
-
174
-
175
-
176
-
177
-
178
-
179
-
180
-
181
-
182
-
183
-
184
-
185
-
186
-
187
-
188
-
189
-
190
-
191
-
192
-
193
-
194
-
195
-
196
-
197
-
198
-
 199
199 -
 200
200 -
 201
201 -
 202
202 -
 203
203 -
 204
204 -
 205
205 -
 206
206 -
 207
207 -
 208
208 -
 209
209 -
210
-
211
-
212
-
213
-
214
-
215
-
216
-
217
-
218
-
219
-
220
-
221
-
222
-
223
-
224
-
225
-
226
-
227
-
228
-
229
-
230
-
231
-
232
-
233
-
234
-
235
-
236
-
237
-
238
-
239
-
240
-
241
-
242
-
243
-
244
-
245
-
246
-
247
-
248
-
249
-
250
-
251
-
252
-
253
-
254
-
255
-
256
-
257
-
258
-
259
-
260
-
261
-
262
-
263
-
264
-
265
-
266
-
267
-
268
-
269
-
270
-
271
-
272
-
273
-
274
-
275
-
276
-
277
-
278
-
279
-
280
-
281
-
282
-
283
-
284
-
285
-
286
-
287
-
288
-
289
-
290
-
291
-
292
 |
 |
