Dell PowerEdge XE2420 EMC Installation and Service Manual - Page 111
Removing the GPU riser 2, Table 47. Riser configuration 3A continued
 |
View all Dell PowerEdge XE2420 manuals
Add to My Manuals
Save this manual to your list of manuals |
Page 111 highlights
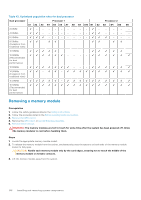
Table 47. Riser configuration 3A (continued) Card type Slot priority Broadcom (25 G PCIe LP) 6 Intel 25 G (SFP) 3, 5, 4, 2 Intel 25 G (SFP LP) 6 Mellanox 100 G (CX6 H100) 3, 5 Internal storage (BOSS) 7 Nvidia GPU DW 3, 5 Nvidia T4 GPU SW 3, 5, 4, 2 OCP (2x10 G)/(2x25 G) 1 Maximum number of cards 1 4 1 2 1 2 4 1 Removing the GPU riser 2 Prerequisites 1. Follow the safety guidelines listed in the Safety instructions. 2. Follow the procedure listed in the Before working inside your system. Steps 1. Disconnect the cables connecting to PIB. 2. Loosen the one blue thumbscrew at the front of the assembly, and two blue thumbscrews at the rear of the assembly. 3. Hold the touch points, and lift the expansion card riser from the riser connector on the system board. Figure 82. GPU riser 2 removal Next steps Replace the primary backplane assembly. Installing the GPU riser 2 Prerequisites 1. Follow the safety guidelines listed in the Safety instructions. 2. Follow the procedure listed in the Before working inside your system. Installing and removing system components 111
-
 1
1 -
2
-
3
-
4
-
5
-
6
-
7
-
8
-
9
-
10
-
11
-
12
-
13
-
14
-
15
-
16
-
17
-
18
-
19
-
20
-
21
-
22
-
23
-
24
-
25
-
26
-
27
-
28
-
29
-
30
-
31
-
32
-
33
-
34
-
35
-
36
-
37
-
38
-
39
-
40
-
41
-
42
-
43
-
44
-
45
-
46
-
47
-
48
-
49
-
50
-
51
-
52
-
53
-
54
-
55
-
56
-
57
-
58
-
59
-
60
-
61
-
62
-
63
-
64
-
65
-
66
-
67
-
68
-
69
-
70
-
71
-
72
-
73
-
74
-
75
-
76
-
77
-
78
-
79
-
80
-
81
-
82
-
83
-
84
-
85
-
86
-
87
-
88
-
89
-
90
-
91
-
92
-
93
-
94
-
95
-
96
-
97
-
98
-
99
-
100
-
101
-
102
-
103
-
104
-
105
-
 106
106 -
 107
107 -
 108
108 -
 109
109 -
 110
110 -
 111
111 -
 112
112 -
 113
113 -
 114
114 -
 115
115 -
 116
116 -
117
-
118
-
119
-
120
-
121
-
122
-
123
-
124
-
125
-
126
-
127
-
128
-
129
-
130
-
131
-
132
-
133
-
134
-
135
-
136
-
137
-
138
-
139
-
140
-
141
-
142
-
143
-
144
-
145
-
146
-
147
-
148
-
149
-
150
-
151
-
152
-
153
-
154
-
155
-
156
-
157
-
158
-
159
-
160
-
161
-
162
-
163
-
164
-
165
-
166
-
167
-
168
-
169
-
170
-
171
-
172
-
173
-
174
-
175
-
176
-
177
 |
 |
