HP Z200 HP Z200 SFF Workstation Maintenance and Service Guide - Page 156
Downloading and accessing HP Vision Diagnostics, Support & Drivers, Download driver and software
 |
View all HP Z200 manuals
Add to My Manuals
Save this manual to your list of manuals |
Page 156 highlights
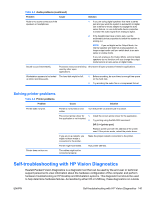
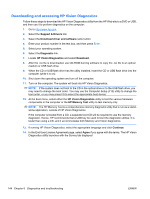
Downloading and accessing HP Vision Diagnostics Follow these steps to download the HP Vision Diagnostics utility from the HP Web site to a DVD or USB, and then use it to perform diagnostics on the computer: 1. Go to http://www.hp.com. 2. Select the Support & Drivers link. 3. Select the Download driver and software radio button. 4. Enter your product number in the text box, and then press Enter. 5. Select your operating system. 6. Select the Diagnostic link. 7. Locate HP Vision Diagnostics and select Download. 8. After the .iso file is downloaded, use CD-ROM burning software to copy the .iso file to an optical medium or USB flash drive. 9. When the CD or USB flash drive has the utility installed, insert the CD or USB flash drive into the computer (while it is on). 10. Shut down the operating system and turn off the computer. 11. Turn on the computer. The system will boot into HP Vision Diagnostics. NOTE: If the system does not boot to the CD in the optical drive or to the USB flash drive, you may need to change the boot order. You may use the Computer Setup (F10) utility to change the boot order, or you may press F9 to select the appropriate boot device. 12. At the boot menu, select either the HP Vision Diagnostics utility to test the various hardware components in the computer or the HP Memory Test utility to test memory only. NOTE: The HP Memory Test is a comprehensive memory diagnostic utility that is run as a standalone application, outside of HP Vision Diagnostics. If the computer is booted from a CD, a separate boot CD will be required to use the memory diagnostic. Hence, HP recommends that a USB key be used to boot the diagnostic utilities. It is faster than using a CD, and it accommodates both Memory and Vision diagnostics. 13. If running HP Vision Diagnostics, select the appropriate language and click Continue. 14. In the End User License Agreement page, select Agree if you agree with the terms. The HP Vision Diagnostics utility launches with the Survey tab displayed 144 Chapter 6 Diagnostics and troubleshooting ENWW
-
 1
1 -
2
-
3
-
4
-
5
-
6
-
7
-
8
-
9
-
10
-
11
-
12
-
13
-
14
-
15
-
16
-
17
-
18
-
19
-
20
-
21
-
22
-
23
-
24
-
25
-
26
-
27
-
28
-
29
-
30
-
31
-
32
-
33
-
34
-
35
-
36
-
37
-
38
-
39
-
40
-
41
-
42
-
43
-
44
-
45
-
46
-
47
-
48
-
49
-
50
-
51
-
52
-
53
-
54
-
55
-
56
-
57
-
58
-
59
-
60
-
61
-
62
-
63
-
64
-
65
-
66
-
67
-
68
-
69
-
70
-
71
-
72
-
73
-
74
-
75
-
76
-
77
-
78
-
79
-
80
-
81
-
82
-
83
-
84
-
85
-
86
-
87
-
88
-
89
-
90
-
91
-
92
-
93
-
94
-
95
-
96
-
97
-
98
-
99
-
100
-
101
-
102
-
103
-
104
-
105
-
106
-
107
-
108
-
109
-
110
-
111
-
112
-
113
-
114
-
115
-
116
-
117
-
118
-
119
-
120
-
121
-
122
-
123
-
124
-
125
-
126
-
127
-
128
-
129
-
130
-
131
-
132
-
133
-
134
-
135
-
136
-
137
-
138
-
139
-
140
-
141
-
142
-
143
-
144
-
145
-
146
-
147
-
148
-
149
-
150
-
 151
151 -
 152
152 -
 153
153 -
 154
154 -
 155
155 -
 156
156 -
 157
157 -
 158
158 -
 159
159 -
 160
160 -
 161
161 -
162
-
163
-
164
-
165
-
166
-
167
-
168
-
169
-
170
-
171
-
172
-
173
-
174
-
175
-
176
-
177
-
178
-
179
-
180
-
181
-
182
-
183
-
184
-
185
-
186
-
187
-
188
-
189
-
190
-
191
-
192
-
193
-
194
-
195
-
196
-
197
-
198
-
199
 |
 |