HP Z200 HP Z200 SFF Workstation Maintenance and Service Guide - Page 89
Predisassembly for drives, Follow all general predisassembly procedures, Perform a data backup - restore plus
 |
View all HP Z200 manuals
Add to My Manuals
Save this manual to your list of manuals |
Page 89 highlights
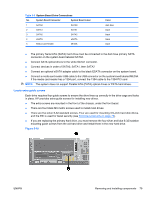
NOTE: For information about configuring SATA RAID devices, see Configuring RAID devices on page 162. Predisassembly for drives Take these actions before you begin installing or removing a drive: Follow all general predisassembly procedures Prepare the computer for servicing by following the Predisassembly procedures on page 68. CAUTION: Failure to follow the predisassembly procedures can result in equipment damage or data loss. Perform a data backup CAUTION: Before removing a hard drive, make sure you back up all information on the drive up to an external storage device before. Failure to do so can result in data loss. After replacing the primary hard drive, you must run the Restore Plus! CD to load the HP factory-installed files. Gather required tools You will need a Torx T-15 screwdriver to remove and install the guide screws on a drive. Verify drive position and information To verify the type, size, and capacity of the storage devices installed in the computer, run the Computer Setup (F10) Utility. The following figure illustrates the physical position of the drives. Table 5-4 Drive positions 1 3.5-inch internal hard drive bay 2 3.5-inch internal/external drive bay for optional drives (media card reader shown) 3 5.25-inch external drive bay for optional drives (optical drive shown) NOTE: The drive configuration on your computer may differ from the drives shown above. NOTE: You can install a maximum of two hard disk drives in the Z200 SFF. NOTE: For additional information about configuring SATA RAID devices, see Configuring RAID deviceson page 162. ENWW Removing and installing components 77
-
 1
1 -
2
-
3
-
4
-
5
-
6
-
7
-
8
-
9
-
10
-
11
-
12
-
13
-
14
-
15
-
16
-
17
-
18
-
19
-
20
-
21
-
22
-
23
-
24
-
25
-
26
-
27
-
28
-
29
-
30
-
31
-
32
-
33
-
34
-
35
-
36
-
37
-
38
-
39
-
40
-
41
-
42
-
43
-
44
-
45
-
46
-
47
-
48
-
49
-
50
-
51
-
52
-
53
-
54
-
55
-
56
-
57
-
58
-
59
-
60
-
61
-
62
-
63
-
64
-
65
-
66
-
67
-
68
-
69
-
70
-
71
-
72
-
73
-
74
-
75
-
76
-
77
-
78
-
79
-
80
-
81
-
82
-
83
-
 84
84 -
 85
85 -
 86
86 -
 87
87 -
 88
88 -
 89
89 -
 90
90 -
 91
91 -
 92
92 -
 93
93 -
 94
94 -
95
-
96
-
97
-
98
-
99
-
100
-
101
-
102
-
103
-
104
-
105
-
106
-
107
-
108
-
109
-
110
-
111
-
112
-
113
-
114
-
115
-
116
-
117
-
118
-
119
-
120
-
121
-
122
-
123
-
124
-
125
-
126
-
127
-
128
-
129
-
130
-
131
-
132
-
133
-
134
-
135
-
136
-
137
-
138
-
139
-
140
-
141
-
142
-
143
-
144
-
145
-
146
-
147
-
148
-
149
-
150
-
151
-
152
-
153
-
154
-
155
-
156
-
157
-
158
-
159
-
160
-
161
-
162
-
163
-
164
-
165
-
166
-
167
-
168
-
169
-
170
-
171
-
172
-
173
-
174
-
175
-
176
-
177
-
178
-
179
-
180
-
181
-
182
-
183
-
184
-
185
-
186
-
187
-
188
-
189
-
190
-
191
-
192
-
193
-
194
-
195
-
196
-
197
-
198
-
199
 |
 |
