Netgear FS752TPS FS752TS Setup Manual - Page 109
Multicast Group Configuration, Auto Learn
 |
View all Netgear FS752TPS manuals
Add to My Manuals
Save this manual to your list of manuals |
Page 109 highlights
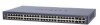
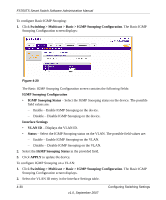
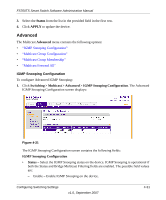
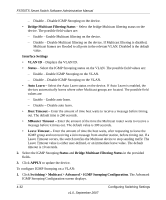
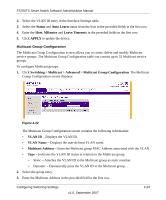
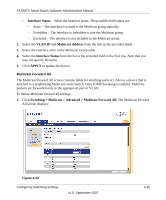
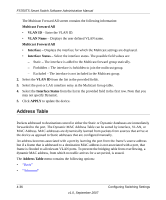
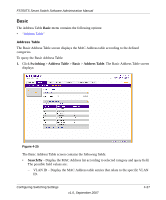
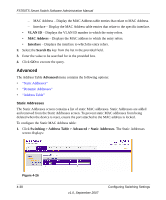
FS700TS Smart Switch Software Administration Manual 2. Select the VLAN ID entry in the Interface Settings table. 3. Select the Status and Auto Learn status from the lists in the provided fields in the first row. 4. Enter the Host, MRouter and Leave Timeouts in the provided fields in the first row. 5. Click APPLY to update the device. Multicast Group Configuration The Multicast Group Configuration screen allows you to create, delete and modify Multicast service groups. The Multicast Group Configuration table can contain up to 32 Multicast service groups. To configure Multicast groups: 1. Click Switching > Multicast > Advanced > Multicast Group Configuration. The Multicast Group Configuration screen displays: Figure 4-22 The Multicast Group Configuration screen contains the following information: • VLAN ID - Displays the VLAN ID. • VLAN Name - Displays the user-defined VLAN name. • Multicast Address - Enter the Multicast group MAC Address associated with the VLAN. • Type - Indicates the VLAN ID status in relation to the Multicast group. - Static - Attaches the VLAN ID to the Multicast group as static member. - Dynamic - Dynamically joins the VLAN ID to the Multicast group. 2. Select the group entry. 3. Enter the Multicast Address in the provided field in the first row. Configuring Switching Settings v1.0, September 2007 4-33
-
 1
1 -
2
-
3
-
4
-
5
-
6
-
7
-
8
-
9
-
10
-
11
-
12
-
13
-
14
-
15
-
16
-
17
-
18
-
19
-
20
-
21
-
22
-
23
-
24
-
25
-
26
-
27
-
28
-
29
-
30
-
31
-
32
-
33
-
34
-
35
-
36
-
37
-
38
-
39
-
40
-
41
-
42
-
43
-
44
-
45
-
46
-
47
-
48
-
49
-
50
-
51
-
52
-
53
-
54
-
55
-
56
-
57
-
58
-
59
-
60
-
61
-
62
-
63
-
64
-
65
-
66
-
67
-
68
-
69
-
70
-
71
-
72
-
73
-
74
-
75
-
76
-
77
-
78
-
79
-
80
-
81
-
82
-
83
-
84
-
85
-
86
-
87
-
88
-
89
-
90
-
91
-
92
-
93
-
94
-
95
-
96
-
97
-
98
-
99
-
100
-
101
-
102
-
103
-
 104
104 -
 105
105 -
 106
106 -
 107
107 -
 108
108 -
 109
109 -
 110
110 -
 111
111 -
 112
112 -
 113
113 -
 114
114 -
115
-
116
-
117
-
118
-
119
-
120
-
121
-
122
-
123
-
124
-
125
-
126
-
127
-
128
-
129
-
130
-
131
-
132
-
133
-
134
-
135
-
136
-
137
-
138
-
139
-
140
-
141
-
142
-
143
-
144
-
145
-
146
-
147
-
148
-
149
-
150
-
151
-
152
-
153
-
154
-
155
-
156
-
157
-
158
-
159
-
160
-
161
-
162
-
163
-
164
-
165
-
166
-
167
-
168
-
169
-
170
-
171
-
172
-
173
-
174
-
175
-
176
-
177
-
178
-
179
-
180
-
181
-
182
-
183
-
184
-
185
-
186
-
187
-
188
-
189
-
190
 |
 |