Netgear FS752TPS FS752TS Setup Manual - Page 15
Network with a DHCP Server, Introduction to the Web Browser Interface - firmware upgrade
 |
View all Netgear FS752TPS manuals
Add to My Manuals
Save this manual to your list of manuals |
Page 15 highlights
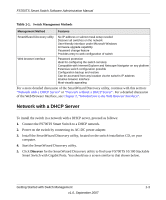
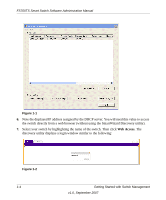
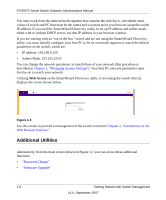
FS700TS Smart Switch Software Administration Manual Table 1-1. Switch Management Methods Management Method Features SmartWizard Discovery utility Web browser interface No IP address or subnet mask setup needed Discover all switches on the network User-friendly interface under Microsoft Windows Firmware upgrade capability Password change feature Provides entry to web configuration of switch Password protection Ideal for configuring the switch remotely Compatible with Internet Explorer and Netscape Navigator on any platform Extensive switch configuration possible Configuration backup and restore Can be accessed from any location via the switch's IP address Intuitive browser interface Most visually appealing For a more detailed discussion of the SmartWizard Discovery utility, continue with this section: "Network with a DHCP Server" or "Network without a DHCP Server". For a detailed discussion of the Web Browser Interface, see Chapter 2, "Introduction to the Web Browser Interface". Network with a DHCP Server To install the switch in a network with a DHCP server, proceed as follows: 1. Connect the FS700TS Smart Switch to a DHCP network. 2. Power on the switch by connecting its AC-DC power adapter. 3. Install the SmartWizard Discovery utility, located on the switch installation CD, on your computer. 4. Start the SmartWizard Discovery utility. 5. Click Discover for the SmartWizard Discovery utility to find your FS700TS 10/100 Stackable Smart Switch with Gigabit Ports. You should see a screen similar to that shown below. Getting Started with Switch Management 1-3 v1.0, September 2007
-
 1
1 -
2
-
3
-
4
-
5
-
6
-
7
-
8
-
9
-
 10
10 -
 11
11 -
 12
12 -
 13
13 -
 14
14 -
 15
15 -
 16
16 -
 17
17 -
 18
18 -
 19
19 -
 20
20 -
21
-
22
-
23
-
24
-
25
-
26
-
27
-
28
-
29
-
30
-
31
-
32
-
33
-
34
-
35
-
36
-
37
-
38
-
39
-
40
-
41
-
42
-
43
-
44
-
45
-
46
-
47
-
48
-
49
-
50
-
51
-
52
-
53
-
54
-
55
-
56
-
57
-
58
-
59
-
60
-
61
-
62
-
63
-
64
-
65
-
66
-
67
-
68
-
69
-
70
-
71
-
72
-
73
-
74
-
75
-
76
-
77
-
78
-
79
-
80
-
81
-
82
-
83
-
84
-
85
-
86
-
87
-
88
-
89
-
90
-
91
-
92
-
93
-
94
-
95
-
96
-
97
-
98
-
99
-
100
-
101
-
102
-
103
-
104
-
105
-
106
-
107
-
108
-
109
-
110
-
111
-
112
-
113
-
114
-
115
-
116
-
117
-
118
-
119
-
120
-
121
-
122
-
123
-
124
-
125
-
126
-
127
-
128
-
129
-
130
-
131
-
132
-
133
-
134
-
135
-
136
-
137
-
138
-
139
-
140
-
141
-
142
-
143
-
144
-
145
-
146
-
147
-
148
-
149
-
150
-
151
-
152
-
153
-
154
-
155
-
156
-
157
-
158
-
159
-
160
-
161
-
162
-
163
-
164
-
165
-
166
-
167
-
168
-
169
-
170
-
171
-
172
-
173
-
174
-
175
-
176
-
177
-
178
-
179
-
180
-
181
-
182
-
183
-
184
-
185
-
186
-
187
-
188
-
189
-
190
 |
 |