Netgear FS752TPS FS752TS Setup Manual - Page 20
Additional Utilities, Managing System Settings, Introduction to - password
 |
View all Netgear FS752TPS manuals
Add to My Manuals
Save this manual to your list of manuals |
Page 20 highlights
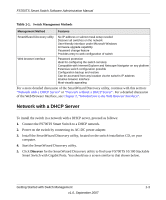
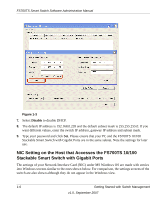
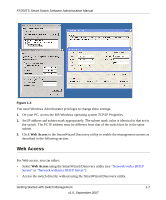
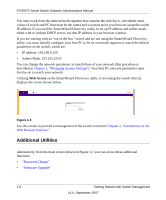
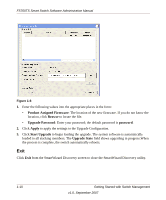
FS700TS Smart Switch Software Administration Manual You must work from the same network segment that contains the switch (i.e., the subnet mask values of switch and PC host must be the same) and you must point your browser using the switch IP address. If you used the SmartWizard Discovery utility to set up IP address and subnet mask, either with or without DHCP server, use that IP address in your browser window. If you are starting with an "out of the box" switch and are not using the SmartWizard Discovery utility, you must initially configure your host PC to be on a network segment to match the default parameters of the switch, which are: • IP address: 192.168.0.239 • Subnet Mask: 255.255.255.0 You can change the network parameters to match those of your network (this procedure is described in Chapter 3, "Managing System Settings"). Your host PC network parameters must then be set to match your network. Clicking Web Access on the SmartWizard Discovery utility or accessing the switch directly displays the screen shown below. . Figure 1-5 Use this screen to proceed to management of the switch covered in Chapter 2, "Introduction to the Web Browser Interface". Additional Utilities Alternatively, from the main screen shown on Figure 1-1 you can access these additional functions: • "Password Change" • "Firmware Upgrade" 1-8 Getting Started with Switch Management v1.0, September 2007
-
 1
1 -
2
-
3
-
4
-
5
-
6
-
7
-
8
-
9
-
10
-
11
-
12
-
13
-
14
-
 15
15 -
 16
16 -
 17
17 -
 18
18 -
 19
19 -
 20
20 -
 21
21 -
 22
22 -
 23
23 -
 24
24 -
 25
25 -
26
-
27
-
28
-
29
-
30
-
31
-
32
-
33
-
34
-
35
-
36
-
37
-
38
-
39
-
40
-
41
-
42
-
43
-
44
-
45
-
46
-
47
-
48
-
49
-
50
-
51
-
52
-
53
-
54
-
55
-
56
-
57
-
58
-
59
-
60
-
61
-
62
-
63
-
64
-
65
-
66
-
67
-
68
-
69
-
70
-
71
-
72
-
73
-
74
-
75
-
76
-
77
-
78
-
79
-
80
-
81
-
82
-
83
-
84
-
85
-
86
-
87
-
88
-
89
-
90
-
91
-
92
-
93
-
94
-
95
-
96
-
97
-
98
-
99
-
100
-
101
-
102
-
103
-
104
-
105
-
106
-
107
-
108
-
109
-
110
-
111
-
112
-
113
-
114
-
115
-
116
-
117
-
118
-
119
-
120
-
121
-
122
-
123
-
124
-
125
-
126
-
127
-
128
-
129
-
130
-
131
-
132
-
133
-
134
-
135
-
136
-
137
-
138
-
139
-
140
-
141
-
142
-
143
-
144
-
145
-
146
-
147
-
148
-
149
-
150
-
151
-
152
-
153
-
154
-
155
-
156
-
157
-
158
-
159
-
160
-
161
-
162
-
163
-
164
-
165
-
166
-
167
-
168
-
169
-
170
-
171
-
172
-
173
-
174
-
175
-
176
-
177
-
178
-
179
-
180
-
181
-
182
-
183
-
184
-
185
-
186
-
187
-
188
-
189
-
190
 |
 |