Symantec 11281411 Administration Guide - Page 117
Advanced, Handle missed events, within, Scan Settings, Options
 |
UPC - 037648327237
View all Symantec 11281411 manuals
Add to My Manuals
Save this manual to your list of manuals |
Page 117 highlights
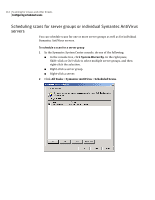
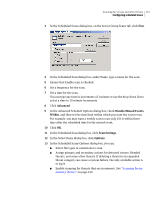
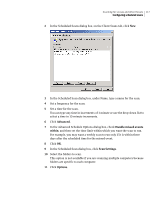
Scanning for viruses and other threats 117 Configuring scheduled scans 2 In the Scheduled Scans dialog box, on the Client Scans tab, click New. 3 In the Scheduled Scan dialog box, under Name, type a name for the scan. 4 Set a frequency for the scan. 5 Set a time for the scan. You can type any time in increments of 1 minute or use the drop-down list to select a time in 15-minute increments. 6 Click Advanced. 7 In the Advanced Schedule Options dialog box, check Handle missed events within, and then set the time limit within which you want the scan to run. For example, you may want a weekly scan to run only if it is within three days after the scheduled time for the missed event. 8 Click OK. 9 In the Scheduled Scan dialog box, click Scan Settings. 10 Select the folders to scan. This option is not available if you are scanning multiple computers because folders are specific to each computer. 11 Click Options.
-
 1
1 -
2
-
3
-
4
-
5
-
6
-
7
-
8
-
9
-
10
-
11
-
12
-
13
-
14
-
15
-
16
-
17
-
18
-
19
-
20
-
21
-
22
-
23
-
24
-
25
-
26
-
27
-
28
-
29
-
30
-
31
-
32
-
33
-
34
-
35
-
36
-
37
-
38
-
39
-
40
-
41
-
42
-
43
-
44
-
45
-
46
-
47
-
48
-
49
-
50
-
51
-
52
-
53
-
54
-
55
-
56
-
57
-
58
-
59
-
60
-
61
-
62
-
63
-
64
-
65
-
66
-
67
-
68
-
69
-
70
-
71
-
72
-
73
-
74
-
75
-
76
-
77
-
78
-
79
-
80
-
81
-
82
-
83
-
84
-
85
-
86
-
87
-
88
-
89
-
90
-
91
-
92
-
93
-
94
-
95
-
96
-
97
-
98
-
99
-
100
-
101
-
102
-
103
-
104
-
105
-
106
-
107
-
108
-
109
-
110
-
111
-
 112
112 -
 113
113 -
 114
114 -
 115
115 -
 116
116 -
 117
117 -
 118
118 -
 119
119 -
 120
120 -
 121
121 -
 122
122 -
123
-
124
-
125
-
126
-
127
-
128
-
129
-
130
-
131
-
132
-
133
-
134
-
135
-
136
-
137
-
138
-
139
-
140
-
141
-
142
-
143
-
144
-
145
-
146
-
147
-
148
-
149
-
150
-
151
-
152
-
153
-
154
-
155
-
156
-
157
-
158
-
159
-
160
-
161
-
162
-
163
-
164
-
165
-
166
-
167
-
168
-
169
-
170
-
171
-
172
-
173
-
174
-
175
-
176
-
177
-
178
-
179
-
180
-
181
-
182
-
183
-
184
-
185
-
186
-
187
-
188
-
189
-
190
-
191
-
192
-
193
-
194
-
195
-
196
-
197
-
198
-
199
-
200
-
201
-
202
-
203
-
204
-
205
-
206
-
207
-
208
-
209
-
210
-
211
-
212
-
213
-
214
-
215
-
216
 |
 |
