Symantec 11281411 Administration Guide - Page 98
About Scan all file types and SmartScan, Configuring Advanced Auto-Protect options
 |
UPC - 037648327237
View all Symantec 11281411 manuals
Add to My Manuals
Save this manual to your list of manuals |
Page 98 highlights
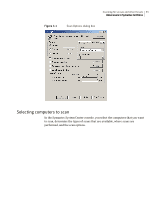
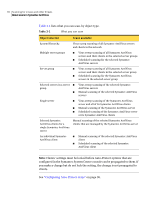
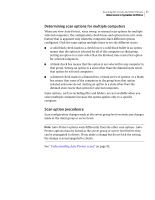
98 Scanning for viruses and other threats Configuring Auto-Protect scans 6 Configure the warning message to display on infected computers. See "Displaying and customizing a warning message on an infected computer" on page 128. 7 Exclude files or folders from Auto-Protect scans, if necessary. See "Selecting file types and extensions to scan for viruses" on page 134. 8 Under Drive types, select drive types to scan. See "Configuring Auto-Protect for files" on page 96. 9 Set advanced file options. See "Configuring Advanced Auto-Protect options" on page 98. 10 Lock any client Auto-Protect options that you want to propagate to clients. See "How to lock and unlock Auto-Protect options" on page 110. 11 If you are configuring Auto-Protect options for a server group, click Reset All to ensure that all of the computers are using the Auto-Protect scanning configuration that you set at this level. See "Configuring Auto-Protect settings" on page 109. 12 Click OK. About Scan all file types and SmartScan You can configure Symantec AntiVirus to scan all file types or to use SmartScan. SmartScan scans a specific, configurable group of file extensions that contain executable code and all .exe and .doc files. SmartScan reads each file's header to determine its file type. It scans .exe and .doc files even if the file extensions for the .exe and .doc files are changed by a virus to extensions that are different from the file extensions that SmartScan has been configured to scan. SmartScan is enabled by default. Configuring Advanced Auto-Protect options When you configure Advanced Auto-Protect options, you can define the following: ■ When to start Auto-Protect ■ When to reload Auto-Protect when a reload is necessary ■ When to scan files with Auto-Protect ■ How many entries to cache in an index of clean files ■ How long to wait before enabling Auto-Protect when it is disabled ■ Whether Auto-Protect backs up files before it attempts to repair them
-
 1
1 -
2
-
3
-
4
-
5
-
6
-
7
-
8
-
9
-
10
-
11
-
12
-
13
-
14
-
15
-
16
-
17
-
18
-
19
-
20
-
21
-
22
-
23
-
24
-
25
-
26
-
27
-
28
-
29
-
30
-
31
-
32
-
33
-
34
-
35
-
36
-
37
-
38
-
39
-
40
-
41
-
42
-
43
-
44
-
45
-
46
-
47
-
48
-
49
-
50
-
51
-
52
-
53
-
54
-
55
-
56
-
57
-
58
-
59
-
60
-
61
-
62
-
63
-
64
-
65
-
66
-
67
-
68
-
69
-
70
-
71
-
72
-
73
-
74
-
75
-
76
-
77
-
78
-
79
-
80
-
81
-
82
-
83
-
84
-
85
-
86
-
87
-
88
-
89
-
90
-
91
-
92
-
 93
93 -
 94
94 -
 95
95 -
 96
96 -
 97
97 -
 98
98 -
 99
99 -
 100
100 -
 101
101 -
 102
102 -
 103
103 -
104
-
105
-
106
-
107
-
108
-
109
-
110
-
111
-
112
-
113
-
114
-
115
-
116
-
117
-
118
-
119
-
120
-
121
-
122
-
123
-
124
-
125
-
126
-
127
-
128
-
129
-
130
-
131
-
132
-
133
-
134
-
135
-
136
-
137
-
138
-
139
-
140
-
141
-
142
-
143
-
144
-
145
-
146
-
147
-
148
-
149
-
150
-
151
-
152
-
153
-
154
-
155
-
156
-
157
-
158
-
159
-
160
-
161
-
162
-
163
-
164
-
165
-
166
-
167
-
168
-
169
-
170
-
171
-
172
-
173
-
174
-
175
-
176
-
177
-
178
-
179
-
180
-
181
-
182
-
183
-
184
-
185
-
186
-
187
-
188
-
189
-
190
-
191
-
192
-
193
-
194
-
195
-
196
-
197
-
198
-
199
-
200
-
201
-
202
-
203
-
204
-
205
-
206
-
207
-
208
-
209
-
210
-
211
-
212
-
213
-
214
-
215
-
216
 |
 |
