Symantec 11281411 Administration Guide - Page 96
Configuring Auto-Protect scans
 |
UPC - 037648327237
View all Symantec 11281411 manuals
Add to My Manuals
Save this manual to your list of manuals |
Page 96 highlights
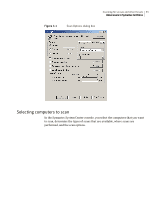
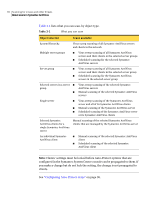
96 Scanning for viruses and other threats Configuring Auto-Protect scans Configuring Auto-Protect scans Configuring Auto-Protect scans consists of the following tasks: ■ Configuring Auto-Protect for files ■ Configuring Auto-Protect email scanning ■ Specifying exclusions ■ Configuring Auto-Protect settings ■ Locking and unlocking Auto-Protect options Configuring Auto-Protect for files When you configure Auto-Protect for files, you select a server group or server, configure scan settings, and configure other settings that define how AutoProtect and its associated features behave. When you configure Auto-Protect options for files, specify which of the following drive types that you want Symantec AntiVirus to scan: ■ Floppy drive: Symantec AntiVirus can scan files as they are read from or written to floppy disks. Floppy disks are common sources of virus infections because users may bring infected disks from home. ■ Network drive: If you enable Auto-Protect on network drives, Symantec AntiVirus can scan files as they're written from a client computer to a server (or from a server to another server). This option is not necessary if you enable Auto-Protect on your servers. For example, if you enable scanning of network drives on client A and also have Auto-Protect enabled on server B, when client A writes a file to a network drive on server B, Symantec AntiVirus scans the file on client A and scans the file again on server B. This could reduce network performance on the client computer. To configure Auto-Protect for files 1 In the Symantec System Center console, do one of the following: ■ Right-click the server group or Symantec AntiVirus servers that you want to configure, and then click All Tasks > Symantec AntiVirus > Server Auto-Protect Options. If you select a server group, the Symantec System Center will configure all of the servers that are in the server group. ■ Right-click an individual server or multiple selected servers, and then click All Tasks > Symantec AntiVirus > Client Auto-Protect Options.
-
 1
1 -
2
-
3
-
4
-
5
-
6
-
7
-
8
-
9
-
10
-
11
-
12
-
13
-
14
-
15
-
16
-
17
-
18
-
19
-
20
-
21
-
22
-
23
-
24
-
25
-
26
-
27
-
28
-
29
-
30
-
31
-
32
-
33
-
34
-
35
-
36
-
37
-
38
-
39
-
40
-
41
-
42
-
43
-
44
-
45
-
46
-
47
-
48
-
49
-
50
-
51
-
52
-
53
-
54
-
55
-
56
-
57
-
58
-
59
-
60
-
61
-
62
-
63
-
64
-
65
-
66
-
67
-
68
-
69
-
70
-
71
-
72
-
73
-
74
-
75
-
76
-
77
-
78
-
79
-
80
-
81
-
82
-
83
-
84
-
85
-
86
-
87
-
88
-
89
-
90
-
 91
91 -
 92
92 -
 93
93 -
 94
94 -
 95
95 -
 96
96 -
 97
97 -
 98
98 -
 99
99 -
 100
100 -
 101
101 -
102
-
103
-
104
-
105
-
106
-
107
-
108
-
109
-
110
-
111
-
112
-
113
-
114
-
115
-
116
-
117
-
118
-
119
-
120
-
121
-
122
-
123
-
124
-
125
-
126
-
127
-
128
-
129
-
130
-
131
-
132
-
133
-
134
-
135
-
136
-
137
-
138
-
139
-
140
-
141
-
142
-
143
-
144
-
145
-
146
-
147
-
148
-
149
-
150
-
151
-
152
-
153
-
154
-
155
-
156
-
157
-
158
-
159
-
160
-
161
-
162
-
163
-
164
-
165
-
166
-
167
-
168
-
169
-
170
-
171
-
172
-
173
-
174
-
175
-
176
-
177
-
178
-
179
-
180
-
181
-
182
-
183
-
184
-
185
-
186
-
187
-
188
-
189
-
190
-
191
-
192
-
193
-
194
-
195
-
196
-
197
-
198
-
199
-
200
-
201
-
202
-
203
-
204
-
205
-
206
-
207
-
208
-
209
-
210
-
211
-
212
-
213
-
214
-
215
-
216
 |
 |
