Symantec 11281411 Administration Guide - Page 163
Configuring managed clients to use an internal LiveUpdate server, Options, All Tasks
 |
UPC - 037648327237
View all Symantec 11281411 manuals
Add to My Manuals
Save this manual to your list of manuals |
Page 163 highlights
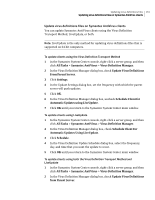
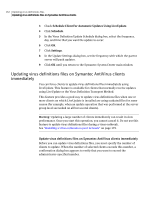
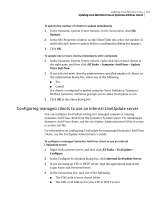
Updating virus definitions files 163 Updating virus definitions files on Symantec AntiVirus clients To specify the number of clients to update immediately 1 In the Symantec System Center console, on the Tools menu, click SSC Options. 2 In the SSC Properties window, on the Client Filter tab, select the number of multi-selected clients to update before a confirmation dialog box appears. 3 Click OK. To update one or more clients immediately with LiveUpdate 1 In the Symantec System Center console, right-click one or more clients in the right pane, and then click All Tasks > Symantec AntiVirus > Update Virus Defs Now. 2 If you selected more than the administrator-specified number of clients, in the confirmation dialog box, select one of the following: ■ Yes ■ Cancel If a client is configured to update using the Virus Definition Transport Method, Symantec AntiVirus prompts you to allow LiveUpdate to run. 3 Click OK in the status dialog box. Configuring managed clients to use an internal LiveUpdate server You can configure LiveUpdate settings for managed computers running Symantec AntiVirus client from the Symantec System Center. For unmanaged Symantec AntiVirus clients, use the LiveUpdate Administration Utility to create a custom .hst file. For information on configuring LiveUpdate for unmanaged Symantec AntiVirus clients, see the LiveUpdate Administrator's Guide. To configure a managed Symantec AntiVirus client to use an internal LiveUpdate server 1 Right-click a parent server, and then click All Tasks > LiveUpdate > Configure. 2 In the Configure LiveUpdate dialog box, click Internal LiveUpdate Server. 3 If you are using an FTP or HTTP server, type the appropriate data in the Login Name and Password boxes. 4 In the Connection box, type one of the following: ■ The UNC path to your shared folder ■ The URL or IP address for your FTP or HTTP server
-
 1
1 -
2
-
3
-
4
-
5
-
6
-
7
-
8
-
9
-
10
-
11
-
12
-
13
-
14
-
15
-
16
-
17
-
18
-
19
-
20
-
21
-
22
-
23
-
24
-
25
-
26
-
27
-
28
-
29
-
30
-
31
-
32
-
33
-
34
-
35
-
36
-
37
-
38
-
39
-
40
-
41
-
42
-
43
-
44
-
45
-
46
-
47
-
48
-
49
-
50
-
51
-
52
-
53
-
54
-
55
-
56
-
57
-
58
-
59
-
60
-
61
-
62
-
63
-
64
-
65
-
66
-
67
-
68
-
69
-
70
-
71
-
72
-
73
-
74
-
75
-
76
-
77
-
78
-
79
-
80
-
81
-
82
-
83
-
84
-
85
-
86
-
87
-
88
-
89
-
90
-
91
-
92
-
93
-
94
-
95
-
96
-
97
-
98
-
99
-
100
-
101
-
102
-
103
-
104
-
105
-
106
-
107
-
108
-
109
-
110
-
111
-
112
-
113
-
114
-
115
-
116
-
117
-
118
-
119
-
120
-
121
-
122
-
123
-
124
-
125
-
126
-
127
-
128
-
129
-
130
-
131
-
132
-
133
-
134
-
135
-
136
-
137
-
138
-
139
-
140
-
141
-
142
-
143
-
144
-
145
-
146
-
147
-
148
-
149
-
150
-
151
-
152
-
153
-
154
-
155
-
156
-
157
-
 158
158 -
 159
159 -
 160
160 -
 161
161 -
 162
162 -
 163
163 -
 164
164 -
 165
165 -
 166
166 -
 167
167 -
 168
168 -
169
-
170
-
171
-
172
-
173
-
174
-
175
-
176
-
177
-
178
-
179
-
180
-
181
-
182
-
183
-
184
-
185
-
186
-
187
-
188
-
189
-
190
-
191
-
192
-
193
-
194
-
195
-
196
-
197
-
198
-
199
-
200
-
201
-
202
-
203
-
204
-
205
-
206
-
207
-
208
-
209
-
210
-
211
-
212
-
213
-
214
-
215
-
216
 |
 |
