Yamaha MO6 Owner's Manual - Page 115
Using the Remote Control functions
 |
UPC - 086792837703
View all Yamaha MO6 manuals
Add to My Manuals
Save this manual to your list of manuals |
Page 115 highlights
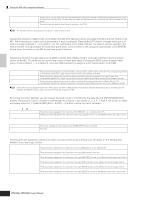
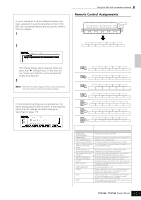
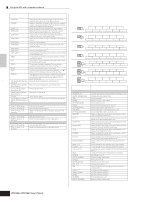
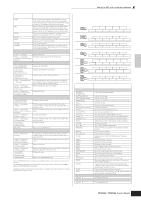
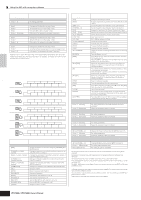
Using the Remote Control functions Using the MO with computer software 1 To enter the Remote Control mode, press the [DAW REMOTE] button (the lamp flashes). The REMOTE display appears, and the panel controls are enabled for Remote operation of the computer software (their normal functions are disabled). DAW REMOTE FILE UTILITY DEMO n Press this button again to exit from the Remote Control mode. 2 Select the software to be remote-controlled (Mode A or Mode B). Change the Mode by simultaneously holding down the [F6] SHIFT button and pressing the [DAW REMOTE] button. Mode A DAW F6 REMOTE Mode B Connecting the MO to external devices Quick Guide 3 Use the Knobs and buttons on the MO to remotely control the software. The following explains which sequencer functions are assigned to which panel controls in the remote control. n For details about how to operate the Editor, refer to the PDF manual included with the Editor. Press the Control function button to change the functions assigned to the [F1] - [F6] and [SF1] - [SF5] buttons (shown at the bottom of the display). Refer to the separate Data List. These dark bars serve as the cursor, indicating the track/part currently being edited by the Knob. Moving the slider automatically moves the cursor to the corresponding track/part. PAN SEND ASSIGN TONE ARP FX MEF EQ The functions of the buttons on each DAW controller are assigned to the [F1] - [F6] and [SF1] - [SF5] button on the MO. The functions to be assigned depend on the software selected in the Mode A or B. For details, refer to the "Remote Control Assignments" on page 117. Upper row indicates the setting values for knobs/sliders 1 - 4 on the DAW controller. Bottom row indicates the setting values for knobs/sliders 5 - 8 on the DAW controller. ■ [J], [F], [I], [ E I ], [G], [H] buttons The six MODE buttons are used as transport controls, letting you start/stop playback of the DAW software on the computer. ■ [EDIT], [JOB], and [STORE] buttons When the Mode is set to "General" Not used. or "Cubase" When the Mode is set to "Logic" These buttons perform the same functions as those of the [OPTION], [CONTROL] and [ALT] buttons on the Logic Control. When the Mode is set to "SONAR" These buttons perform the same functions as those of the [M2], [M3] and [M4] buttons on the Mackie Control. When the Mode is set to "D.Perf" These buttons perform the same functions as those of the [OPTION], [CONTROL] and [COMMAND] buttons on the Mackie Control. ■ [ARPEGGIO ON/OFF] button When the Mode is set to "General" Not used. or "Cubase" When the Mode is set to "Logic" The button can be used to switch the whether the track/slot number of DAW is displayed on the LCD or not. When the Mode is set to "SONAR" The button can be used to switch the whether the track/slot number of DAW is displayed on the LCD or not. When the Mode is set to "D.Perf" The button can be used to switch the whether the send/effect number of DAW is displayed on the LCD or not. Owner's Manual 115
-
 1
1 -
2
-
3
-
4
-
5
-
6
-
7
-
8
-
9
-
10
-
11
-
12
-
13
-
14
-
15
-
16
-
17
-
18
-
19
-
20
-
21
-
22
-
23
-
24
-
25
-
26
-
27
-
28
-
29
-
30
-
31
-
32
-
33
-
34
-
35
-
36
-
37
-
38
-
39
-
40
-
41
-
42
-
43
-
44
-
45
-
46
-
47
-
48
-
49
-
50
-
51
-
52
-
53
-
54
-
55
-
56
-
57
-
58
-
59
-
60
-
61
-
62
-
63
-
64
-
65
-
66
-
67
-
68
-
69
-
70
-
71
-
72
-
73
-
74
-
75
-
76
-
77
-
78
-
79
-
80
-
81
-
82
-
83
-
84
-
85
-
86
-
87
-
88
-
89
-
90
-
91
-
92
-
93
-
94
-
95
-
96
-
97
-
98
-
99
-
100
-
101
-
102
-
103
-
104
-
105
-
106
-
107
-
108
-
109
-
 110
110 -
 111
111 -
 112
112 -
 113
113 -
 114
114 -
 115
115 -
 116
116 -
 117
117 -
 118
118 -
 119
119 -
 120
120 -
121
-
122
-
123
-
124
-
125
-
126
-
127
-
128
-
129
-
130
-
131
-
132
-
133
-
134
-
135
-
136
-
137
-
138
-
139
-
140
-
141
-
142
-
143
-
144
-
145
-
146
-
147
-
148
-
149
-
150
-
151
-
152
-
153
-
154
-
155
-
156
-
157
-
158
-
159
-
160
-
161
-
162
-
163
-
164
-
165
-
166
-
167
-
168
-
169
-
170
-
171
-
172
-
173
-
174
-
175
-
176
-
177
-
178
-
179
-
180
-
181
-
182
-
183
-
184
-
185
-
186
-
187
-
188
-
189
-
190
-
191
-
192
-
193
-
194
-
195
-
196
-
197
-
198
-
199
-
200
-
201
-
202
-
203
-
204
-
205
-
206
-
207
-
208
-
209
-
210
-
211
-
212
-
213
-
214
-
215
-
216
-
217
-
218
-
219
-
220
-
221
-
222
-
223
-
224
-
225
-
226
-
227
-
228
-
229
-
230
-
231
-
232
-
233
-
234
-
235
-
236
-
237
-
238
-
239
-
240
 |
 |
