Yamaha MO6 Owner's Manual - Page 124
Owner's Manual, F1] NAME display.
 |
UPC - 086792837703
View all Yamaha MO6 manuals
Add to My Manuals
Save this manual to your list of manuals |
Page 124 highlights
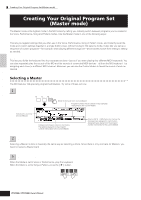
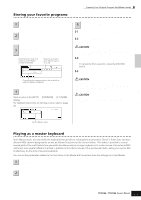
Creating Your Original Program Set (Master mode) 3 After setting the Mode and Program number which you wish to memorize to the Master, set the Zone Switch to "on." Determines the mode that is called up when the Master number is selected. Set the Zone Switch to "on." Quick Guide Creating Your Original Program Set (Master mode) Determines the program number that is called up when the Master is selected. 4 Press the [EDIT] button to enter the Master Edit mode. EDIT JOB STORE COMPARE 5 Call up the Common Edit display or Zone Edit display. Use Zone Edit to edit the parameters for each Zone. Use Common Edit to edit the parameters for all of the Zones. While in the Master Edit mode, you can switch between the Common Edit display and the Zone Edit display as shown below. Calling up the Common Edit display Press the [COMMON] button to call up the Common Edit display. In the Edit mode, the [DRUM KITS] button functions as the [COMMON] button. DRUM KITS FAVORITES PRE 1 PRE 2 PRE 3 PRE 4 A. PIANO KEYBOARD ORGAN A B C GUITAR PLUCKED D Indicates a Common Edit display. SYN LEAD 1 SYN PAD CHOIR 2 SYN COMP CHROMATIC PERCUSSION 3 4 Calling up the Zone Edit display Press the desired Zone number from the ZONE [1] - [4] buttons to call up the Zone Edit display. Indicates the display for editing Zone 1. COMMON ELEMENT PERF. PART ZONE 9 10 11 12 Common Edit Zone 1 Edit Zone 2 Edit Zone 3 Edit Zone 4 Edit 6 Select the menu you wish to edit by pressing the [F1] - [F5] buttons and [SF1] - [SF5] buttons, then edit the parameters in each display. See the next page for details and some setting examples. 7 Name the edited Master. Input a name in the [EDIT] → [COMMON] → [F1] NAME display. For detailed instructions on naming a Voice, refer to page 38. 8 Store the edited Master to internal User memory. Refer to step 5 on page 123. 124 Owner's Manual
-
 1
1 -
2
-
3
-
4
-
5
-
6
-
7
-
8
-
9
-
10
-
11
-
12
-
13
-
14
-
15
-
16
-
17
-
18
-
19
-
20
-
21
-
22
-
23
-
24
-
25
-
26
-
27
-
28
-
29
-
30
-
31
-
32
-
33
-
34
-
35
-
36
-
37
-
38
-
39
-
40
-
41
-
42
-
43
-
44
-
45
-
46
-
47
-
48
-
49
-
50
-
51
-
52
-
53
-
54
-
55
-
56
-
57
-
58
-
59
-
60
-
61
-
62
-
63
-
64
-
65
-
66
-
67
-
68
-
69
-
70
-
71
-
72
-
73
-
74
-
75
-
76
-
77
-
78
-
79
-
80
-
81
-
82
-
83
-
84
-
85
-
86
-
87
-
88
-
89
-
90
-
91
-
92
-
93
-
94
-
95
-
96
-
97
-
98
-
99
-
100
-
101
-
102
-
103
-
104
-
105
-
106
-
107
-
108
-
109
-
110
-
111
-
112
-
113
-
114
-
115
-
116
-
117
-
118
-
 119
119 -
 120
120 -
 121
121 -
 122
122 -
 123
123 -
 124
124 -
 125
125 -
 126
126 -
 127
127 -
 128
128 -
 129
129 -
130
-
131
-
132
-
133
-
134
-
135
-
136
-
137
-
138
-
139
-
140
-
141
-
142
-
143
-
144
-
145
-
146
-
147
-
148
-
149
-
150
-
151
-
152
-
153
-
154
-
155
-
156
-
157
-
158
-
159
-
160
-
161
-
162
-
163
-
164
-
165
-
166
-
167
-
168
-
169
-
170
-
171
-
172
-
173
-
174
-
175
-
176
-
177
-
178
-
179
-
180
-
181
-
182
-
183
-
184
-
185
-
186
-
187
-
188
-
189
-
190
-
191
-
192
-
193
-
194
-
195
-
196
-
197
-
198
-
199
-
200
-
201
-
202
-
203
-
204
-
205
-
206
-
207
-
208
-
209
-
210
-
211
-
212
-
213
-
214
-
215
-
216
-
217
-
218
-
219
-
220
-
221
-
222
-
223
-
224
-
225
-
226
-
227
-
228
-
229
-
230
-
231
-
232
-
233
-
234
-
235
-
236
-
237
-
238
-
239
-
240
 |
 |
