Yamaha MO6 Owner's Manual - Page 78
Creating a Pattern by Preset Phrases and Arpeggio, Selecting a Drum pattern from Preset, Phrases
 |
UPC - 086792837703
View all Yamaha MO6 manuals
Add to My Manuals
Save this manual to your list of manuals |
Page 78 highlights
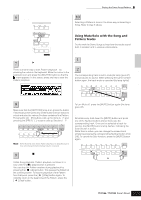
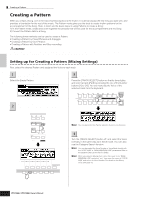
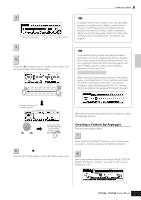
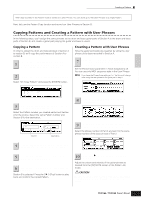
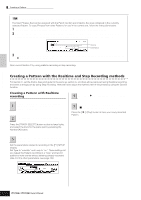
Quick Guide Creating a Song on the MO Creating a Pattern TIP Creating Mixing Voices exclusively for Songs/Patterns If you assign User Voices to your Song or Pattern and then edit them (in the Voice Edit mode), the Voices may sound different than expected. This convenient feature lets you create dedicated Mixing Voices for your Songs and Patterns-ensuring that the Voices will play exactly as they were edited for the Song/Pattern. The Mixing Voice can be stored with the Song or Pattern. n Only Normal Voices can be created/edited as Mixing Voices. 1 Enter the Song mode/Pattern mode and select the Song number/Pattern number. 2 Press the [MIXING] button (the lamp lights), then select the Part containing the desired Voice. MIXING 4 Call up the Common Edit or Element Edit display as required. These displays are the same as in the Voice mode. See page 203. 5 Store the edited Mixing Voice to internal User memory with the Song/Pattern. 1 2 3 4 5 6 7 8 TRACK SELECT 5-1 Press the [STORE] button to enter the Mixing Voice Store mode. 5-2 Set the destination Voice Bank to "MIXV" and select the destination Voice number. You can store the Voice edited in the Mixing Voice Edit mode as a User Normal Voice by setting the Voice Bank to "USER1" or "USER2." Destination Voice Number ELEMENT PERF. PART ZONE 9 10 11 12 13 14 15 16 MUTE 3 Press the [F5] VCE ED (Voice Edit) button to enter the Mixing Voice Edit mode. n The Mixing Edit mode can only be entered when selecting a Part to which a Normal Voice has been assigned. Destination Voice Bank 5-3 Press the [ENTER] button to execute the Store operation. CAUTION The created Song and Pattern data resides temporarily in DRAM (page 150). Because data contained in DRAM is lost when the power is turned off, you should always store any data residing in DRAM to a USB storage device before turning off the power. Creating a Pattern by Preset Phrases and Arpeggio Naturally, you can create phrases and Patterns by recording your own keyboard performance in real time. However, the MO has convenient features-preset phrases and the Arpeggio function-that let you quickly and easily select backing parts and phrases suitable for various music genres and styles. First, we'll record a performance to Section A, using the Preset Phrases of the Drum patterns, as well as some guitar and bass guitar Arpeggio phrases. Selecting a Drum pattern from Preset Phrases Press the [PATTERN] button, then select the 1 Pattern you stored in the section "Setting up for Creating a Pattern (Mixing Settings)" on page 76. In the example here, we'll use a Pattern that consists of the following: Track 1: Drums Track 4: Piano Track 2: Bass guitar Track 5: Strings Track 3: Guitar 2 Turn the [SECTION] button on, then press the [A] button. PRE 1 PRE 2 PRE 3 PRE 4 USER 1 USER 2 GM - SECTION A. PIANO KEYBOARD ORGAN A B C GUITAR PLUCKED D BASS E STRINGS BRASS REED PIPE F G H SYN LEAD SYN PAD SYN COMP CHROMATIC DRUM SE MUSICAL FX COMBI CHOIR PERCUSSION PERCUSSION 78 Owner's Manual
-
 1
1 -
2
-
3
-
4
-
5
-
6
-
7
-
8
-
9
-
10
-
11
-
12
-
13
-
14
-
15
-
16
-
17
-
18
-
19
-
20
-
21
-
22
-
23
-
24
-
25
-
26
-
27
-
28
-
29
-
30
-
31
-
32
-
33
-
34
-
35
-
36
-
37
-
38
-
39
-
40
-
41
-
42
-
43
-
44
-
45
-
46
-
47
-
48
-
49
-
50
-
51
-
52
-
53
-
54
-
55
-
56
-
57
-
58
-
59
-
60
-
61
-
62
-
63
-
64
-
65
-
66
-
67
-
68
-
69
-
70
-
71
-
72
-
 73
73 -
 74
74 -
 75
75 -
 76
76 -
 77
77 -
 78
78 -
 79
79 -
 80
80 -
 81
81 -
 82
82 -
 83
83 -
84
-
85
-
86
-
87
-
88
-
89
-
90
-
91
-
92
-
93
-
94
-
95
-
96
-
97
-
98
-
99
-
100
-
101
-
102
-
103
-
104
-
105
-
106
-
107
-
108
-
109
-
110
-
111
-
112
-
113
-
114
-
115
-
116
-
117
-
118
-
119
-
120
-
121
-
122
-
123
-
124
-
125
-
126
-
127
-
128
-
129
-
130
-
131
-
132
-
133
-
134
-
135
-
136
-
137
-
138
-
139
-
140
-
141
-
142
-
143
-
144
-
145
-
146
-
147
-
148
-
149
-
150
-
151
-
152
-
153
-
154
-
155
-
156
-
157
-
158
-
159
-
160
-
161
-
162
-
163
-
164
-
165
-
166
-
167
-
168
-
169
-
170
-
171
-
172
-
173
-
174
-
175
-
176
-
177
-
178
-
179
-
180
-
181
-
182
-
183
-
184
-
185
-
186
-
187
-
188
-
189
-
190
-
191
-
192
-
193
-
194
-
195
-
196
-
197
-
198
-
199
-
200
-
201
-
202
-
203
-
204
-
205
-
206
-
207
-
208
-
209
-
210
-
211
-
212
-
213
-
214
-
215
-
216
-
217
-
218
-
219
-
220
-
221
-
222
-
223
-
224
-
225
-
226
-
227
-
228
-
229
-
230
-
231
-
232
-
233
-
234
-
235
-
236
-
237
-
238
-
239
-
240
 |
 |
