Yamaha MO6 Owner's Manual - Page 79
Creating a Pattern by Arpeggio, User Phrases, Turning the Phrase Voice on or off
 |
UPC - 086792837703
View all Yamaha MO6 manuals
Add to My Manuals
Save this manual to your list of manuals |
Page 79 highlights
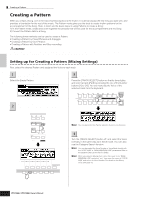
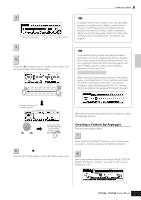
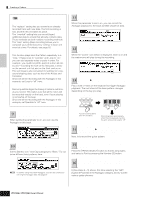
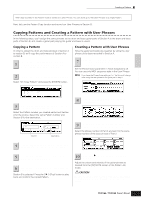
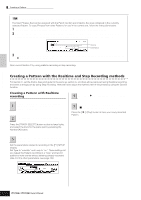
Creating a Song on the MO Quick Guide Creating a Pattern 3 Set the meter (time signature), tempo, and length. Meter (time signature) Tempo Length of pattern 4 Press the [F4] PATCH button to call up the Patch display. Select Track 1, then select one of the settings 5 Dr 1 to Dr 4 in the category. Next, select a Phrase Number. Press the [F] (Play) button to hear the Drum Pattern. Try out some different drum patterns here. 1 2 3 4 5 6 7 8 ELEMENT PERF. PART ZONE 9 10 11 12 13 14 15 16 Select a track TRACK SELECT MUTE TIP User Phrases In addition to the Preset Phrases, you can store MIDI data you've recorded in the Pattern mode as User Phrases. User Phrases have the added benefit of being able to use the sounds of other instruments, letting you record bass, guitar, piano and other parts as well as drums and percussion. For details, see page 81. TIP Turning the Phrase Voice on or off In the default settings, when assigning a Phrase to each track, the track's current Voice will be changed to the Voice stored in the Phrase (Phrase Voice). If you do not want to change the Voice and you want to use only the MIDI sequence data, set the following parameter for the track to off. [F3]TRACK ➞ [SF3]TR VOICE When setting the parameters as shown in the display below, the original Voice in Track 3 will be used, even if a Phrase is assigned to the track. If you assign Phrases to other tracks (those with the "On" setting), the Voices stored in the assigned Phrase will be used. Indicates the category of the preset Phrases Indicates the Phrase number Next, let's record the bass guitar, guitar, and piano by using the Arpeggio function. DEC/NO INC / YES Select a Preset Phrase. SEQ TRANSPORT LOCATE 1 2 REC Play the Pattern to confirm the assigned Phrase. 6 Press the [J] button to stop playback. Press the [F1] PLAY button to return the Pattern Play mode. Creating a Pattern by Arpeggio Record a bass guitar pattern. 7 Select a track to which the bass guitar will be assigned. Press the [TRACK SELECT] button so that its lamp lights, and select a track by pressing the Number [2] button. 8 Press the [REC] button to enter the Pattern Record mode. Set the parameters related to recording in the [F1] SETUP display. Set Type to "replace," set Loop to "off," and set Quantize to "off." Owner's Manual 79
-
 1
1 -
2
-
3
-
4
-
5
-
6
-
7
-
8
-
9
-
10
-
11
-
12
-
13
-
14
-
15
-
16
-
17
-
18
-
19
-
20
-
21
-
22
-
23
-
24
-
25
-
26
-
27
-
28
-
29
-
30
-
31
-
32
-
33
-
34
-
35
-
36
-
37
-
38
-
39
-
40
-
41
-
42
-
43
-
44
-
45
-
46
-
47
-
48
-
49
-
50
-
51
-
52
-
53
-
54
-
55
-
56
-
57
-
58
-
59
-
60
-
61
-
62
-
63
-
64
-
65
-
66
-
67
-
68
-
69
-
70
-
71
-
72
-
73
-
 74
74 -
 75
75 -
 76
76 -
 77
77 -
 78
78 -
 79
79 -
 80
80 -
 81
81 -
 82
82 -
 83
83 -
 84
84 -
85
-
86
-
87
-
88
-
89
-
90
-
91
-
92
-
93
-
94
-
95
-
96
-
97
-
98
-
99
-
100
-
101
-
102
-
103
-
104
-
105
-
106
-
107
-
108
-
109
-
110
-
111
-
112
-
113
-
114
-
115
-
116
-
117
-
118
-
119
-
120
-
121
-
122
-
123
-
124
-
125
-
126
-
127
-
128
-
129
-
130
-
131
-
132
-
133
-
134
-
135
-
136
-
137
-
138
-
139
-
140
-
141
-
142
-
143
-
144
-
145
-
146
-
147
-
148
-
149
-
150
-
151
-
152
-
153
-
154
-
155
-
156
-
157
-
158
-
159
-
160
-
161
-
162
-
163
-
164
-
165
-
166
-
167
-
168
-
169
-
170
-
171
-
172
-
173
-
174
-
175
-
176
-
177
-
178
-
179
-
180
-
181
-
182
-
183
-
184
-
185
-
186
-
187
-
188
-
189
-
190
-
191
-
192
-
193
-
194
-
195
-
196
-
197
-
198
-
199
-
200
-
201
-
202
-
203
-
204
-
205
-
206
-
207
-
208
-
209
-
210
-
211
-
212
-
213
-
214
-
215
-
216
-
217
-
218
-
219
-
220
-
221
-
222
-
223
-
224
-
225
-
226
-
227
-
228
-
229
-
230
-
231
-
232
-
233
-
234
-
235
-
236
-
237
-
238
-
239
-
240
 |
 |
