Yamaha MO6 Owner's Manual - Page 29
Keyboard octave setting MO6, Transpose setting of the keyboard
 |
UPC - 086792837703
View all Yamaha MO6 manuals
Add to My Manuals
Save this manual to your list of manuals |
Page 29 highlights
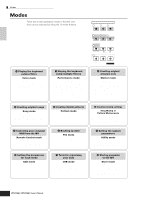
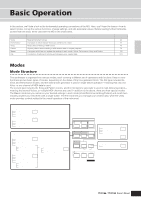
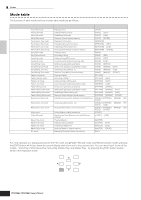
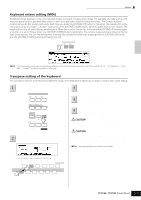
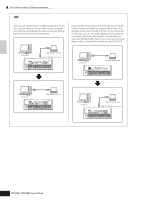
Basic Operation Modes Keyboard octave setting (MO6) Sometimes when playing a voice, you may wish to play in a lower or higher pitch range. For example, you may want to shift the pitch down lower to get extra bass notes, or shift up to get higher notes for leads and solos. The Octave Up/Down controls let you do this quickly and easily. Each time you press the [OCTAVE UP] button on the panel, the overall pitch of the voice goes up by one octave. Likewise, each press of the [OCTAVE DOWN] button takes the pitch down by one octave. The range is from -3 to +3, with 0 being standard pitch. When this is set to Octave Up, the lamp of the [OCTAVE UP] button lights, and when it is set to Octave Down, the [OCTAVE DOWN] button's lamp lights. The current octave setting is shown at the top right of the display. You can instantly restore standard pitch (0) by simultaneously pressing both the [OCTAVE UP] button and the [OCTAVE DOWN] button (both lamps turn off). OCTAVE DOWN UP n The Octave setting made here is automatically reflected in the identical Octave parameter in the Utility mode ([UTILITY] → [F1] GENERAL → [SF2] KBD → Octave). This setting is available in all modes. Transpose setting of the keyboard You can set the amount in semitones by which the range of the keyboard is shifted up or down as well as the octave setting. 1 Press the [UTILITY] button to enter the Utility mode. VOICE MODE PERFORM MASTER SONG PATTERN MIXING DAW REMOTE FILE UTILITY 3 Move the cursor to "Transpose" by using the Cursor button. 4 Change the Transpose value by using the [INC/YES], [DEC/NO] buttons and data dial. 5 Press the [STORE] button to store the Transpose setting to internal Flash ROM. EDIT DEMO JOB STORE COMPARE SCENE STORE SET LOCATE 2 Press the [F1] GENERAL button, then the [SF2] KBD button. CAUTION Make sure to execute step 5. The settings made in step 4 will be lost if you turn the power off without executing step 5. CAUTION Never attempt to turn off the power while data is being written to Flash ROM (while a "Please keep power on" message is shown). Turning the power off in this state may not only cause the system to freeze (due to data corruption in the Flash ROM) and prevent normal startup the next time the power is turned on, it may also result in loss of all user data. n The transpose setting is available in all modes. SCENE SF1 SF2 SF3 SF4 SF5 INFORMATION F1 F2 F3 F4 F5 F6 Owner's Manual 29
-
 1
1 -
2
-
3
-
4
-
5
-
6
-
7
-
8
-
9
-
10
-
11
-
12
-
13
-
14
-
15
-
16
-
17
-
18
-
19
-
20
-
21
-
22
-
23
-
 24
24 -
 25
25 -
 26
26 -
 27
27 -
 28
28 -
 29
29 -
 30
30 -
 31
31 -
 32
32 -
 33
33 -
 34
34 -
35
-
36
-
37
-
38
-
39
-
40
-
41
-
42
-
43
-
44
-
45
-
46
-
47
-
48
-
49
-
50
-
51
-
52
-
53
-
54
-
55
-
56
-
57
-
58
-
59
-
60
-
61
-
62
-
63
-
64
-
65
-
66
-
67
-
68
-
69
-
70
-
71
-
72
-
73
-
74
-
75
-
76
-
77
-
78
-
79
-
80
-
81
-
82
-
83
-
84
-
85
-
86
-
87
-
88
-
89
-
90
-
91
-
92
-
93
-
94
-
95
-
96
-
97
-
98
-
99
-
100
-
101
-
102
-
103
-
104
-
105
-
106
-
107
-
108
-
109
-
110
-
111
-
112
-
113
-
114
-
115
-
116
-
117
-
118
-
119
-
120
-
121
-
122
-
123
-
124
-
125
-
126
-
127
-
128
-
129
-
130
-
131
-
132
-
133
-
134
-
135
-
136
-
137
-
138
-
139
-
140
-
141
-
142
-
143
-
144
-
145
-
146
-
147
-
148
-
149
-
150
-
151
-
152
-
153
-
154
-
155
-
156
-
157
-
158
-
159
-
160
-
161
-
162
-
163
-
164
-
165
-
166
-
167
-
168
-
169
-
170
-
171
-
172
-
173
-
174
-
175
-
176
-
177
-
178
-
179
-
180
-
181
-
182
-
183
-
184
-
185
-
186
-
187
-
188
-
189
-
190
-
191
-
192
-
193
-
194
-
195
-
196
-
197
-
198
-
199
-
200
-
201
-
202
-
203
-
204
-
205
-
206
-
207
-
208
-
209
-
210
-
211
-
212
-
213
-
214
-
215
-
216
-
217
-
218
-
219
-
220
-
221
-
222
-
223
-
224
-
225
-
226
-
227
-
228
-
229
-
230
-
231
-
232
-
233
-
234
-
235
-
236
-
237
-
238
-
239
-
240
 |
 |
