Yamaha MO6 Owner's Manual - Page 46
Creating a Performance by combining Voices, Preparing to create a Performance
 |
UPC - 086792837703
View all Yamaha MO6 manuals
Add to My Manuals
Save this manual to your list of manuals |
Page 46 highlights
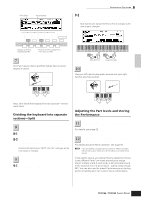
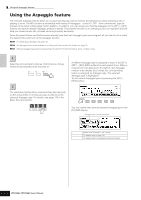
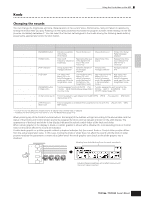
Quick Guide Playing the MO Performance Play mode Creating a Performance by combining Voices Performances can be made up of a maximum of four Parts, each of which can be assigned a different Voice. In this section, we'll create a Performance by combining two Voices. Preparing to create a Performance (Initializing the Performance) 1 Select the desired Performance in the Performance Play mode. 2 Press the [JOB] button, and then the [F1] button. The Initialize display is shown. Check the "ALL" check box to initialize all data of the Performance. For details about the Initialize function, refer to page 168. EDIT JOB STORE COMPARE Playing several Voices together (Layer) 5 Press the [F2] VOICE button. This calls up a list indicating which Voice is assigned to each Part of the current Performance. Since the current Performance has been initialized, the only Voice in the Performance is "PRE1: Full Grand," set to Part 1. SCENE SF1 SF2 SF3 SF4 SF5 INFORMATION F1 F2 F3 F4 F5 F6 3 Press the [ENTER] button. (The display prompts you for confirmation.) Press the [INC/YES] button to initialize the Performance. n Keep in mind that when you execute the Store operation by pressing the [STORE] button here, the Performance at the destination will be replaced with the Initialized Performance above. n For details about the Store operation, refer to page 66. 6 Assign the desired Voice to Part 2. 6-1 Move the cursor to the Voice Bank or Voice Number of Part 2. Voice Bank Voice Number 4 Press the [PERFORM] button. The current Performance name will change to "Init Perf" in the display. n When you initialize a Performance, the Voice at Preset Bank 1, Voice number 1 is assigned to Part 1 as the default. 6-2 Press the [SF1] ADD INT button. This enables assignment of the selected internal Voice to Part 2. 6-3 Select the Voice you've assigned to Part 2 as you did in steps 2 - 4 in the section "Selecting a Normal Voice" or "Selecting a Drum Voice" (page 40 or 41). You can select the desired Bank and Number directly by using the [DEC/NO], [INC/YES] buttons and data dial. You can also use the Category Search function (page 42). Here, we'll assign a flute Voice (PRE2: SweetFlute) to Part 2. 46 Owner's Manual
-
 1
1 -
2
-
3
-
4
-
5
-
6
-
7
-
8
-
9
-
10
-
11
-
12
-
13
-
14
-
15
-
16
-
17
-
18
-
19
-
20
-
21
-
22
-
23
-
24
-
25
-
26
-
27
-
28
-
29
-
30
-
31
-
32
-
33
-
34
-
35
-
36
-
37
-
38
-
39
-
40
-
 41
41 -
 42
42 -
 43
43 -
 44
44 -
 45
45 -
 46
46 -
 47
47 -
 48
48 -
 49
49 -
 50
50 -
 51
51 -
52
-
53
-
54
-
55
-
56
-
57
-
58
-
59
-
60
-
61
-
62
-
63
-
64
-
65
-
66
-
67
-
68
-
69
-
70
-
71
-
72
-
73
-
74
-
75
-
76
-
77
-
78
-
79
-
80
-
81
-
82
-
83
-
84
-
85
-
86
-
87
-
88
-
89
-
90
-
91
-
92
-
93
-
94
-
95
-
96
-
97
-
98
-
99
-
100
-
101
-
102
-
103
-
104
-
105
-
106
-
107
-
108
-
109
-
110
-
111
-
112
-
113
-
114
-
115
-
116
-
117
-
118
-
119
-
120
-
121
-
122
-
123
-
124
-
125
-
126
-
127
-
128
-
129
-
130
-
131
-
132
-
133
-
134
-
135
-
136
-
137
-
138
-
139
-
140
-
141
-
142
-
143
-
144
-
145
-
146
-
147
-
148
-
149
-
150
-
151
-
152
-
153
-
154
-
155
-
156
-
157
-
158
-
159
-
160
-
161
-
162
-
163
-
164
-
165
-
166
-
167
-
168
-
169
-
170
-
171
-
172
-
173
-
174
-
175
-
176
-
177
-
178
-
179
-
180
-
181
-
182
-
183
-
184
-
185
-
186
-
187
-
188
-
189
-
190
-
191
-
192
-
193
-
194
-
195
-
196
-
197
-
198
-
199
-
200
-
201
-
202
-
203
-
204
-
205
-
206
-
207
-
208
-
209
-
210
-
211
-
212
-
213
-
214
-
215
-
216
-
217
-
218
-
219
-
220
-
221
-
222
-
223
-
224
-
225
-
226
-
227
-
228
-
229
-
230
-
231
-
232
-
233
-
234
-
235
-
236
-
237
-
238
-
239
-
240
 |
 |
