Yamaha MO6 Owner's Manual - Page 92
Song Location, Assigning Locations, Jumping to an assigned Location
 |
UPC - 086792837703
View all Yamaha MO6 manuals
Add to My Manuals
Save this manual to your list of manuals |
Page 92 highlights
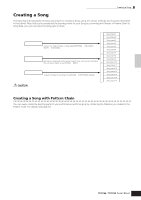
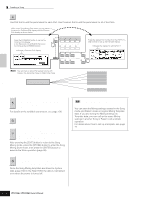
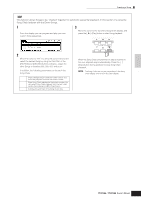
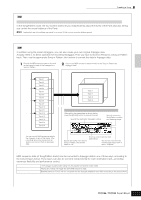
Quick Guide Creating a Song on the MO Creating a Song 2 Press the [JOB] button to enter the Song Job mode. As shown below, the Jobs are divided into six main groups, each of which is selected using the [F1] - [F6] buttons. Indicates the Job List. Because all the Jobs cannot be displayed simultaneously, you will need to use the cursor buttons to scroll the display in order to find the desired Job. Press the [SONG] button to return to the Song 6 Play mode, then press the [F] button to hear the Song over which the Job is applied. If you are satisfied with the result of the Job, go to step 7. If not, execute the UNDO Job in the [F1] UNDO display in the Song Job mode to restore the data to its previous state, then try out the Job (from step 4) again. For details about Undo, see next page. [F1] [F1] UNDO [F2] NOTE [F3] EVENT [F4] MEAS [F5] TRACK [F6] SONG [F2] [F3] [F4] [F5] [F6] Undo (Canceling the executed Job)/Redo (Restoring the executed Job) functions Note Data Job Event Job Measure Job Track Job Song Job Press the [F2] NOTE button, move the cursor 3 to "01: Quantize" then press the [ENTER] button to call up the Quantize Job display. 4 Set the relevant Job parameters. After specifying the track and range over which the Job is to be applied, set Quantize to " " (8th note) according to the notation example above. Set the Strength to "100%," SwingRate to "050%," and GateTime to "100%." Regarding these parameters, see page 183. Track over which the Job is applied Range over which the Job is applied Save the Song data to a USB storage device in 7 the File mode (page 98) before turning the power off. In addition to Quantize, you'll find a variety of other useful and powerful Jobs in the Song Job mode (page 183) and Pattern Job mode (page 199). Song Location The Song Play mode has a convenient Location function that lets you jump to user-specified parts of a Song. This lets you assign a specific measure number in the selected Song, and instantly jump to the assigned measure-either during playback or when the Song is stopped. Two Locations can be assigned. ■ Assigning Locations Select the desired measure in the recorded Song for the Location. (Highlight "MEAS" and use the [INC/YES] and [DEC/NO] buttons or data dial.) Then, to assign the measure to Location 1, simultaneously hold down the [SET LOCATE] button and press the [G] (Reverse) button. To assign Location 2, use the [H] (Forward) button. n Set the Quantize value to correspond to the smallest value notes in the track you are working with. For example, if the data was recorded with both quarter notes and eighth notes, use eighth note for the quantize value. 5 Press the [ENTER] button to execute the Job. After the Job has been completed, a "Completed" message appears and operation returns to the original display. CAUTION An "Executing..." message is shown when it takes a short amount of time to execute the Job. Never attempt to turn off the power while the Job is being executed. Turning the power off in this state results in loss of all user data. EDIT JOB STORE Specify a measure number to be registered. SEQ TRANSPORT COMPARE SCENE STORE SET LOCATE LOCATE 1 2 In this example, the selected measure REC is assigned to Location 1. The current settings for Locations 1 and 2 are shown at the top right of the display. ■ Jumping to an assigned Location To instantly jump to the assigned Location 1 or 2, simultaneously hold down the [SET LOCATE] button and pressing the [G] (Reverse) button (for Location 1) or the [H] (Forward) button (for Location 2). SEQ TRANSPORT LOCATE 1 2 REC 92 Owner's Manual
-
 1
1 -
2
-
3
-
4
-
5
-
6
-
7
-
8
-
9
-
10
-
11
-
12
-
13
-
14
-
15
-
16
-
17
-
18
-
19
-
20
-
21
-
22
-
23
-
24
-
25
-
26
-
27
-
28
-
29
-
30
-
31
-
32
-
33
-
34
-
35
-
36
-
37
-
38
-
39
-
40
-
41
-
42
-
43
-
44
-
45
-
46
-
47
-
48
-
49
-
50
-
51
-
52
-
53
-
54
-
55
-
56
-
57
-
58
-
59
-
60
-
61
-
62
-
63
-
64
-
65
-
66
-
67
-
68
-
69
-
70
-
71
-
72
-
73
-
74
-
75
-
76
-
77
-
78
-
79
-
80
-
81
-
82
-
83
-
84
-
85
-
86
-
 87
87 -
 88
88 -
 89
89 -
 90
90 -
 91
91 -
 92
92 -
 93
93 -
 94
94 -
 95
95 -
 96
96 -
 97
97 -
98
-
99
-
100
-
101
-
102
-
103
-
104
-
105
-
106
-
107
-
108
-
109
-
110
-
111
-
112
-
113
-
114
-
115
-
116
-
117
-
118
-
119
-
120
-
121
-
122
-
123
-
124
-
125
-
126
-
127
-
128
-
129
-
130
-
131
-
132
-
133
-
134
-
135
-
136
-
137
-
138
-
139
-
140
-
141
-
142
-
143
-
144
-
145
-
146
-
147
-
148
-
149
-
150
-
151
-
152
-
153
-
154
-
155
-
156
-
157
-
158
-
159
-
160
-
161
-
162
-
163
-
164
-
165
-
166
-
167
-
168
-
169
-
170
-
171
-
172
-
173
-
174
-
175
-
176
-
177
-
178
-
179
-
180
-
181
-
182
-
183
-
184
-
185
-
186
-
187
-
188
-
189
-
190
-
191
-
192
-
193
-
194
-
195
-
196
-
197
-
198
-
199
-
200
-
201
-
202
-
203
-
204
-
205
-
206
-
207
-
208
-
209
-
210
-
211
-
212
-
213
-
214
-
215
-
216
-
217
-
218
-
219
-
220
-
221
-
222
-
223
-
224
-
225
-
226
-
227
-
228
-
229
-
230
-
231
-
232
-
233
-
234
-
235
-
236
-
237
-
238
-
239
-
240
 |
 |
