Yamaha MO6 Owner's Manual - Page 83
Using the Groove function, Creating a Pattern with Step recording
 |
UPC - 086792837703
View all Yamaha MO6 manuals
Add to My Manuals
Save this manual to your list of manuals |
Page 83 highlights
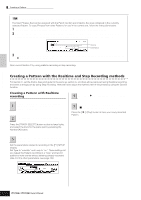
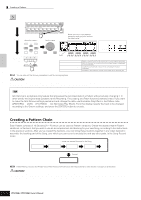
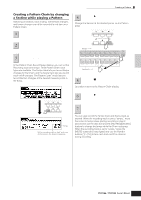
Creating a Pattern with Step recording Next, we'll add a strings part by using the Step recording method. 6 Select the track to which the strings part is to be assigned. Press the [TRACK SELECT] button so that its lamp lights, and select the track for the strings part by pressing the Number [5] button. 7 Press the [REC] button to enter the Pattern Record mode. 8 Set the Type parameter to "step" in the [F1] SETUP display. Creating a Pattern TIP Rehearsing parts before recording To temporarily disengage the record mode and enter the "Rehearsal" mode, simply press the [REC] button during realtime recording-the [REC] indicator will flash and playback will continue uninterrupted but no data will be recorded. This convenient Rehearsal mode lets you easily and temporarily disable recording, in order to practice a part or try out various ideas (while listening to the other tracks) without actually recording. To return to the record mode press the [REC] button again-the [REC] indicator will light continuously. Recording SEQ TRANSPORT Rehearsal mode (playback continues) SEQ TRANSPORT LOCATE 1 2 REC LOCATE 1 2 REC Creating a Song on the MO Quick Guide 9 Press the [F] (Play) button to start the recording. For details about Step Recording, see page 193. 10 Press the [J] (Stop) button to stop the recording. Press the [F] (Play) button to hear your newly recorded Pattern. CAUTION The created Song and Pattern data resides temporarily in DRAM (page 150). Because data contained in DRAM is lost when the power is turned off, you should always store any data residing in DRAM to a USB storage device before turning off the power. TIP Editing the recorded Pattern The Pattern Edit mode and Pattern Job mode can be used to edit or change the data of the already recorded Pattern. The Pattern Edit mode lets you change the recorded data and insert new data if needed. This includes note data as well as non-note data, such as program (Voice) changes and MIDI control change messages. The Pattern Job mode on the other hand provides a comprehensive variety of tools you can use to transform the recorded data-such as cleaning up the timing (Quantize), transposing, changing the velocity of notes, modifying the length of notes, and other useful operations for altering the sound. It also includes a variety of convenient operations, such as copying or erasing data. Most of these operations can be performed on either an entire track or a selected range of measures in the track. The procedure is basically the same as in the Song mode. See page 90. Using the Groove function The Groove function makes it possible to adjust the pitch, timing, length, and velocity of notes in a specified track via a 1-measure 16th-note grid to create interesting, unique "grooves" that would not be possible with precise sequencer-like programming. n The Groove settings are applied to all measures of the current Pattern. Keep in mind that you cannot apply different Groove settings to each measure. n The Grid Groove function affects Pattern playback without actually changing the MIDI sequence data (created via the Recording, File Loading, and Patch functions). The Groove settings are handled separately from MIDI sequence data. See page 137. 1 In the Pattern Play mode, select a Pattern and Section for which the Groove is to be applied. 2 Press the [F2] GROOVE button to call up the Groove setting display. Owner's Manual 83
-
 1
1 -
2
-
3
-
4
-
5
-
6
-
7
-
8
-
9
-
10
-
11
-
12
-
13
-
14
-
15
-
16
-
17
-
18
-
19
-
20
-
21
-
22
-
23
-
24
-
25
-
26
-
27
-
28
-
29
-
30
-
31
-
32
-
33
-
34
-
35
-
36
-
37
-
38
-
39
-
40
-
41
-
42
-
43
-
44
-
45
-
46
-
47
-
48
-
49
-
50
-
51
-
52
-
53
-
54
-
55
-
56
-
57
-
58
-
59
-
60
-
61
-
62
-
63
-
64
-
65
-
66
-
67
-
68
-
69
-
70
-
71
-
72
-
73
-
74
-
75
-
76
-
77
-
 78
78 -
 79
79 -
 80
80 -
 81
81 -
 82
82 -
 83
83 -
 84
84 -
 85
85 -
 86
86 -
 87
87 -
 88
88 -
89
-
90
-
91
-
92
-
93
-
94
-
95
-
96
-
97
-
98
-
99
-
100
-
101
-
102
-
103
-
104
-
105
-
106
-
107
-
108
-
109
-
110
-
111
-
112
-
113
-
114
-
115
-
116
-
117
-
118
-
119
-
120
-
121
-
122
-
123
-
124
-
125
-
126
-
127
-
128
-
129
-
130
-
131
-
132
-
133
-
134
-
135
-
136
-
137
-
138
-
139
-
140
-
141
-
142
-
143
-
144
-
145
-
146
-
147
-
148
-
149
-
150
-
151
-
152
-
153
-
154
-
155
-
156
-
157
-
158
-
159
-
160
-
161
-
162
-
163
-
164
-
165
-
166
-
167
-
168
-
169
-
170
-
171
-
172
-
173
-
174
-
175
-
176
-
177
-
178
-
179
-
180
-
181
-
182
-
183
-
184
-
185
-
186
-
187
-
188
-
189
-
190
-
191
-
192
-
193
-
194
-
195
-
196
-
197
-
198
-
199
-
200
-
201
-
202
-
203
-
204
-
205
-
206
-
207
-
208
-
209
-
210
-
211
-
212
-
213
-
214
-
215
-
216
-
217
-
218
-
219
-
220
-
221
-
222
-
223
-
224
-
225
-
226
-
227
-
228
-
229
-
230
-
231
-
232
-
233
-
234
-
235
-
236
-
237
-
238
-
239
-
240
 |
 |
