Yamaha MO6 Owner's Manual - Page 120
When controlling SONAR 4
 |
UPC - 086792837703
View all Yamaha MO6 manuals
Add to My Manuals
Save this manual to your list of manuals |
Page 120 highlights
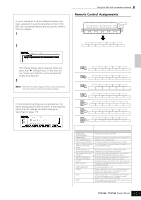
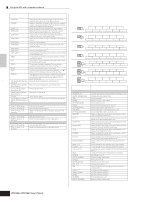
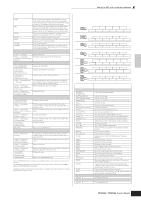
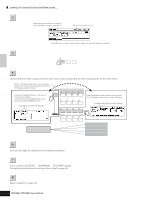
Quick Guide Connecting the MO to external devices Using the MO with computer software Button/Controller names on Mackie Control Functions SEND mode [DYN] (SELECTED CHANNEL only) Knobs 1 - 8 For editing parameters. PLUG-IN mode [PLUG-IN] (SELECTED CHANNEL only) Knob 1 Changes the Slot Number (on page 1 only). Knob 2 Turns the Effects on or off (on page 1 only). Knob 3 Selects an Effect Type (on page 1 only). Knobs 1 - 8 (turning) Edits each of the parameters (on page 2 and later). SEND EFFECT mode [SENDS]/MASTER EFFECT mode [MASTER] (Global mode only) Knob 1 Changes the Slot Number (on page 1 only). Knob 2 Turns the Effects on or off (on page 1 only). Knobs 1 - 8 Edits each of the parameters (on page 2 and later). INSTRUMENT mode [INSTRUMENTS] (Global mode only) Knob 1 Changes the Slot Number (on page 1 only). Knob 2 Turns the software tone generator on or off (on page 1 only). Knobs 1 - 8 Edits each of the parameters (on page 2 and later). Parameters to be edited differ depending on the assigned Effect and Software Tone Generator. Additional operations other than those listed above are available. For details, refer to the relevant documentation of Mackie Control. When controlling SONAR 4: Functions of Mackie Control assigned to [F1] - [F6] and [SF1] - [SF5] buttons PAN / SEND ASSIGNMENT SENDS PLUG-INS TRACKS PAN EQ DYN DIAL RESET KN1-4/5-8 BANK-L BANK-R M1 TONE FADER BANKS FLIP EDIT CHANNEL-L CHANNEL-R NAME/VALUE DIAL RESET KN1-4/5-8 BANK-L BANK-R M1 ARP FX TRACKS/DIALOG/WINDOW OK/ENTER CANCEL NEXT WINDOW CLOSE WINDOW KN1-4/5-8 NEW AUDIO NEW MIDI FIT TRACK FIT PROJECT M1 EQ TRACK AUX MAIN DIAL RESET KN1-4/5-8 SAVE UNDO REDO BANK-L BANK-R M1 PAN / SEND TONE TONE ARP FX F5 F6 F7 F8 F1 F2 F3 F4 KN1-4/5-8 M1 JOG PRM LOOP ON/OFF HOME DIAL RESET MAKER LOOP SELECT PUNCH KN1-4/5-8 M1 ARP FX EQ CURSOR-L CURSOR-R SCRUB DIAL RESET KN1-4/5-8 CURSOR-DWN CURSOR-UP ZOOM BANK-L BANK-R M1 Button/Controller names on Mackie Control Functions In all modes: [EDIT] [CHANNEL ] (Multi channel) [BANK ] (Multi channel) [CHANNEL ] (Selected channel) [BANK ] (Selected channel) [NAME/VALUE] [SEL] [MUTE] [M4]+[MUTE] [SOLO] [M4]+[SOLO] [REC RDY] [M4]+[REC RDY] [TRACK] Assigns a parameter to a Knob by using the [CHANNEL] and [BANK] buttons. Changes a parameter to be edited via a Knob in order one by one when [EDIT] is turned on. Changes the parameters to be edited via a Knob in groups of eight when [EDIT] is turned on. Changes an indicated parameter in order one by one when [EDIT] is turned on. Changes the indicated parameters in groups of eight when [EDIT] is turned on. Changes the indication of the parameter name and its value. Selects a channel. Mutes or unmutes each channel. Unmutes all channels. Sets Solo for each channel to on or off. Sets Solo for all channels to off. Sets the REC RDY of each channel to on or off. Sets the REC RDY of all channels to off. Assigns a Track to a Fader. Button/Controller names on Mackie Control Functions [AUX] Assigns an AUX BUS to a Fader. [MAIN] Assigns output level adjustment of the Virtual Main Bus to the Faders. [BANK ] Scrolls through the track indication every eight channels. [CHANNEL ] Scrolls through the track indication channel-by-channel. [FLIP] Assigns the functions of the Channel Knobs to the Faders. [FLIP] → [FLIP] Switches the functions of the Channel Knobs and the Faders. [NEXT WINDOW] Moves the next window to the front of the screen. [LOOP SW] Sets Loop to on or off. [F1] - [F8] [F1] - [F8] as defined in SONAR. [CLOSE WINDOW] Closes the current window. [UNDO] Executes the Undo operation. [REDO] Executes the Redo operation. [SAVE] Executes the Save operation. [M1]+[MARKER] Opens the window for entering the Marker to the current song position. [MARKER] Turns the Marker on or off. [RWD] Press briefly to move back one measure at a time, or hold to continuously rewind. When the Marker is turned on, this operation moves the song position to the previous Marker. [M1]+[RWD] Moves the song position to the top of the song. When the Marker is turned on, this operation opens the window for entering the Marker. [FF] Press briefly to move forward one measure at a time, or hold to continuously fast-forward. When the Marker is turned on, this operation moves the song position to the next Marker. [M1]+[FF] Moves the song position to the end of the song. When the Marker is turned on, this operation opens the window for entering the Marker. [STOP] Stops recording or playback. [PLAY] Press to start playback from the current point. [REC] Press this to start song recording. The [F] (Play) and [REC] lamp are turned on during recording. [ZOOM] Turns Zoom on and off. [SCRUB] Turns Scrub on and off. When Scrub is on, the dial can be used for Scrub playback. When Scrub is off, the dial is used to move the song position. [JOG PRM] Turns Data Entry on and off. When turned on (the lamp lights), rotating the dial has the Data Entry function. TRACK mode [TRACKS] (Track Parameter mode) [TRACKS] → [TRACKS] (Selected Channel mode) Knobs 1 - 8 (turning) For editing parameters. (The LCD indication may not be updated.) Knobs 1 - 8 (pressing) Resets the parameter value to its default. PAN mode [PAN] [PAN] → [PAN] (Selected Channel mode of PAN/SURROUND) Knobs 1 - 8 (turning) For editing parameters. Knobs 1 - 8 (pressing) Resets the parameter value to its default. SEND mode [SENDS] [SENDS] → [SENDS] (Selected Channel mode) Knobs 1 - 8 (turning) For editing parameters. Knobs 1 - 8 (pressing) Resets the parameter value to its default. PLUG-IN mode [PLUG-IN] [PLUG-IN] → [PLUG-IN] (Selected Channel mode) [M1]+[CHANNEL ] Changes the Plug-in number when the [EDIT] is turned on. Knobs 1 - 8 (turning) For editing parameters. Knobs 1 - 8 (pressing) Resets the parameter value to its default. EQ Edit [EQ] [EQ] → [EQ] (Selected Channel mode) (in the Selected Channel mode) [EQ] (Band mode) [M1]+[CHANNEL ] Changes the EQ number when the [EDIT] is turned on. Knobs 1 - 8 (Band mode) For editing each frequency band. Faders (Band mode) For editing the gain of each Band. The Song Position Bar may not synchronize with the actual playback position during Scrub playback. Parameters to be edited may differ depending on the assigned Effect and Software Tone Generator. Some parameters may not be available depending on the selected Effect Type. Press the [DRUM KIT] button to indicate the Track/Slot/EQ/DYN number in the brackets [ ] at the top of the LCD. The [M2] - [M4] buttons on the Mackie Control correspond respectively to the [EDIT], [JOB], and [STORE] buttons. Additional operations other than those listed above are available. For details, refer to the relevant documentation of Mackie Control. You can find the Help window by selecting "Mackie Control" from the Tool Menu on SONAR and pressing the [F1] button. Please keep in mind that some functions may not be available. 120 Owner's Manual
-
 1
1 -
2
-
3
-
4
-
5
-
6
-
7
-
8
-
9
-
10
-
11
-
12
-
13
-
14
-
15
-
16
-
17
-
18
-
19
-
20
-
21
-
22
-
23
-
24
-
25
-
26
-
27
-
28
-
29
-
30
-
31
-
32
-
33
-
34
-
35
-
36
-
37
-
38
-
39
-
40
-
41
-
42
-
43
-
44
-
45
-
46
-
47
-
48
-
49
-
50
-
51
-
52
-
53
-
54
-
55
-
56
-
57
-
58
-
59
-
60
-
61
-
62
-
63
-
64
-
65
-
66
-
67
-
68
-
69
-
70
-
71
-
72
-
73
-
74
-
75
-
76
-
77
-
78
-
79
-
80
-
81
-
82
-
83
-
84
-
85
-
86
-
87
-
88
-
89
-
90
-
91
-
92
-
93
-
94
-
95
-
96
-
97
-
98
-
99
-
100
-
101
-
102
-
103
-
104
-
105
-
106
-
107
-
108
-
109
-
110
-
111
-
112
-
113
-
114
-
 115
115 -
 116
116 -
 117
117 -
 118
118 -
 119
119 -
 120
120 -
 121
121 -
 122
122 -
 123
123 -
 124
124 -
 125
125 -
126
-
127
-
128
-
129
-
130
-
131
-
132
-
133
-
134
-
135
-
136
-
137
-
138
-
139
-
140
-
141
-
142
-
143
-
144
-
145
-
146
-
147
-
148
-
149
-
150
-
151
-
152
-
153
-
154
-
155
-
156
-
157
-
158
-
159
-
160
-
161
-
162
-
163
-
164
-
165
-
166
-
167
-
168
-
169
-
170
-
171
-
172
-
173
-
174
-
175
-
176
-
177
-
178
-
179
-
180
-
181
-
182
-
183
-
184
-
185
-
186
-
187
-
188
-
189
-
190
-
191
-
192
-
193
-
194
-
195
-
196
-
197
-
198
-
199
-
200
-
201
-
202
-
203
-
204
-
205
-
206
-
207
-
208
-
209
-
210
-
211
-
212
-
213
-
214
-
215
-
216
-
217
-
218
-
219
-
220
-
221
-
222
-
223
-
224
-
225
-
226
-
227
-
228
-
229
-
230
-
231
-
232
-
233
-
234
-
235
-
236
-
237
-
238
-
239
-
240
 |
 |
