Yamaha MO6 Owner's Manual - Page 37
Confirmation Message, Information Display, Note (Key) settings, Edit Recall Function
 |
UPC - 086792837703
View all Yamaha MO6 manuals
Add to My Manuals
Save this manual to your list of manuals |
Page 37 highlights
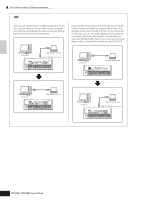
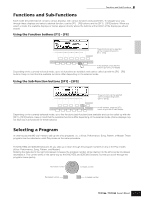
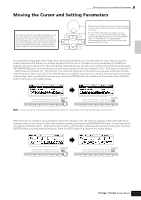
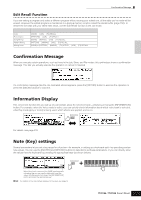
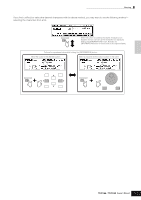
Confirmation Message Edit Recall Function If you are editing a program and select a different program without storing your edited one, all the edits you've made will be erased. However, the edited program is maintained in a backup memory location called the Recall buffer (page 150). To restore the lost data with your latest edits intact, use the Edit Recall function in the Job mode. Job mode Voice Performance Song Mixing Pattern Mixing Mixing Voice How to call up the Edit Recall display [VOICE] → [JOB] → [F2] RECALL [PERFORM] → [JOB] → [F2] RECALL [SONG] → [MIXING] → [JOB] → [F2] RECALL [PATTERN] → [MIXING] → [JOB] → [F2] RECALL [SONG] or [PATTERN] → [MIXING] → [F5] VCE ED → [JOB] → [F2] RECALL Confirmation Message When you execute certain operations, such as those in the Job, Store, and File modes, this synthesizer shows a confirmation message. This lets you actually execute the operation or cancel it if desired. Basic Operation If a confirmation message (like the one illustrated above) appears, press the [INC/YES] button to execute the operation or press the [DEC/NO] button to cancel it. Information Display This convenient function lets you call up relevant details about the selected mode-simply by pressing the [INFORMATION] button. For example, when the Voice mode is active, you can quickly check information about which voice bank is selected, what Play mode (poly or mono) is being used, which effects are applied, and so on. INFORMATION For details, see page 219. Note (Key) settings Several parameters let you set a key range for a function-for example, in setting up a keyboard split-by specifying certain note values. You can use the [INC/YES] and [DEC/NO] buttons or data dial to set these parameters, or you can directly enter the values from the keyboard by pressing the appropriate keys (as shown below). INFORMATION When Note Limit is selected, the [KBD] mark appears, indicating that you can use the keyboard to set the value. Simultaneously hold down the [INFORMATION] button and press the appropriate key. n For details on the note names assigned to the keys, see page 14. Owner's Manual 37
-
 1
1 -
2
-
3
-
4
-
5
-
6
-
7
-
8
-
9
-
10
-
11
-
12
-
13
-
14
-
15
-
16
-
17
-
18
-
19
-
20
-
21
-
22
-
23
-
24
-
25
-
26
-
27
-
28
-
29
-
30
-
31
-
 32
32 -
 33
33 -
 34
34 -
 35
35 -
 36
36 -
 37
37 -
 38
38 -
 39
39 -
 40
40 -
 41
41 -
 42
42 -
43
-
44
-
45
-
46
-
47
-
48
-
49
-
50
-
51
-
52
-
53
-
54
-
55
-
56
-
57
-
58
-
59
-
60
-
61
-
62
-
63
-
64
-
65
-
66
-
67
-
68
-
69
-
70
-
71
-
72
-
73
-
74
-
75
-
76
-
77
-
78
-
79
-
80
-
81
-
82
-
83
-
84
-
85
-
86
-
87
-
88
-
89
-
90
-
91
-
92
-
93
-
94
-
95
-
96
-
97
-
98
-
99
-
100
-
101
-
102
-
103
-
104
-
105
-
106
-
107
-
108
-
109
-
110
-
111
-
112
-
113
-
114
-
115
-
116
-
117
-
118
-
119
-
120
-
121
-
122
-
123
-
124
-
125
-
126
-
127
-
128
-
129
-
130
-
131
-
132
-
133
-
134
-
135
-
136
-
137
-
138
-
139
-
140
-
141
-
142
-
143
-
144
-
145
-
146
-
147
-
148
-
149
-
150
-
151
-
152
-
153
-
154
-
155
-
156
-
157
-
158
-
159
-
160
-
161
-
162
-
163
-
164
-
165
-
166
-
167
-
168
-
169
-
170
-
171
-
172
-
173
-
174
-
175
-
176
-
177
-
178
-
179
-
180
-
181
-
182
-
183
-
184
-
185
-
186
-
187
-
188
-
189
-
190
-
191
-
192
-
193
-
194
-
195
-
196
-
197
-
198
-
199
-
200
-
201
-
202
-
203
-
204
-
205
-
206
-
207
-
208
-
209
-
210
-
211
-
212
-
213
-
214
-
215
-
216
-
217
-
218
-
219
-
220
-
221
-
222
-
223
-
224
-
225
-
226
-
227
-
228
-
229
-
230
-
231
-
232
-
233
-
234
-
235
-
236
-
237
-
238
-
239
-
240
 |
 |
