Yamaha MO6 Owner's Manual - Page 61
Saving the edited Voices to a USB, storage device, Set the Type parameter to All Voice.
 |
UPC - 086792837703
View all Yamaha MO6 manuals
Add to My Manuals
Save this manual to your list of manuals |
Page 61 highlights
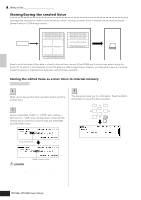
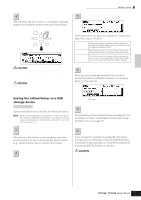
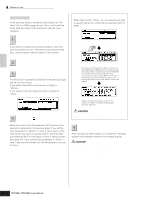
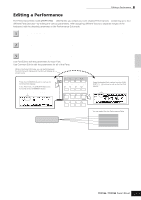
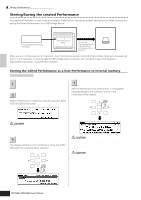
Editing a Program Quick Guide Editing a Voice 4 To execute the Store operation, press the [INC/YES] button. After the Voice has been stored, a "Completed" message appears and operation returns to the Voice Play display. DEC NO INC YES EXIT ENTER EXECUTE 3 Set the Type parameter to "All Voice." The following three file types are available for saving Voice data. Here, select "All Voice." All All Voice Voice Editor When this is selected, execute the Save operation to save all the created data including the User Voices as a single file (extension: M7A). When this is selected, execute the Save operation to save all User Voices as a single file (extension: W7V). When this is selected, execute the Save operation to save all User Voices as a single file (extension: W7E) which can be exported to the Voice Editor software. CAUTION Never attempt to turn off the power while an "Executing..." or "Please keep power on" message is shown. Turning the power off in this state may cause the system to freeze and prevent normal startup the next time the power is turned on, as well as resulting in the loss of all user data. CAUTION If you select another Voice without storing, the currently edited Voice will be lost. Make sure to store the edited Voice before selecting another Voice. 4 Input a file name. Move the cursor to the file name field, then input the desired file name. For detailed instructions on naming a Voice, refer to page 38. Saving the edited Voices to a USB storage device [FILE] ➞ [F2] SAVE Connect the USB device and follow the instructions below. n When a USB storage device is connected or media is inserted, an error message "USB device unformatted." may appear in the LCD display, indicating that the device must be formatted for use in the File mode (page 211). Press the [FILE] button to enter the File mode. 1 Then press the [F1] CONFIG button and [SF1] CURRENT button. If the device is divided into several partitions, select the specific partition for use. If the device has several media (e.g., discs) inserted, select a specific Slot number. 2 Press the [F2] SAVE button to call up the Save display. File name 5 If you have created a destination folder, select the folder. For information on how to select a folder, see page 213. For information on how to create/delete a folder and change the folder name, see page 211. 6 Press the [SF1] EXEC button to actually save the file. If you are about to overwrite an existing file, the display prompts you for confirmation. Press the [INC/YES] button to execute the Save operation to overwrite the existing file, or press the [DEC/NO] button to cancel it. CAUTION While the data is being saved/loaded, make sure to follow these precautions: • Do not remove or eject the media from the USB storage device. • Do not unplug or disconnect the USB storage device. • Do not turn off the power of the instrument or the relevant devices. Owner's Manual 61
-
 1
1 -
2
-
3
-
4
-
5
-
6
-
7
-
8
-
9
-
10
-
11
-
12
-
13
-
14
-
15
-
16
-
17
-
18
-
19
-
20
-
21
-
22
-
23
-
24
-
25
-
26
-
27
-
28
-
29
-
30
-
31
-
32
-
33
-
34
-
35
-
36
-
37
-
38
-
39
-
40
-
41
-
42
-
43
-
44
-
45
-
46
-
47
-
48
-
49
-
50
-
51
-
52
-
53
-
54
-
55
-
 56
56 -
 57
57 -
 58
58 -
 59
59 -
 60
60 -
 61
61 -
 62
62 -
 63
63 -
 64
64 -
 65
65 -
 66
66 -
67
-
68
-
69
-
70
-
71
-
72
-
73
-
74
-
75
-
76
-
77
-
78
-
79
-
80
-
81
-
82
-
83
-
84
-
85
-
86
-
87
-
88
-
89
-
90
-
91
-
92
-
93
-
94
-
95
-
96
-
97
-
98
-
99
-
100
-
101
-
102
-
103
-
104
-
105
-
106
-
107
-
108
-
109
-
110
-
111
-
112
-
113
-
114
-
115
-
116
-
117
-
118
-
119
-
120
-
121
-
122
-
123
-
124
-
125
-
126
-
127
-
128
-
129
-
130
-
131
-
132
-
133
-
134
-
135
-
136
-
137
-
138
-
139
-
140
-
141
-
142
-
143
-
144
-
145
-
146
-
147
-
148
-
149
-
150
-
151
-
152
-
153
-
154
-
155
-
156
-
157
-
158
-
159
-
160
-
161
-
162
-
163
-
164
-
165
-
166
-
167
-
168
-
169
-
170
-
171
-
172
-
173
-
174
-
175
-
176
-
177
-
178
-
179
-
180
-
181
-
182
-
183
-
184
-
185
-
186
-
187
-
188
-
189
-
190
-
191
-
192
-
193
-
194
-
195
-
196
-
197
-
198
-
199
-
200
-
201
-
202
-
203
-
204
-
205
-
206
-
207
-
208
-
209
-
210
-
211
-
212
-
213
-
214
-
215
-
216
-
217
-
218
-
219
-
220
-
221
-
222
-
223
-
224
-
225
-
226
-
227
-
228
-
229
-
230
-
231
-
232
-
233
-
234
-
235
-
236
-
237
-
238
-
239
-
240
 |
 |
