Yamaha MO6 Owner's Manual - Page 80
Type, Loop, and Quantize, Set the Arpeggio Bank, Category, and Type. - key replacement
 |
UPC - 086792837703
View all Yamaha MO6 manuals
Add to My Manuals
Save this manual to your list of manuals |
Page 80 highlights
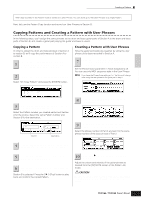
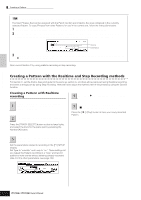
Quick Guide Creating a Song on the MO Creating a Pattern TIP Type, Loop, and Quantize Type The "replace" setting lets you overwrite an already recorded track with new data. The first recording is lost, and the new one takes its place. The "overdub" setting lets you record (layer) additional data to a track that already contains data. These methods are both realtime recording methods. The "step" setting (Step recording) allows you to compose your performance by "writing" it down one event at a time. For details, see page 82. Loop This function plays back the Pattern repeatedly in a "loop." If Type is set to "overdub" and Loop to "on," you can add separate notes or parts in order. For example, you could record the parts of a drum kit one by one-recording the kick on the first pass, a snare on the second, a hi hat part on the third, and so on. This technique is also convenient for adding non-note, sound-shaping data, such as that of the Knobs and Controller. Since we will be recording with the Arpeggio in this example, set Loop to "off" here. Quantize Record quantize aligns the timing of notes in real time, as you record. This makes sure that all the notes will be recorded exactly on the beat, even if your playing is somewhat off the beat. Since we will be recording with the Arpeggio in this example, set Quantize to "off" here. 11 Set the RecArp parameter to on in the [F4] RECARP (Record Arpeggio) display. When this parameter is set to on, you can record the Arpeggio playback to the track as MIDI sequence data. 12 Press the [F5] CLICK button to turn Click on and play the metronome during the recording. When the "sound" icon below is displayed, Click is on and the metronome will play during the recording. 13 Press the [F] (Play) button to start recording. Play a note or notes on the keyboard to trigger Arpeggio playback. The root chord of the bass pattern changes depending on the key you play. Start recording SEQ TRANSPORT Arpeggio playback LOCATE 1 2 REC 9 Set the PartSw (Part Switch) parameters to off in the [F3] ARP display. When setting the parameter to on, you can use the Arpeggio on this track. Actual recording starts after one measure. Recording stops automatically when Pattern playback reaches the end, since Loop is set to "off." Turn the [ARPEGGIO ON/OFF] indicator off, 14 and press the [F] (Play) button to hear your newly recorded bass guitar pattern. Next, let's record the guitar pattern. 10 Set the Arpeggio Bank, Category, and Type. Set the Bank to "pre" and Ctgr (category) to "Bass." Try out some different bass patterns here. n In addition using the preset Arpeggios, you can also create your own original Arpeggio data. See page 97. 15 Select the track to which the guitar will be assigned. Press the [TRACK SELECT] button so that its lamp lights, and select a Part by pressing the Number [3] button. Record the guitar part using the Arpeggio, in 16 the same way you did with the bass guitar part above. Follow steps 8 -14 above, this time selecting the "GtPl" (Guitar & Plucked) in the Arpeggio category, and try out the various guitar phrases. 80 Owner's Manual
-
 1
1 -
2
-
3
-
4
-
5
-
6
-
7
-
8
-
9
-
10
-
11
-
12
-
13
-
14
-
15
-
16
-
17
-
18
-
19
-
20
-
21
-
22
-
23
-
24
-
25
-
26
-
27
-
28
-
29
-
30
-
31
-
32
-
33
-
34
-
35
-
36
-
37
-
38
-
39
-
40
-
41
-
42
-
43
-
44
-
45
-
46
-
47
-
48
-
49
-
50
-
51
-
52
-
53
-
54
-
55
-
56
-
57
-
58
-
59
-
60
-
61
-
62
-
63
-
64
-
65
-
66
-
67
-
68
-
69
-
70
-
71
-
72
-
73
-
74
-
 75
75 -
 76
76 -
 77
77 -
 78
78 -
 79
79 -
 80
80 -
 81
81 -
 82
82 -
 83
83 -
 84
84 -
 85
85 -
86
-
87
-
88
-
89
-
90
-
91
-
92
-
93
-
94
-
95
-
96
-
97
-
98
-
99
-
100
-
101
-
102
-
103
-
104
-
105
-
106
-
107
-
108
-
109
-
110
-
111
-
112
-
113
-
114
-
115
-
116
-
117
-
118
-
119
-
120
-
121
-
122
-
123
-
124
-
125
-
126
-
127
-
128
-
129
-
130
-
131
-
132
-
133
-
134
-
135
-
136
-
137
-
138
-
139
-
140
-
141
-
142
-
143
-
144
-
145
-
146
-
147
-
148
-
149
-
150
-
151
-
152
-
153
-
154
-
155
-
156
-
157
-
158
-
159
-
160
-
161
-
162
-
163
-
164
-
165
-
166
-
167
-
168
-
169
-
170
-
171
-
172
-
173
-
174
-
175
-
176
-
177
-
178
-
179
-
180
-
181
-
182
-
183
-
184
-
185
-
186
-
187
-
188
-
189
-
190
-
191
-
192
-
193
-
194
-
195
-
196
-
197
-
198
-
199
-
200
-
201
-
202
-
203
-
204
-
205
-
206
-
207
-
208
-
209
-
210
-
211
-
212
-
213
-
214
-
215
-
216
-
217
-
218
-
219
-
220
-
221
-
222
-
223
-
224
-
225
-
226
-
227
-
228
-
229
-
230
-
231
-
232
-
233
-
234
-
235
-
236
-
237
-
238
-
239
-
240
 |
 |
