Yamaha MO6 Owner's Manual - Page 181
During Song Recording, Realtime Recording, Step Recording
 |
UPC - 086792837703
View all Yamaha MO6 manuals
Add to My Manuals
Save this manual to your list of manuals |
Page 181 highlights
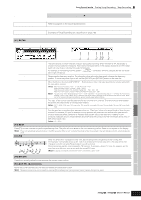
Voice mode Song Record mode During Song Recording Step Recording During Song Recording [SONG] ➞ Song selection ➞ [REC] ➞ [F] (Play) Realtime Recording Refer to page 88 in the Quick Guide section. Step Recording Examples of Step Recording are described on page 193. [F1] SETUP Pointer indicating the current note position. Beat Graph Beat Graph This is the display in which notes are "placed" during step recording. When the meter is 4/4, the display is divided into four beats (one measure). Each diamond-shaped marker in the display represents one 32nd beat (each 1/4 note division is divided into eight 32nd beats). For example, if the following rhythmic pattern " above right will appear. " is entered in 4/4 time, a display like the one shown Pointer Determines the data-entry position. The triangular pointer above the beat graph indicates the data-entry position. To move the pointer right or left, use the [INC/YES] and [DEC/NO] buttons or the data dial. Value When the Event to be entered ([F1] SETUP → Event) is set to "note," this value specifies the velocity with which the note will be entered. Settings: When the Event is set to "note": 1 - 127, kbd, rnd1 - rnd4 When the Event is set to "p.bend": -8192 - +8191 When the Event is set to "CC (Control Change 001 - 119)": 000 - 127 When the Event is set to "tempo" with the RecTrack = tempo: 001 - 300 n You can select "kbd" (keyboard) and "rnd1" - "rnd4" (random1 - 4) as well as the values 1 - 127 when the Event to be entered is set to "note." When "kbd" is selected, the actual playing strength will be entered as the velocity value. When one of the random settings is selected, a random velocity value will be entered. StepTime The "size" of the current recording step time for the next note to be entered. This determines to what position the pointer will advance after a note has been entered. Settings: 0001 - 0059, 32nd note, 16th note triplet, 16th note, 8th note triplet, 8th note, 1/4 note triplet, 1/4 note, half note, whole note GateTime Sets the gate time to produce slurs, staccato notes, etc. "Gate time" refers to the actual length of time the note sounds. For the same 1/4 note, for example, a long gate time will produce a slur while a short gate time will produce a staccato effect. Gate time is indicated as a percent value of the step time. A setting of 50% produces a staccato sound, values between about 80% and 90% produce normal note length, and a value of 99% will produce a slur. Settings: 1% - 200% [F3] REST Press [F3] to enter a rest as long as the specified step time. The point will move ahead to the next data-entry position. Rests do not appear on the display. n There is no actual data representing rests in the MIDI sequencer. When a "rest" is entered the pointer simply moves ahead to the next data-entry position, effectively leaving a rest. [F4] TIE 12 When the [F4] button is pressed to enter a tie, the preceding note is lengthened to the full step time. For example, in the phrase shown at left, note 1 is entered with 1/4 note step time. If the step time is then changed to an 8th note and [F4] is pressed, note 2 is entered. Dotted notes can also be entered using the TIE function. To produce a dotted 1/4 note, for example, set the step time to an 8th note, enter a note and then press [F4] twice. n This display is available only when the Event to be entered is set to "note." [F5] DELETE Press this to actually delete the note events at the current cursor position. [F6] BAK DEL (Back Delete) Moves the pointer backward by one step and deletes all notes at that location. n Mistakenly entered notes can be erased by pressing [F6] immediately after they are entered (before changing the step time value). Performance mode Song mode Pattern mode Reference Mixing Voice mode Utility mode Master mode File mode Owner's Manual 181
-
 1
1 -
2
-
3
-
4
-
5
-
6
-
7
-
8
-
9
-
10
-
11
-
12
-
13
-
14
-
15
-
16
-
17
-
18
-
19
-
20
-
21
-
22
-
23
-
24
-
25
-
26
-
27
-
28
-
29
-
30
-
31
-
32
-
33
-
34
-
35
-
36
-
37
-
38
-
39
-
40
-
41
-
42
-
43
-
44
-
45
-
46
-
47
-
48
-
49
-
50
-
51
-
52
-
53
-
54
-
55
-
56
-
57
-
58
-
59
-
60
-
61
-
62
-
63
-
64
-
65
-
66
-
67
-
68
-
69
-
70
-
71
-
72
-
73
-
74
-
75
-
76
-
77
-
78
-
79
-
80
-
81
-
82
-
83
-
84
-
85
-
86
-
87
-
88
-
89
-
90
-
91
-
92
-
93
-
94
-
95
-
96
-
97
-
98
-
99
-
100
-
101
-
102
-
103
-
104
-
105
-
106
-
107
-
108
-
109
-
110
-
111
-
112
-
113
-
114
-
115
-
116
-
117
-
118
-
119
-
120
-
121
-
122
-
123
-
124
-
125
-
126
-
127
-
128
-
129
-
130
-
131
-
132
-
133
-
134
-
135
-
136
-
137
-
138
-
139
-
140
-
141
-
142
-
143
-
144
-
145
-
146
-
147
-
148
-
149
-
150
-
151
-
152
-
153
-
154
-
155
-
156
-
157
-
158
-
159
-
160
-
161
-
162
-
163
-
164
-
165
-
166
-
167
-
168
-
169
-
170
-
171
-
172
-
173
-
174
-
175
-
 176
176 -
 177
177 -
 178
178 -
 179
179 -
 180
180 -
 181
181 -
 182
182 -
 183
183 -
 184
184 -
 185
185 -
 186
186 -
187
-
188
-
189
-
190
-
191
-
192
-
193
-
194
-
195
-
196
-
197
-
198
-
199
-
200
-
201
-
202
-
203
-
204
-
205
-
206
-
207
-
208
-
209
-
210
-
211
-
212
-
213
-
214
-
215
-
216
-
217
-
218
-
219
-
220
-
221
-
222
-
223
-
224
-
225
-
226
-
227
-
228
-
229
-
230
-
231
-
232
-
233
-
234
-
235
-
236
-
237
-
238
-
239
-
240
 |
 |
