Yamaha MO6 Owner's Manual - Page 85
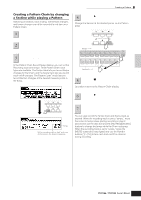
Creating a Pattern Chain by changing, a while playing a Pattern, Pattern Chain Play display.
 |
UPC - 086792837703
View all Yamaha MO6 manuals
Add to My Manuals
Save this manual to your list of manuals |
Page 85 highlights
Creating a Song on the MO Quick Guide Creating a Pattern Chain by changing a Section while playing a Pattern Switching of sections, track muting, scene/mute changes, and tempo changes can all be recorded in real time as a Pattern Chain. 1 In the Pattern Play mode, select a Pattern for which data has already been created. 2 Press the [F6] CHAIN button to call up the Pattern Chain Play display. Press the [REC] button to enter the Pattern 3 Chain Record mode, then set the basic parameters. In the Pattern Chain Record Setup display, you can set the Recording track and tempo. Three Pattern Chain track types are available. The Tempo track lets you record tempo changes for the Chain, and the Scene track lets you record track on/off changes. The Pattern ("patt") track lets you record Section changes at the desired measure points in the Song. Pattern Chain Play display Creating a Pattern 4 Press the [F] button to start recording and play the Pattern as you like. Change the Section at the desired points, as the Pattern plays. SEQ TRANSPORT LOCATE 1 2 REC Section I - P PRE 1 PRE 2 PRE 3 PRE 4 USER 1 USER 2 GM - SECTION A. PIANO KEYBOARD ORGAN A B C GUITAR PLUCKED D BASS E STRINGS BRASS REED PIPE F G H SYN LEAD SYN PAD SYN COMP CHROMATIC DRUM SE MUSICAL FX COMBI CHOIR PERCUSSION PERCUSSION Section A - H 5 Press the [J] (Stop) button to stop recording. Operation returns to the Pattern Chain display. SEQ TRANSPORT LOCATE 1 2 REC Pattern Chain Record Setup display Tempo Set the recording track to "patt" and enter the Sections to the desired measures. 6 Press the [F] (Play) button to hear the recorded Pattern Chain. Save the created Pattern data to a USB 7 storage device (page 98) before turning the power off. You can also record the Tempo track and Scene track as desired. When the recording track is set to "tempo," move the cursor to tempo value (during recording in step 4 above) and use the data dial and the [INC/YES]/[DEC/NO] buttons to change the tempo while the Chain is playing. When the recording track is set to "scene," press the [MUTE] button (the lamp lights) and use the Number buttons [1] - [16] to turn each track on/off as desired during recording. Owner's Manual 85
-
 1
1 -
2
-
3
-
4
-
5
-
6
-
7
-
8
-
9
-
10
-
11
-
12
-
13
-
14
-
15
-
16
-
17
-
18
-
19
-
20
-
21
-
22
-
23
-
24
-
25
-
26
-
27
-
28
-
29
-
30
-
31
-
32
-
33
-
34
-
35
-
36
-
37
-
38
-
39
-
40
-
41
-
42
-
43
-
44
-
45
-
46
-
47
-
48
-
49
-
50
-
51
-
52
-
53
-
54
-
55
-
56
-
57
-
58
-
59
-
60
-
61
-
62
-
63
-
64
-
65
-
66
-
67
-
68
-
69
-
70
-
71
-
72
-
73
-
74
-
75
-
76
-
77
-
78
-
79
-
 80
80 -
 81
81 -
 82
82 -
 83
83 -
 84
84 -
 85
85 -
 86
86 -
 87
87 -
 88
88 -
 89
89 -
 90
90 -
91
-
92
-
93
-
94
-
95
-
96
-
97
-
98
-
99
-
100
-
101
-
102
-
103
-
104
-
105
-
106
-
107
-
108
-
109
-
110
-
111
-
112
-
113
-
114
-
115
-
116
-
117
-
118
-
119
-
120
-
121
-
122
-
123
-
124
-
125
-
126
-
127
-
128
-
129
-
130
-
131
-
132
-
133
-
134
-
135
-
136
-
137
-
138
-
139
-
140
-
141
-
142
-
143
-
144
-
145
-
146
-
147
-
148
-
149
-
150
-
151
-
152
-
153
-
154
-
155
-
156
-
157
-
158
-
159
-
160
-
161
-
162
-
163
-
164
-
165
-
166
-
167
-
168
-
169
-
170
-
171
-
172
-
173
-
174
-
175
-
176
-
177
-
178
-
179
-
180
-
181
-
182
-
183
-
184
-
185
-
186
-
187
-
188
-
189
-
190
-
191
-
192
-
193
-
194
-
195
-
196
-
197
-
198
-
199
-
200
-
201
-
202
-
203
-
204
-
205
-
206
-
207
-
208
-
209
-
210
-
211
-
212
-
213
-
214
-
215
-
216
-
217
-
218
-
219
-
220
-
221
-
222
-
223
-
224
-
225
-
226
-
227
-
228
-
229
-
230
-
231
-
232
-
233
-
234
-
235
-
236
-
237
-
238
-
239
-
240
 |
 |
