Yamaha MO6 Owner's Manual - Page 84
Creating a Pattern Chain
 |
UPC - 086792837703
View all Yamaha MO6 manuals
Add to My Manuals
Save this manual to your list of manuals |
Page 84 highlights
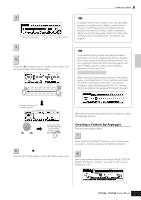
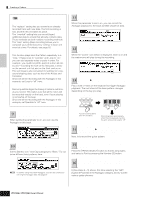
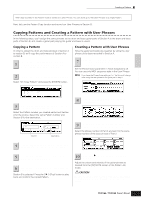
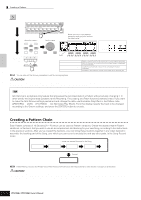
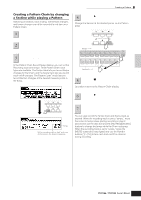
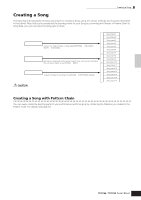
Quick Guide Creating a Song on the MO Creating a Pattern 3 Select a track, then adjust the Groove settings. Select a track. 1 2 3 4 ELEMENT PERF. PART ZONE 9 10 11 12 Set each parameter. Move the cursor... DEC/NO INC / YES EXIT ENTER Play the Pattern to check the result of the Groove settings. EXECUTE SEQ TRANSPORT LOCATE 1 2 REC 5 6 7 8 TRACK SELECT 13 14 15 16 MUTE SOLO Set the value. Move the cursor to the desired parameter and grid point and set the offset value. DEC/NO INC / YES Grid - NOTE OFST CLOCK SFT GATE OFST VELO OFST 0 + NOTE OFST (Note Offset) CLOCK SFT (Clock Shift) GATE OFST (Gate time Offset) VELO OFST (Velocity Offset) Raises or lowers the pitch of the note(s) on the selected grid in semitones. Shifts the timing of the note(s) on the selected grid forward or backward in clock increments. Lengthens or shortens the note(s) on the selected grid in clock increments. Increases or decreases the velocity of the note(s) on the selected grid. n You can also edit the Groove parameters in real time during playback. CAUTION The created Song and Pattern data resides temporarily in DRAM (page 150). Because data contained in DRAM is lost when the power is turned off, you should always store any data residing in DRAM to a USB storage device before turning off the power. TIP Using the Groove settings to change the Pattern data Grid Groove is a playback-only feature that processes the recorded data of a Pattern without actually changing it. In other words, the original data (created via the Recording, File Loading and Patch functions) remains intact. If you want to make the Grid Groove settings permanent and change the data, use Normalize Play Effect in the Pattern Jobs ([PATTERN] → [JOB] → [F5] TRACK → 04: Normalize Play Effect). From this display, specify the track to be changed according to the Groove settings, and press the [ENTER] button to execute. Creating a Pattern Chain Each Pattern consists of 16 Sections (A - P) which can be used as Pattern variations. Create the desired rhythm Pattern variations, or Sections, that you wish to use as accompaniment and backing for your new Song, according to the instructions in the previous sections. After you've created the Sections, you can string these Sections together in any order desired to assemble the backing part of the Song, over which you can record a melody line and any other parts, in the Song Record mode. Section A Pattern Chain.....Enter the desired Sections for the Song Section B Section F Section H ........ Convert Song n Pattern Mixing, Groove, and Phrase Voice (Track Voice) on/off cannot be set independently for each Section, but apply to all Sections. CAUTION The same User Phrases can be assigned to different Sections within a pattern. Keep in mind, however, that the Section data will automatically be changed if another Section sharing the same User Phrase is changed. For example, if you've assigned a certain User Phrase to both Section A and Section D, and you change that User Phrase for Section A, the same Phrase will be changed for Section D as well. 84 Owner's Manual
-
 1
1 -
2
-
3
-
4
-
5
-
6
-
7
-
8
-
9
-
10
-
11
-
12
-
13
-
14
-
15
-
16
-
17
-
18
-
19
-
20
-
21
-
22
-
23
-
24
-
25
-
26
-
27
-
28
-
29
-
30
-
31
-
32
-
33
-
34
-
35
-
36
-
37
-
38
-
39
-
40
-
41
-
42
-
43
-
44
-
45
-
46
-
47
-
48
-
49
-
50
-
51
-
52
-
53
-
54
-
55
-
56
-
57
-
58
-
59
-
60
-
61
-
62
-
63
-
64
-
65
-
66
-
67
-
68
-
69
-
70
-
71
-
72
-
73
-
74
-
75
-
76
-
77
-
78
-
 79
79 -
 80
80 -
 81
81 -
 82
82 -
 83
83 -
 84
84 -
 85
85 -
 86
86 -
 87
87 -
 88
88 -
 89
89 -
90
-
91
-
92
-
93
-
94
-
95
-
96
-
97
-
98
-
99
-
100
-
101
-
102
-
103
-
104
-
105
-
106
-
107
-
108
-
109
-
110
-
111
-
112
-
113
-
114
-
115
-
116
-
117
-
118
-
119
-
120
-
121
-
122
-
123
-
124
-
125
-
126
-
127
-
128
-
129
-
130
-
131
-
132
-
133
-
134
-
135
-
136
-
137
-
138
-
139
-
140
-
141
-
142
-
143
-
144
-
145
-
146
-
147
-
148
-
149
-
150
-
151
-
152
-
153
-
154
-
155
-
156
-
157
-
158
-
159
-
160
-
161
-
162
-
163
-
164
-
165
-
166
-
167
-
168
-
169
-
170
-
171
-
172
-
173
-
174
-
175
-
176
-
177
-
178
-
179
-
180
-
181
-
182
-
183
-
184
-
185
-
186
-
187
-
188
-
189
-
190
-
191
-
192
-
193
-
194
-
195
-
196
-
197
-
198
-
199
-
200
-
201
-
202
-
203
-
204
-
205
-
206
-
207
-
208
-
209
-
210
-
211
-
212
-
213
-
214
-
215
-
216
-
217
-
218
-
219
-
220
-
221
-
222
-
223
-
224
-
225
-
226
-
227
-
228
-
229
-
230
-
231
-
232
-
233
-
234
-
235
-
236
-
237
-
238
-
239
-
240
 |
 |
