Yamaha MO6 Owner's Manual - Page 76
Creating a Pattern, Setting up for Creating a Pattern Mixing Settings
 |
UPC - 086792837703
View all Yamaha MO6 manuals
Add to My Manuals
Save this manual to your list of manuals |
Page 76 highlights
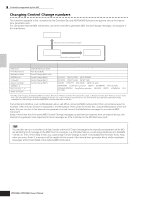
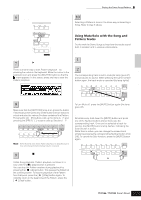
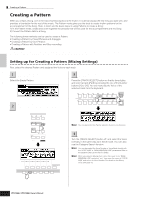
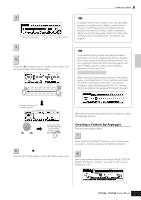
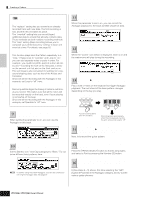
Quick Guide Creating a Song on the MO Creating a Pattern Creating a Pattern When you create a Song, one of the most essential aspects is the rhythm. It is almost always the first thing you start with, and provides a foundation for the rest of the music. The Pattern mode gives you the tools to create rhythm patterns for the accompaniment of the Song. Here, in brief, are the basic steps in using Patterns to create a Song: 1) In the Pattern mode, create and chain together the phrases that will be used for the accompaniment and the Song. 2) Convert the Pattern data to a Song. The following three methods can be used to create a Pattern. • Creating a Pattern by Preset Phrases and Arpeggio • Creating a Pattern by User Phrases • Creating a Pattern with Realtime and Step recording CAUTION The created Song and Pattern data resides temporarily in DRAM (page 150). Because data contained in DRAM is lost when the power is turned off, you should always store any data residing in DRAM to a USB storage device before turning off the power. Setting up for Creating a Pattern (Mixing Settings) First, select the desired Pattern and assigned the Voice to each track. 1 Press the [PATTERN] button to enter the Pattern Play mode. Select the Empty Pattern. 3 Select a track (Part) to which you want to assign a Voice. Press the [TRACK SELECT] button so that its lamp lights, and select a track (Part) by pressing the one of the Number buttons [1] to [16]. You can now play the Voice of the selected track from the keyboard. 1 2 3 4 5 6 7 8 TRACK SELECT Press the [MIXING] button, then [F2] VOICE 2 button to call up the display for setting a Voice. ELEMENT PERF. PART ZONE 9 10 11 12 13 14 15 16 MUTE SOLO VOICE MODE PERFORM MASTER SONG PATTERN MIXING DAW REMOTE FILE UTILITY EDIT DEMO JOB STORE COMPARE SCENE STORE SET LOCATE SCENE SF1 SF2 SF3 SF4 SF5 INFORMATION F1 F2 F3 F4 F5 F6 n You can also select the Part by using the Cursor [] buttons. 4 Select the desired Voice. Turn the [TRACK SELECT] button off, and select the Voice normally, in the same way as in Voice mode. You can also use the Category Search function. n You can also select the Voice Number or Voice Bank directly with the "VOICE NUM" or "BANK MSB/BANK LSB" parameters. Refer to the separate Data List booklet for details. n When selecting the Mixing Voice, move the cursor to the "BANK MSB/BANK LSB" and select "mv," then move the cursor to "VOICE NUM" and select the Voice Number. For details on the Mixing Voice, see page 78. 76 Owner's Manual
-
 1
1 -
2
-
3
-
4
-
5
-
6
-
7
-
8
-
9
-
10
-
11
-
12
-
13
-
14
-
15
-
16
-
17
-
18
-
19
-
20
-
21
-
22
-
23
-
24
-
25
-
26
-
27
-
28
-
29
-
30
-
31
-
32
-
33
-
34
-
35
-
36
-
37
-
38
-
39
-
40
-
41
-
42
-
43
-
44
-
45
-
46
-
47
-
48
-
49
-
50
-
51
-
52
-
53
-
54
-
55
-
56
-
57
-
58
-
59
-
60
-
61
-
62
-
63
-
64
-
65
-
66
-
67
-
68
-
69
-
70
-
 71
71 -
 72
72 -
 73
73 -
 74
74 -
 75
75 -
 76
76 -
 77
77 -
 78
78 -
 79
79 -
 80
80 -
 81
81 -
82
-
83
-
84
-
85
-
86
-
87
-
88
-
89
-
90
-
91
-
92
-
93
-
94
-
95
-
96
-
97
-
98
-
99
-
100
-
101
-
102
-
103
-
104
-
105
-
106
-
107
-
108
-
109
-
110
-
111
-
112
-
113
-
114
-
115
-
116
-
117
-
118
-
119
-
120
-
121
-
122
-
123
-
124
-
125
-
126
-
127
-
128
-
129
-
130
-
131
-
132
-
133
-
134
-
135
-
136
-
137
-
138
-
139
-
140
-
141
-
142
-
143
-
144
-
145
-
146
-
147
-
148
-
149
-
150
-
151
-
152
-
153
-
154
-
155
-
156
-
157
-
158
-
159
-
160
-
161
-
162
-
163
-
164
-
165
-
166
-
167
-
168
-
169
-
170
-
171
-
172
-
173
-
174
-
175
-
176
-
177
-
178
-
179
-
180
-
181
-
182
-
183
-
184
-
185
-
186
-
187
-
188
-
189
-
190
-
191
-
192
-
193
-
194
-
195
-
196
-
197
-
198
-
199
-
200
-
201
-
202
-
203
-
204
-
205
-
206
-
207
-
208
-
209
-
210
-
211
-
212
-
213
-
214
-
215
-
216
-
217
-
218
-
219
-
220
-
221
-
222
-
223
-
224
-
225
-
226
-
227
-
228
-
229
-
230
-
231
-
232
-
233
-
234
-
235
-
236
-
237
-
238
-
239
-
240
 |
 |
